Hello, and welcome to another great BDO breakdown. Here, we’ll be going over the various settings included in Black Desert Online that are important to know for any person just getting started.
In addition, we’ll also get into how you can quickly and easily disable all of the more annoying setting notifications that will pop up while playing.
So with that out of the way, let’s get into it!
Table of Contents
How To Disable Notifications
We’ll first jump into how to turn off and disable all those annoying notifications and alerts so they aren’t constantly popping up while playing.
Step 1. Open Up Settings Menu
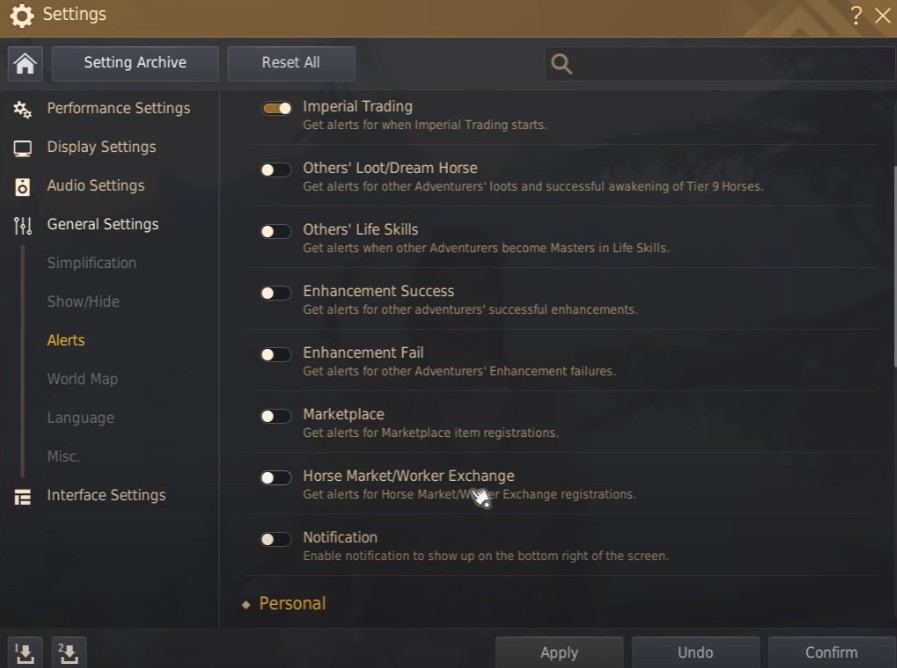
First things first, you’ll want to open up your settings. This will show the different settings options, including the Performance, Display, Audio, General, and Interface Settings. You’ll want to head over to the General Settings before following down and hitting the Alerts tab.

Step 2. Disable Notifications
Your next step is fairly straightforward. Once you get into the Alerts tab in the General Settings section, you’ll be introduced to all the different alerts and notifications you can enable or disable based on your preference.
While what you decide on is entirely up to your personal preference, some of the more annoying alerts you may consider cutting out include the following:
- Others’ Loot / Dream Horse
- Others’ Life Skills
- Enhancement Success
- Enhancement Fail
- Pearl Item Suggestions
These are the most common to show up and are incredibly useless. You may also want to consider Marketplace or Horse Market / Worker Exchange if you aren’t particularly interested in those factors while playing.
Again, you can decide what you do and do not want; however, these are a great set to disable due to their constant pop-ups and the fact that they are useless information for your gameplay.
Step 3. Finalize & Confirm Decisions
Once you’ve decided what alerts you want disabled, you’ll want to press the Apply button at the bottom of the window. This will cause the game to immediately prevent potential notifications from reaching you, the only exception being any notifications already in your queue before disabling. This generally will take around 5 minutes maximum to clear out, so be a little patient, especially if you have a larger friend list or are in an especially busy area.
Now that you’ve handled your notifications, let’s take a minute to review the different settings you may not have been aware of.
Different Overlooked Settings
If you’re starting, you may not know that you can tweak the basic navigation arrow along different types.

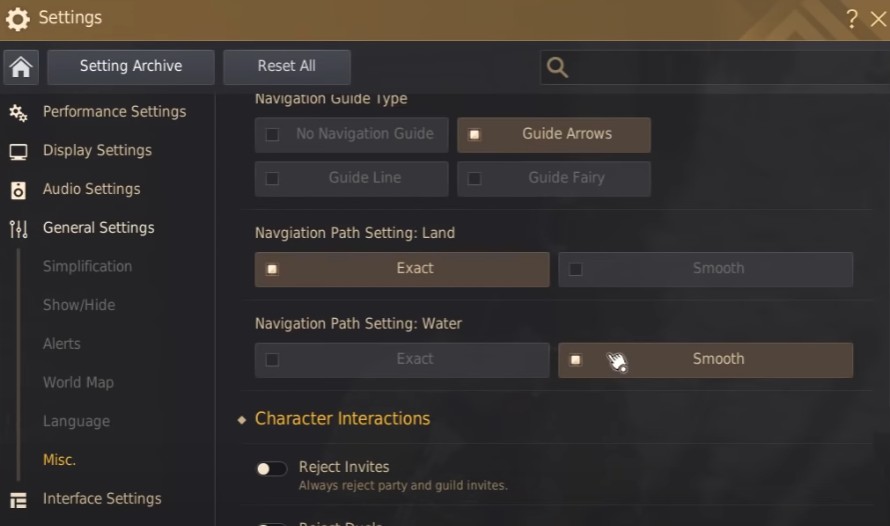
By hopping into the settings menu and going to the General Settings and Misc. section, you’ll see several different navigation guide types. These include the following:
- No Navigation Guide: No arrow or guidance is included. You walk through the world metaphorically blind in terms of following your next quest marker. Great for those that want deep immersion, though not recommended for beginners.
- Guide Arrows: The standard option is already included in the game. This presents an arrow pointing where you need to go to hit your next quest marker.
- Guide Line: Another simple navigation type. The guiding line is a straight line you follow in your objective direction. It is less intrusive than the Guide Arrows and fairly easy to notice and follow.
- Guide Fairy: Lastly, the Guide Fairy takes the navigation guide to a more whimsical setting, whereby you have a fairy sprite leading you toward your objective.
These are based on your preference but can add a fun bit of immersion into your playing experience.
A more important setting to check out is the Navigation Path Setting for land and water are right below the navigation guide type and offer either the Exact or Smooth option. Ideally, you’ll want to put the land setting on “Exact” while the water settings on “Smooth”.

These are just a few useful settings to tweak and implement to improve your gameplay. Let us know if there are any other setting tweaks worth noting below!
