Table of Contents
Introduction
Workers are mainly NPC helpers that you can benefit from to farm and craft materials for you. Workers can only do a lot of advanced crafts. They are essential if you want to get involved in life skills in this game. Workers farm in the background while you are into other things, so choosing them would be a great way to make money without exerting too much effort.
They live in cities, and they stay wherever you hire them. You can’t make them go around on the map, so it is better to hire your workers where you want them to live.
Workers
Hiring workers is economical. You can hire a worker in a city without the fuss of renting additional housing. You’re only going to need to rent some lodging if you are hiring two (2) or more workers. The question of how to get lodging isn’t something to worry about.
-Open your mini-map at the upper right corner of your screen.
-From the drop-down button, select lodging from the housing option.
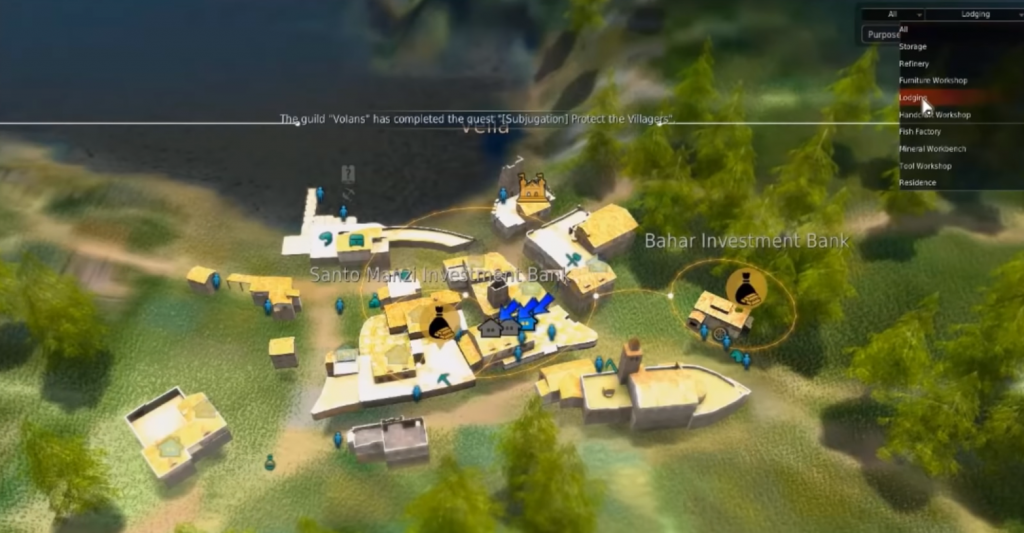
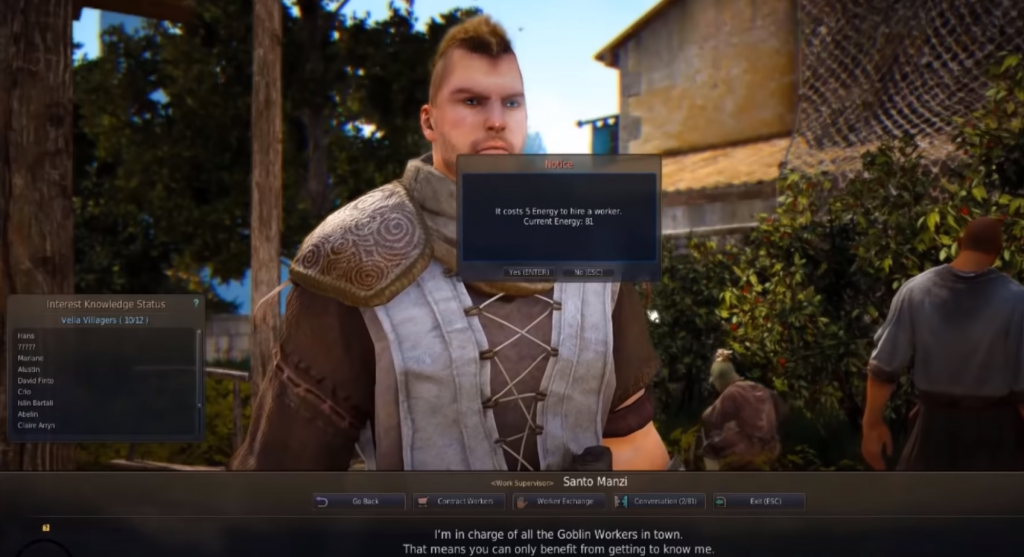
Remember that the more workers you hire, the more lodging you need to provide them. Hiring a worker requires at least 100,000 silver either in your inventory or in the warehouse of the city. The worker you’re shown will be random, so if you close the Contract Worker window because you realize you don’t have enough silver, you’ll lose the worker, and they will be re-rolled when you return. So keep in mind to gather at least 100,000 silver before you hire a worker.
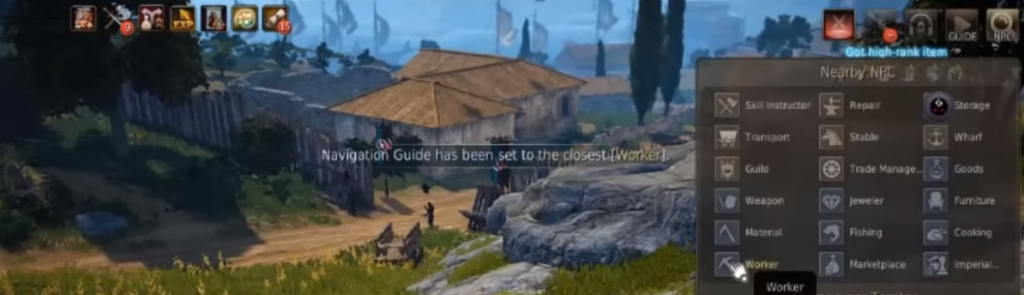
After sorting out money problems, just click the NPC search button next to your mini-map and navigate to the nearest worker manager. Viewing a worker will require you to spend five (5) energy. A worker’s type and grade that will be shown is going to be random. If you don’t like the worker you get, you just have to spend an additional five (5) energy to re-roll it. Re-rolling is possible until you run out of energy.
Viewing how many units of available lodging you have will help you determine the number of workers you can hire.
When hiring a worker, you need to look at these four (4) statistics—work speed, movement speed, luck, and stamina, before deciding whether or not a worker is going to meet your needs.
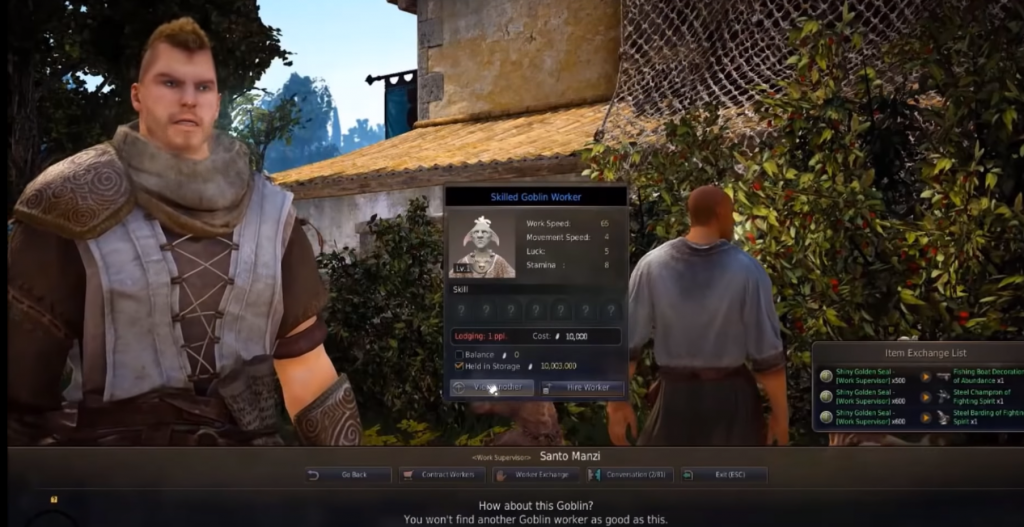
Work Speed points out how fast a worker can finish a task to which he is designated. Movement Speed indicates how fast he can run from the starting city (the city where he is from) to wherever you are sending him. If you’re using a worker to craft in the town, it won’t matter much, but the longer the distances he has to travel, the more critical this step becomes. Luck defines how a worker likely to ‘critical hit’ crafts or harvests rare drops from nodes. Stamina tells you how long he can work before he becomes exhausted and calls for your attention.
Types of Workers
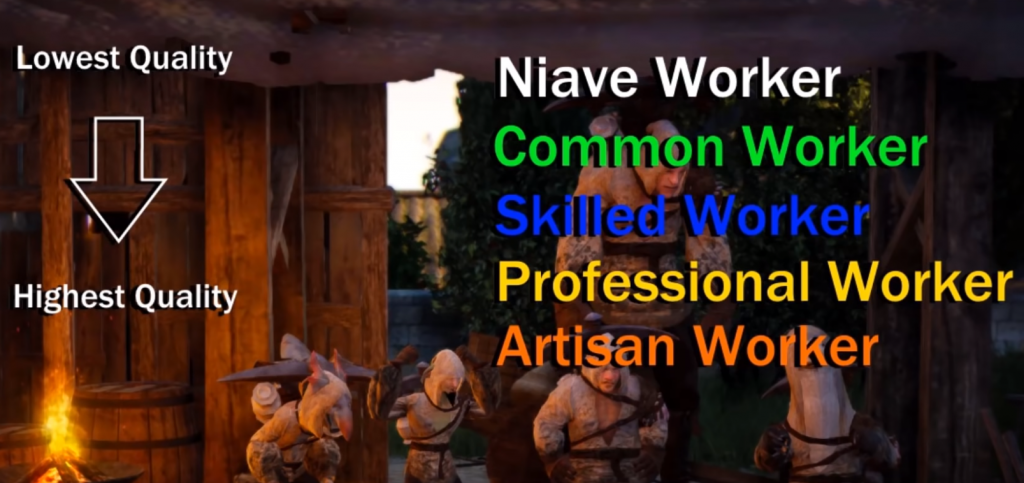
There are five (5) qualities of a worker. From lowest quality to highest quality: Naive Worker (White), Common Worker (Green), Skilled Worker (Blue), Professional Worker (Yellow), and Artisan Worker (Orange).
There are also three (3) races of workers available for players: Goblins, Humans, and Giants.
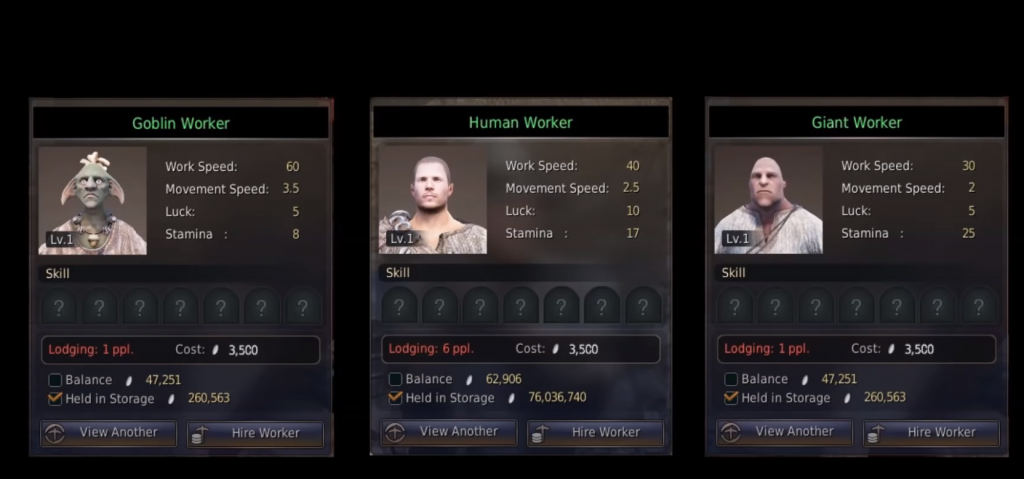
Goblins works fast, but they have low stamina resulting from having to tend to them more often to keep them working. Goblins are suitable for players with short play times who need to gather a lot of materials or craft a lot of stuff quickly. Humans are in the middle on both speed and stamina. They are not as fast as goblins, but they also don’t run out of stamina as quickly. If you are looking for rare drops or critical hits on crafting, humans have the highest luck, so they are best at those. Giants are the slowest workers, but they have the most prominent stamina. They can work for a long time without needing attention from you. They are the best bet for players who are only AFK for a long time.
As a new player, a mix of all three (3) races would be enough to be useful—a giant or two for farms, a goblin for harvesting grains and humans for everything else. Firing workers are always easy if you decide you need a different set-up instead, and they would easily pay for themselves within a few rounds of work. Note that not all workers at the same quality and race have the same statistics. For example, a human worker may have a higher working speed and lower stamina compared to another human worker with a lower working speed but higher stamina.
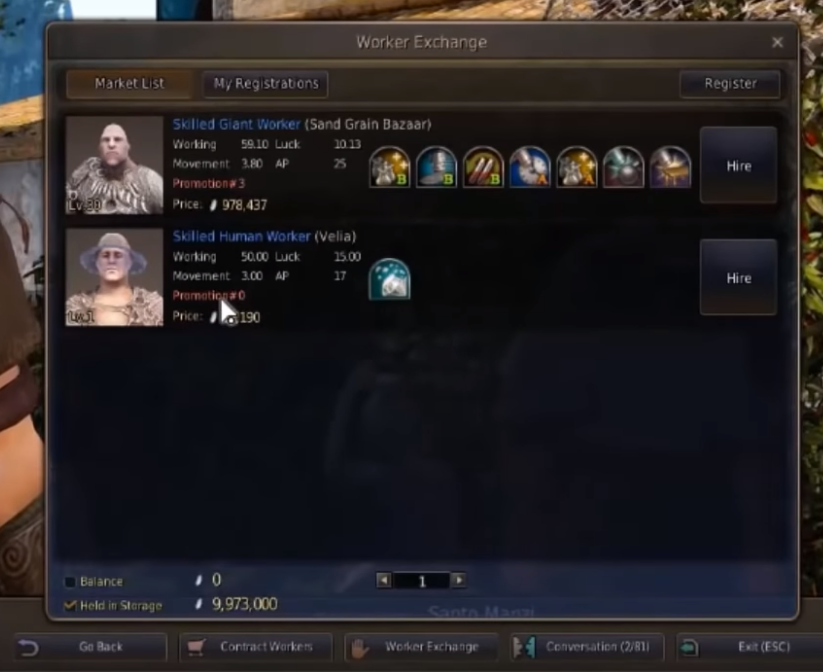
Workers can also be found on the worker exchange, which you can find at the Worker Manager. These are workers that other people have used and are currently selling. They can be any level and any grade, and they may or may not have been upgraded using the promotion system. They also can’t be moved to a different city so it would be better to check their home city before hiring them.
Promotion System for Workers
As workers perform tasks, they level up. Every five levels, your worker will most likely gain a random skill. During levels 10, 20, and 30, you will have a shot to send your worker to take a promotion test, which he’ll either pass or fail based on RNG, if he passes, his quality will improve.
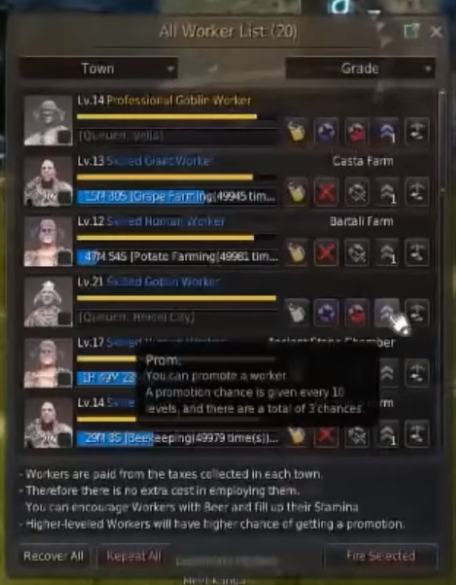
The test takes 24 hours to complete, so while a worker is taking a test, he will not be able to work. Only one (1) worker at a time can be sent for testing. Workers of higher quality are more likely to have better statistics. Having the promotion at random, the better the quality of worker you start with, the higher the chance of winding up at artisan workers after undergoing the test.
Feeding your Workers
As your workers gather and craft, they are going to use stamina. There are numerous different food and drink items that you can cook to refill them, but you are going to spend the most for your buck by feeding them beer. The items necessary to make beer are either bought directly from an NPC or harvested by workers. It’s an easy recipe, and you can easily use one or two workers to feed an entire worker army. First, you need to have a residence.
Open the city where you want your main cooking house to be. In the upper right-hand corner, change the housing type to a residence to view all the houses in the city that can be used. You can choose a layout with your preference or go see someone else’s home in the same location before buying it.
Here is the recipe to make beer:
Five (5) grains (either potato, wheat, corn, barley, and sweet potatoes)Six (6) mineral water(2) leavening agent (1) sugar
Water, leavening agent, and sugar all come from a cooking vendor that you can access by hitting the NPC search button and route to the nearest cooking vendor.
To feed workers, click the pickaxe icon in the upper left corner of your screen. You can feed workers one at a time, but you can just usually hit recover all. After that, you can redirect your workers one by one by clicking on the nodes and assigning them a place to go. If you prefer them to just keep doing what they were doing before, click repeat all.
Crafting using Workers
There are a bunch of things your workers can craft and process for you; however, not all crafts are created equally. While you can craft tools on your own, some tools must be crafted by workers. Using a worker to craft a particular tool, the materials needed for that tool need to be in the storage of the city where the worker lives. You can use a worker from another town to craft it, but both cities have to be completely connected with a node chain. Remember that the worker would’ve to travel from his home city to the crafting city. If you’re sending workers from a different city to craft, make sure that the materials are in the worker’s home city.
Nodes
Nodes are locations on the map where you can put and capitalize your CP (Contributions Points) on. Different types of nodes have a corresponding item—crops, trees, minerals, and even special drops.
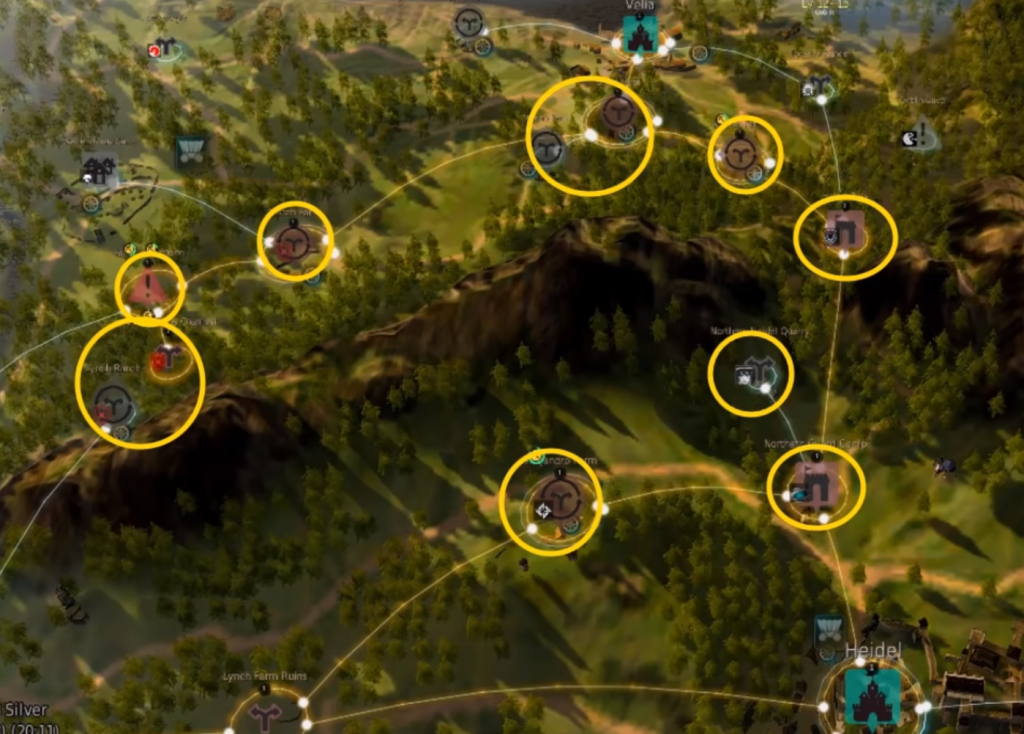
Other nodes only serve as gateways or connection points between cities and have no gathering items. Other methods can also obtain anything that can be found from a Node: gathering by hands, as a drop from mobs, and as an exchange item. Nodes give you the chance to use workers for farming these items for you so that you can spend your time doing other things.
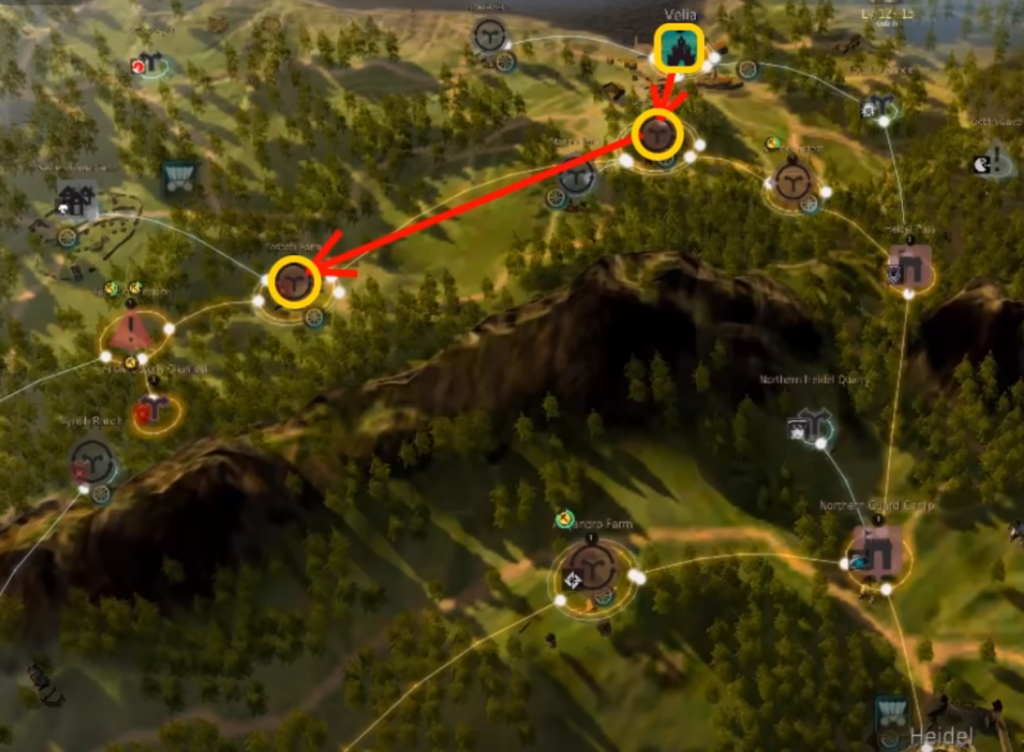
How to Use a Node
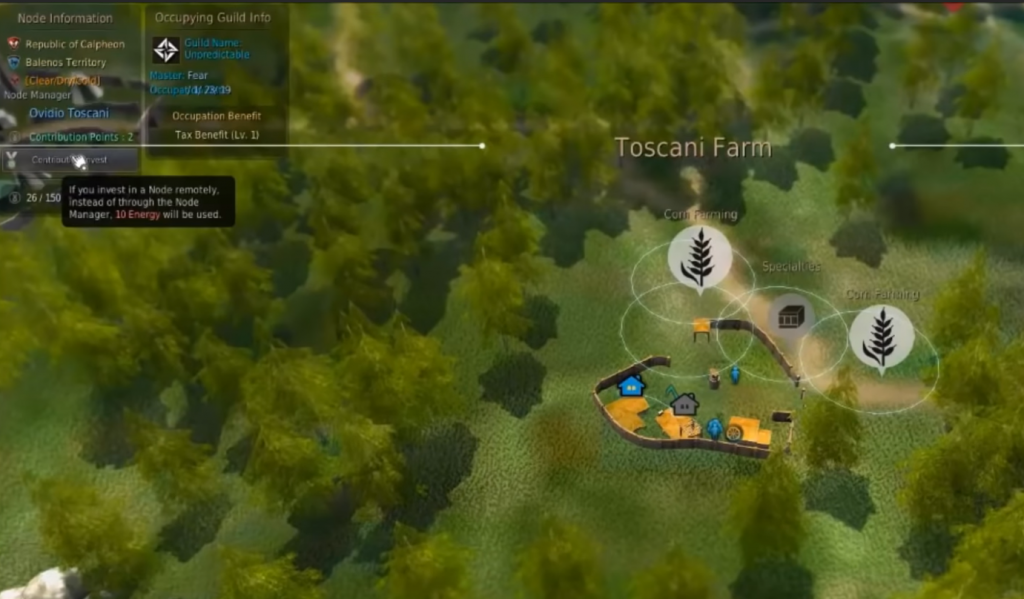
You need to invest a contribution to use a node. For example, you want corn from the Toscani farm, so you are going to use a worker that you hired. For you to invest in a particular farm, you also have to invest in all the nodes between the farm inter-chains. To find the connection points, just click the previous node. Pins in your map will appear that will help figure out where the nearest connection points that you’re trying to link.
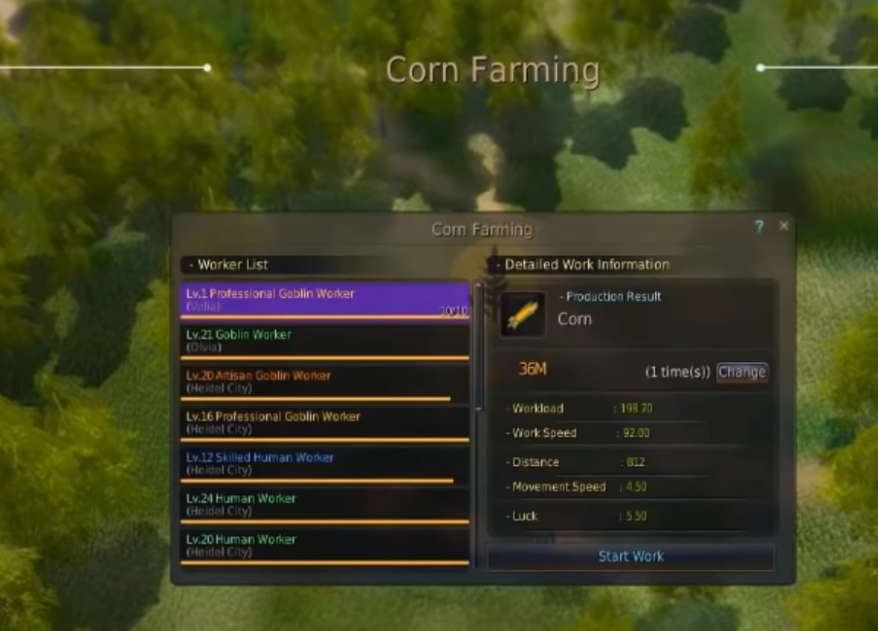
You can use your contribution remotely if you are using a value pack. This needs ten energy. Whether you prefer conserving energy or you’re not using a value pack on something else, you can run to the node and talk to the Node Manager. You’ll need to unlock the node and the sub-node if wanting to harvest materials from it comes to mind. All you have to do is access the sub node, click the worker you wish to send, then click start work

Unlocking Hidden Nodes(Excavation Nodes)
Other nodes have hidden sub nodes that can only be viewed remotely only after they’re unlocked. What are the steps to unlock them?
First, you need to connect the node to the nearest city. Talk to the Node Manager. You have to run there and talk to them because this cannot be done remotely. They are going to prompt you to spend a small amount of energy. Once you’re through with it, you can talk to them again to view the newly unlocked sub node and then invest contribution and send your workers just as you would for any other node.

Hopefully, this one pretty much covers the workers and nodes guide and would serve as a head start for everyone new and is planning to join the Black Desert Online community.