Akuma Guide
A guide made in inspiration of AutoMattock’s Kolin Guide. Seeing how detailed he goes into his okizeme, having a cheat sheet for what type of okizeme to go to after a certain amount of frame advantage, and a series of exercises, makes me want to have an Akuma guide to be as detailed and thorough as his.
Table of Contents
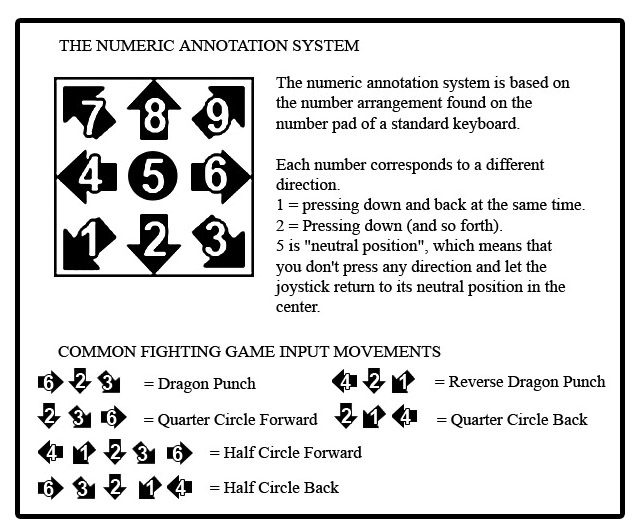
Number Pad Annotation
Abbreviations
AF – Active Frame(s)
CC – Crush Counter
CH – Counter Hit
FK – Frame Kill
OH – On Hit
OB – On Block
SU – Start Up
TAF – Total Active Frames
TC – Target Combo
VS – V-Skill
VS-P – V-Skill Punch
VS-K – V-Skill Kick
VT – V-Trigger
VTC – V-Trigger Cancel
Normals
Throw (5/2/18 24)
Starts up in 5 frames, just like that of any other character in SFV. While you are -4 on a forward dash after a forward throw, you are +2 on a forward dash after a back throw. Back throw allow for the option to throw a fireball and uppercut on reaction to a wake up forward jump.
5LP (3/2/7 11)
3 frame startup, can chain into other light normals for continued pressure or light confirms into LK tatsu or MK tatsu. Can be used as an anti-air in certain situations, especially cross ups. Counter-hit confirms into 5MK xx 214LK; 2AF links into 5MK
2LP (4/2/6 11)
4 frame startup, farthest reaching light normal for Akuma. Can chain into other light normals for continued pressure or light confirms into LK tatsu or MK tatsu. Recommended for a light confirm in the following situations: 5LP, 2LP xx 214LK/MK/EX or 2LP, 2LP xx 214LK/MK/EX
5LK (4/3/10 16)
4 frame startup, leaves in range for a throw and is +1 OB. 3 frame active means it’s great for characters with their fastest normal being 4 frames. Opponent can walk away from throw, unless they are cornered. Great to use against characters whose fastest normal is 4 frames. Frame traps into 5LP and can counter hit convert that into 5MK.
2LK (4/2/7 12)
4 frame startup, can chain into other light attacks and does not special cancel. Mainly a move used to catch people not blocking low on wake-up. Will also be the normal that you want to attempt to cancel into parry. Example is 2LP/2MP, 2LK xx VS; if they v-reversal the first button, 2LK will not come out and parry will take its place.
5MP (7/3/14 23)
7 frame startup, +1 OB, +3 OH. 3 frame active means it’s great for characters with their fastest normal being 4 frames. Farthest reaching medium normal in neutral that can be canceled into fireball for a knockdown. This move canceled into normal fireball or LP red fireball at certain ranges will leave you safe OB.
2MP (6/3/12 20)
6 frame startup, +3 OB, +5 OH. 3 frame active means it’s great for characters with their fastest normal being 4 frames. Good poke to cancel into fireball at max range in neutral. Sets up counter-hit, links into 5MK on normal hit, and links into 2MP/5MP/4HP/2MK on counter-hit. If the first 2MP gets block and the second 2MP is a counter-hit, it can link into 5MP.
6MP (23/3/21 46)
23 frame overhead, 0 OB, and has deceptively far reach on the second hit of the overhead. Mainly used to close out matches or catch people who are really on the defensive.
5MK (5/2/18 24)
5 frame startup, +4 OH, -4 OB, and forces stand. Akuma’s fastest startup normal to use in neutral, leads to one of his most damaging whiff punishes in the game, and can combo into his okizeme setups that cover both wake-up options. While it is -4 OB, using it at max range means he’ll be -3 on block and the push back makes it hard to punish. When it counter hits, he’s at a +5 OH and can link into itself at the right ranges. Great to use to cancel into EX red fireball for continued pressure. If 5MK connects on 2AF, it can link into itself.
2MK (6/2/14 21)
6 frame startup, +3 OH, -1 OB. Great low normal that is safe OB, and can be +0 OB at best. Can be linked into 5LP on normal hit and 5MK on counter-hit. Has late cancelable frames, so you can late cancel into your desired special in neutral. Also your key normal to use to cancel into fireball xx super in certain situations.
5HP (8/3/19 29)
8 frame startup, +2 OH, -5 OB. Great normal to use at max range and can late confirm to finish into the 5HP > HP target combo. Even easier when the 5MP crush counters; can crush counter confirm into super. The 5HP > HP target combo in the corner can follow up into a 6HP to cover both wake-up options, or a 9HK if they back recover.
2HP (10/4/20 33)
10 frame startup, +8 OH, +3 OB, and forces stand. EXCELLENT normal to use in the mid-range game and is the key normal to use in your meaty setups. If done early enough, it’s a pretty decent anti-air. It’s active for 4 frames, meaning it can cover both wake-up options for your okizeme for any character in the cast. Scoring a crush counter causes a crumple state in neutral allows to do a 66, 4HP xx 41236HK xx HP / 63214HP for corner push or keep-away. Primarily used to link into 5MK to repeat the okizeme, or 5MP if the opponent may be too far.
4HP (6/7/21 33)
6 frame startup, KD OH, -10 OB, and forces stand. Great anti-air to use to cover the ranges where MP uppercut cannot. Canceling this move into any red fireball will leave you at a safe distance; if canceled into MP red fireball, it leaves a perfect 3 frame gap for those who like to mash their fastest normal. Best used in a shimmy situation in the corner; 5LK, walk back, 4HP (if blocked, cancel into EX fireball; if hit can follow up into a juggle combo).
6HP (32/7/16 54)
32 frame startup, +5 OH, -2 OB, can OTG. Mainly used to bait people who have a habit to tech a throw in a particular rhythm, but can be punished prior to the move being active via an air throw, or any other normal before it becomes active. Can be used as a meaty to cover both recovery options after a 214KKK in the corner, or a BnB into VS K xx 41236MK xx 214KKK. Can link into 5MK on normal hit, and 5MP on counter-hit. At the last active frame, can link into 2HP.
5HK (11/2/22 34)
12 frame startup, +3 OH, -2 OB. Mainly used as your crush counter punish, or to follow into the 5HK > HK target combo for the post-stun combo. Links into 2HP on a crush counter.
2HK (7/2/27 35)
7 frame startup, KD OH, -15 OB, +14 OB w/ VTC. At certain ranges, 2HK can be safe and no normals can reach to punish Akuma. Allows for a dash forward into raging demon to punish 3 frame normals. Can lead into safe jump setups with Akuma on a crush counter sweep, along with certain meaty setups on normal knockdown.
Block Strings
5LK > 5LP; beats 3F normals
Your string to use to see if your opponent is trying to do a reversal 3F normal in between your strings or is attempting to jump. If you see 5LP counter-hit, you can follow up into 5MK into your BnB; if they are hit but it’s a normal hit, you can chain into 2LP and cancel into 214LK/MK if they are standing or crouching, or even EX to get the most damage.
5LK (4F, +1 OB) > throw; beats 4F normals
Your close range immediate throw frame trap and is best used to influence the way your opponent behaves. Against characters with 3F normals if you see the 5LK > 5LP block string blocked, you can condition them with a throw; against those with 4F normals, it will beat their fastest reversal normal. This is best used in the corner because they are not able to get out of the throw and can be used to condition into a shimmy situation.
5LP > 5MK; beats 3F normals
This is useful because if the 5LP counter-hits, you can confirm that into 5MK, canceled into whichever special you want. Otherwise, if you’re close enough and the 5MK counter-hits, you can link it into another 5MK. There is a 3F gap, so it can be beaten with a reversal uppercut that blows up the 3F gap. If 5LP connects on 2AF, it can link into 5MK. However, this should be used sparingly due to it being -4 oB.
5LP > 2MP; beats 4F normals
A pretty good string to use overall for those who don’t necessarily use a 3F reversal normal in between. If the 5LP counter-hits, then the 2MP can be linked; at close range, 5MK can connect after the 2MP. When the 2MP counter-hits, it can be followed into 5MK at close range, or 2HK.
5LP > 2MK; beats 4F normals
Mainly used to catch people who like to walk back in between your block strings. You can then low confirm the 2MK into 214LK to punish them for walking back. If they don’t walk back, you can either just end it there and be safe on block, or cancel into 236P.
2LP > 2LK > VS OS; true string
A true block string where if your opponent likes to v-reversal in between your 2LP, the 2LK will not come out and a VS will take place. Mainly used as a way to test out your opponent’s defense. 2LK leaves you at +1 OB and can continue the string with 2MK.
2MP > 2LK > VS OS; beats 3F reversals
A string that’s similar to the 2LP > 2LK > VS OS, but works against those who have slower v-reversals i.e. Cammy, Dhalsim, others.
2MP > 5LP; beats 3F reversals
A great string that leaves a 2F gap. Mainly used to bait those with slow reversals like Urien’s EX headbutt. You will recover in time to block the EX headbutt and go into a full crush counter punish.
2MP > 5MK; beats 3F normals
This is a great string because there is a 2F gap that will beat those who are attempting to do reversals that blow up 3F gaps. Using this will get you a good feel on what your opponent likes to do when he/she is on defense.
2MP > 2MP; beats 3F normals
Block string with a 3F gap that will beat those who are mashing 3F normals. If the second 2MP counter-hits, you can follow into 2HK or 5MP xx 236P. Can be beaten with a reversal uppercut that blows up the 3F gap.
2MP > 2MP > 5MP; beats 4F normals
Great string to stack grey damage and can cancel the 5MP into fireball if you want to get chip damage. If the second 2MP counter-hits, then the 5MP will be linked and can cancel into a normal fireball that knocks down on crouchers. If the second 2MP connects on counter-hit on standing opponents, you need to follow up with 2HK.
2MP > 2MP > 5MK; beats 3F normals
A string that connects primarily on wide-body characters and beats 3F normals. You can continue the pressure by canceling this into 63214PPP to be +8 OB.
4HP > 63214MP; beats 3F normals
This string is a great follow-up to those who block a 2MP on block. The pushback as a result of this string makes it so that you are safe, even though 63214MP is considered to be -7 OB.
4HP > 63214HP; beats 4F normals
Similar to the string mentioned above, a great follow-up for those who block a 2MP on block. 63214HP is -8 OB, but the greater pushback leaves you at a safe distance afterwards.
2MP > 2MP > 5MP > 41236LK > K; beats anti-air demon flip attempts (+12 OH/+5 OB on stand, +10 OH/+3 OB on crouch); 2LP/5LP > 2MP> 2MK > 41236MK > K; (+9 OH/+2 OB on stand, +7 OH/+0 OB on crouch); 2MK (max range) > 41236LK
Great string to use to attempt to counter those who like to use normals to air reset you upon a demon flip palm/throw situation. The extended time that you are in the air will cause the normal to whiff and you will punish the opponent for the attempt.
Okizeme Cheat Sheet
+1
Raging Demon
+2
Throw
2LP
5LP
2LK
5LK
5MK
2MP (double meaty vs 4F)
+3
Throw 2AF
2LP 2AF +5 OH, +7 OH CH
5LP 2AF +5 OH, +7 OH CH
2LK 2AF
5LK 2AF +3 OH, +5 OH CH
5MK
2MP
2MK
5MP (double meaty vs 4F)
+4
Throw 3AF
5LK 3AF +4 OH, +6 OH CH
5MP 2AF
2MP
5MK (normal recovery)
5HP (double meaty vs 4F)
+5
2MP
5MP
5HP
4HP
5MK 2AF +5 OH, +7 OH CH
+6
2MP 2AF
5MP
2MK 2AF + 4 OH, +6 OH CH
4HP 2AF
2HP (double meaty vs 4F)
IAOH 9LP
+7
2HP (double meaty)
2MP 3AF
IAOH 7LP/9LP
+8
2HP
5MP
5HP
IAOH 7LP
+9
2HP
+10
2HP
5HK
+11
2HP
5HK
+12
2HP
+24
6MP 3AF
+28
IAOH 7LP/9LP
+29
IAOH 7LP
+30
6HP (double meaty against 4F characters)
+32
6HP 2AF normal recovery +6 oH, 2AF normal recovery, +11 oH, 7AF back recovery (double meaty)
+38
4F forward safe jump (empty jump or jump HP)/6HP +10 OH
+40
4F neutral/forward safe jump
Optimal BnB Combos
*Highlighted in green for okizeme follow-up available
By Damage
No Bar
Mid Screen
2MP > 5MK > VS-K > 214LK > 623HP, 246/375
2MP> 5MK > 214LK > 623HP, 238/359
9HP > 5HK x2 TC > 5MK > 214MK > VT1 623LP, 376/571
Corner Only
2MP > 5MK > 63214LP > 623HP, 254/391
2MP > 5MK > 63214LP > 623MP, 247/391
9HP > 5HK x2 TC > MIcrowalk 5MK > 63214LP > MIcrowalk 623HP, 346/531
9HP > 5HK x2 TC > Microwalk 5MK > 63214MP > VT1 623LP, 382/571
Three Bars
Mid Screen
9HP > 5HK x2 TC > 5MK > VS-K > 214LK > 623HP (2 hits) > 236236P > 485/509
9HP > 5HK x2 TC > 5MK > 214MK > VT1 623HP > 236236P > 481/456
9HP > 5HK x2 TC > 5MK > 214LK > VT1 236P > VT1 623HP > 236236P, 522/507
Corner Only
9HP > 5HK x2 TC > 5MK > 63214LP > 623LP > 236236P, 496/531
9HP > 4HP > 236236P > VT1 623P, 551/491
By Stun
No Bar
Mid Screen
2MP > 5MK > VS-K > 214LK > 214HK, 233/410
Corner Only
2MP > 5MK > 63214LP > 214HK, 241/426
By Carrying Distance
No Bar
Mid Screen
2MP > 5MK > 214LK > Microwalk 214HK, 225/394
2MP > 5MK > VS-K > 41236HK > P, 232/375
Knockdown Okizeme
* A meaty normal follow-up that leads you at a +36/+37 state on no recovery is your ideal number. This will allow you to perform a setup that will set your opponent into a meaty throw or meaty normal situation that your opponent will have to guess.
* Okizeme that allows you to be at a +7 state before your opponent wakes up with either a normal or back recovery is ideal. This will guarantee a 2HP meaty that covers both wake-up options, which sometimes follows with the +32/+33 state on no recovery mentioned above. Text color highlighted for a +7 state meaty to beat 3F characters. Text color highlighted for a +6 state meaty to beat 4F characters. *NEW* The +7 state allows for IAOH 7LP or 9LP on normal recovery.
* Some knockdown combos will result in the same knockdown frame advantage. It will be easier if I were to bundle all the combos that follow the same okizeme flowchart.
TODO: Update 2HP frame kill okizeme
Throw, 110/120, 12/12/71
Mid Screen
Normal/Back Recovery
Corner Only
No Recovery
Back Throw, 120/170, 18/18/77
Mid Screen
> 236HP
* Mainly used to force your opponent to jump; you recover in time to uppercut
Corner Only
Normal/Back Recovery
* Throwing opponent into corner
> 66 FK (+2 state)
>> Throw
>> 2LP
>> 5LP
>> 2LK
>> 5LK
>> 5MK
>> 2MP (double meaty vs 4F)
No Recovery
> 66 > Throw 2AF (+37 state)
>> 5LP/2LP > 5MP FK (+3 state)
>>> Throw 2AF
>>> 2LP 2AF +5 OH, +7 OH CH
>>> 5LP 2AF +5 OH, +7 OH CH
>>> 2LK 2AF
>>> 5LK 2AF +3 OH, +5 OH CH
>>> 5MK
>>> 2MP
>>> 2MK
>>> 5MP (double meaty vs 4F)
OR
>> 2LK > 2MK FK (+4 state)
>>> Throw
>>> 5LP
>>> 2LP
>>> 2LK
>>> 5LK
>>> 2MP (against 4F characters)
OR
>> 2HP (+4 state)
>>> Throw
>>> 5LP
>>> 2LP
>>> 2LK
>>> 5LK
>>> 2MP (against 4F characters)
41236K(KKK) > Throw, 150/200 (180/250), 11/11/70
Corner Only
Both Recoveries
> 2HP
No Recovery
> 2HP FK (+37 state)
>> 2LP > 2MP FK (+3 state)
>>> Throw 2AF
>>> 2LP 2AF
>>> 5LP 2AF
>>> 2LK 2AF
>>> 5LK 2AF
>>> 5MK
>>> 2MP
>>> 2MK
>>> 5MP (double meaty vs 4F)
OR
>> 2LK > 2MK FK (+4 state)
>>> Throw 3AF
>>> 5LK 3AF
>>> 5MP
>>> 2MP
>>> 5MK
>>> 5HP
41236K, 100/150, 22/27/71
Mid Screen
Normal Recovery
> 66 FK (+6 state)
>> 2MP 2AF
>> 5MP
>> 2MK 2AF
>> 4HP 2AF
>> 2HP (double meaty vs 4F)
Back Recovery
> 66 FK (+11 state)
>> 2HP
>> 5HK
No Recovery
> 66 > 2HP FK (+22 state)
>> 2MP FK (+2 state)
>>> Throw
>>> 2LP
>>> 5LP
>>> 2LK
>>> 5LK
>>> 5MK
>>> 2MP (double meaty vs 4F)
V-Reversal, 60/0, 14/19/73
Corner Only
Both Recoveries
> 2LK FK (+2 state)
>> Throw
>> 2LP
>> 5LP
>> 2LK
>> 5LK
>> 5MK
>> 2MP (double meaty vs 4F)
No Recovery
2HK, 90/150, 18/23/67
Mid Screen
Normal Recovery
> 66 FK (+2 state)
>> Throw
>> 2LP
>> 5LP
>> 2LK
>> 5LK
>> 5MK
>> 2MP (double meaty vs 4F)
Back Recovery
> 66 FK (+7 state)
>> 2MP
>> 5MP
>> 2HP
Both Recoveries
> 66 FK (+2 normal, +7 back)
>> 2MP (against 4F characters)
No Recovery
> 66 > 2MP FK (+31 state)
>> 2LK (+19 state) > 66/5LK FK (+3 state)
>>> Throw 2AF
>>> 2LP 2AF
>>> 5LP 2AF
>>> 2LK 2AF
>>> 5LK 2AF
>>> 5MK
>>> 2MP
>>> 2MK
>>> 5MP (against 4F characters)
OR
>> 2LP/5LP (+20 state) > 66/5LK FK (+4 state)
>>> Throw 3AF
>>> 5LK 3AF +4 OH, +6 OH CH
>>> 5MP 2AF
>>> 2MP
>>> 5MK (normal recovery)
>>> 5HP (double meaty vs 4F)
OR
> 5LK > 5LP FK (+40 state)
>> 4F forward jump safe jump
Corner Only
Both Recoveries
> 5LP/2LP FK (+7 normal, +12 back)
>> 2HP
No Recovery
> 5LP > 2HP FK (+23 state)
>> 2MP FK (+3 state)
>>> Throw 2AF
>>> 2LP 2AF +5 OH, +7 OH CH
>>> 5LP 2AF +5 OH, +7 OH CH
>>> 2LK 2AF
>>> 5LK 2AF +3 OH, +5 OH CH
>>> 5MK
>>> 2MP
>>> 2MK
>>> 5MP (double meaty vs 4F)
4HP (2 hits) > 623KKK, 90/20, 7/12/66
Mid Screen
Both Recoveries
> 2HP (double meaty)
No Recovery
> 2HP FK (+33 state)
>> 5HP FK (+4 state)
>>> Throw 3AF
>>> 5LK 3AF
>>> 5MP
>>> 2MP
>>> 5MK
>>> 5HP
* 4HP (two hits) > 41236HK > P, 180/335, 23/28/82
* 2HP CH > 4HP (two hits, late crumple) > 63214LP (late cancel) > VS P, 282/526, 23/28/82
Corner Only
Both Recoveries
> 66 FK (+7 normal, +12 back)
>> 2HP (double meaty)
No Recovery
> 66 > 2HP FK (+33 state)
>> 5HP FK (+4 state)
>>> Throw 3AF
>>> 5LK 3AF
>>> 5MP
>>> 2MP
>>> 5MK
>>> 5HP
2MP > 5MK > VS K > 41236KKK, 170/298, 30/35/89
Corner Only
Both Recoveries
> 6HP
No Recovery
> 6HP (OTG property (8/13/64))
Normal Recovery
>> 5MP 3AF
Back Recovery
>> 5LP/2LP FK (+2 state)
>>> Throw
No Recovery
>> 5MP 3AF FK (+44 state)
>>> 2MP >> 2MK FK (+3 state)
>>>> Throw 2AF
>>>> 2LP 2AF
>>>> 5LP 2AF
>>>> 2LK 2AF
>>>> 5LK 2AF
>>>> 5MK
>>>> 2MP
>>>> 2MK
>>>> 5MP (against 4F characters)
OR
>> 2LP/5LP > 2MP FK (+33 state)
>>> 6HP 6AF, +10 oH/+3 OB
2MP > 5MK > 214KKK, 210/310, 32/37/91
Corner Only
Both Recoveries
> 6HP 2AF/5AF on normal/back recovery, +6/+11 oH, -1/+4 OB
No Recovery
> 6HP (OTG property (8/13/64))
Normal Recovery
>> 5MP 3AF
Back Recovery
>> 5LP/2LP FK (+2 state)
>>> Throw
No Recovery
>> 5MP 3AF FK (+44 state)
>>> 2MP > 2MK FK (+3 state)
>>>> Throw 2AF
>>>> 2LP 2AF
>>>> 5LP 2AF
>>>> 2LK 2AF
>>>> 5LK 2AF
>>>> 5MK
>>>> 2MP
>>>> 2MK
>>>> 5MP (against 4F characters)
OR
>> 2LP/5LP > 2MP FK (+33 state)
>>> 6HP 6AF, +10 oH/+3 OB
TC 5HP > HP, 134/222, 33/38/92
Mid Screen
Normal Recovery
> 66 x2 FK (+1 state)
>> Raging Demon
Back Recovery
> 66 x2 FK (+6 state)
>> 2MP 2AF
>> 5MP
>> 2MK 2AF
>> 4HP 2AF
>> 2HP (against 4F characters)
OR
> 4F forward jump safe jump
2MP > 5MK > 214LK, 154/254, 42/47/101
Mid Screen
Normal Recovery
> 214LK FK (+6 state)
>> 2MP 2AF
>> 5MP
>> 2MK 2AF + 4 OH, +5 OH CH
>> 2HP (double meaty vs 4F)
>> 4HP 2AF
>> IAOH 9LP
Back Recovery
> 214LK FK (+11 state)
>> 2HP
>> 5HK
Both Recoveries
> 214LK FK (+6 normal, +11 back)
>> 2HP (double meaty vs 4F)
No Recovery
> 214LK FK > 2HP (+36 state)
>> 4HP FK (+3 state)
>>> Throw 2AF
>>> 2LP 2AF
>>> 5LP 2AF
>>> 2LK 2AF
>>> 5LK 2AF
>>> 5MK
>>> 2MP
>>> 2MK
>>> 5MP (double meaty vs 4F)
2MP > 5MK > VS K > 214LK, 162/270, 38/43/97
Mid Screen
Normal Recovery
> 214LK FK (+2 state)
>> Throw
>> 2LP
>> 5LP
>> 2LK
>> 5LK
>> 5MK
>> 2MP (double meaty vs 4F)
Back Recovery
> 214LK FK (+7 state)
>> 2HP (double meaty)
>> IAOH 7LP/9LP
Both Recoveries
> 214LK FK (+2 normal, +7 back)
>> 2MP (against 4F characters)
No Recovery
> 214LK > 2MP FK (+41 state)
>> 2MK > 66/5LK FK (+4 state)
>>> Throw 3AF
>>> 5LK 3AF
>>> 5MP
>>> 2MP
>>> 5MK
>>> 5HP
2MP > 5MK > 214LK > 2HK, 217/359, 19/24/68
Mid Screen
Normal Recovery
> 66 FK (+3 state)
>> Throw 2AF
>> 2LP 2AF
>> 5LP 2AF
>> 2LK 2AF
>> 5LK 2AF
>> 5MK
>> 2MP
Back Recovery
> 66 FK (+8 state)
>> 5MP
>> 5HP
>> 2HP
Both Recoveries
> 66 FK (+3 normal, +8 back)
>> 5MP (against 4F characters)
No Recovery
> 66 FK > Throw FK (+28 state)
>> 2MK FK (+7 state)
>>> 2HP
> 66 FK > 5MP FK (+29 state)
>> 2MK FK (+8 state)
>>> 2HP
OR
>> 5LP/2LP FK > 66 FK (+2 state)
>>> Throw
>>> 5LP
>>> 2LP
>>> 2LK
>>> 5LK
>>> 2MP (against 4F characters)
** Ideal against 4F characters
* Corner Only
Both Recoveries
> 2LK (+7 normal, +12 back)
>> 2HP
No Recovery
> 2LK > 2HP FK (+23 state)
>> 2MP FK (+3 state)
>>> Throw 2AF
>>> 2LP 2AF
>>> 5LP 2AF
>>> 2LK 2AF
>>> 5LK 2AF
>>> 5MK
>>> 2MP
2MP > 5MK > 214LK > 214HK, 225/394, 21/26/80
Mid Screen
Normal Recovery
> 66 FK (+5 state)
>> 2MP
>> 5MP
>> 5HP
>> 4HP
** 5HP is unsafe on block; wouldn’t recommend unless you know the opponent is pressing buttons or if you’re going to to 5HP > HP TC xx VT
Back Recovery
> 66 FK (+10 state)
>> 2HP
>> 5HK
** 5HK will only connect on those who are standing
Corner Only
Normal Recovery
> 5LP FK (+10 state)
>> 2HP
>> 5HK
** 5HK will only connect on those who are standing
> 44 FK (+0 state)
** This is something that I’m experimenting with for matchups like Necalli; it puts me out of range of his fastest normals and will make his uppercut whiff if I go for a 2MK
* 2MP > 5MK > 214LK > micro step 3F > 214HK, 225/394, 18/23/77;
* (Corner Only) 2MP > 5MK > 63214LP > 214HK, 241/426, 18/23/77;
* (Corner Only) 4HP > 236PPP > 214HK, 260/513, 18/23/77;
* 2MP > 5MK > VS K > 214LK > 214HK, 233/410, 18/23/77
Mid Screen
Normal Recovery
> 66 FK (+2 state)
>> Throw
>> 5LP
>> 2LP
>> 2LK
>> 5LK
>> 2MP (against 4F characters)
Back Recovery
> 66 FK (+7 state)
>> 2MP
>> 5MP
>> 2HP
>> IAOH 7LP/9LP
No Recovery
> 66 > 2MP (+41 state)
>> 2MK > 66 FK (+4 state)
>>> Throw 3AF
>>> 5LK 3AF
>>> 5MP
>>> 2MP
>>> 5MK
>>> 5HP
* Corner Only
Both Recoveries
> 5LP FK (+7 state)
>> 2HP
>> IAOH 7LP/9LP
No Recovery
> 5LP > 2HP FK (+33 state)
>> 5HP FK (+4 state)
>>> Throw 3AF
>>> 5LK 3AF
>>> 5MP
>>> 2MP
>>> 5MK
>>> 5HP (4F characters)
* 5MP > 63214LP > 2HK, 195/328, 18/23/67
* Corner Only
Both Recoveries
> 5LP FK (+7 state)
>> 2HP
>> IAOH 7LP/9LP
OR
> 66 (+6 state)
>> 2MP (against 4F characters)
No Recovery
> 5LP > 2HP FK (+23 state)
>> 2MP FK (+3 state)
>>> Throw 2AF
>>> 2LP 2AF +5 OH, +7 OH CH
>>> 5LP 2AF +5 OH, +7 OH CH
>>> 2LK 2AF
>>> 5LK 2AF +3 OH, +5 OH CH
>>> 5MK
>>> 2MP
>>> 2MK
>>> 5MP (double meaty vs 4F)
* 2MK > 214MK (2 hits), 122/208, 38/43/97
Mid Screen
Normal Recovery
> 66 x2 FK (+6 state)
>> 2MP 2AF
>> 5MP
>> 2MK 2AF
>> 5HP
>> 4HP 2AF
>> 2HP (against 4F characters)
>> Throw (manual delay 3F)
> 2MP > 66 FK (+2 state)
>> Throw
>> 5LP
>> 2LP
>> 2LK
>> 5LK
>> 2MP (against 4F characters)
> 41236LK > P
** Manual timed P
> 4F forward safe jump
Back Recovery
> 66 x2 FK (+11 state)
>> 2HP
>> 5HK
> 41236MK > P
** Manual timed P
No Recovery
> 41236LK > P FK (+47 state)
>> 2HP > 2LP FK (+7 state)
>>> 2HP
OR
> 66 x2 > 2HP FK (+32 state)
>> 2LK > 66/5LK FK (+4 state)
>>> Throw 3AF
>>> 5LK 3AF
>>> 5MP
>>> 2MP
>>> 5MK
>>> 5HP
* Corner Only
Normal Recovery
> 66 x2 FK (+6 state)
> IAOH 9LP
Both Recoveries
> 2LP > 2MP FK (+7 normal, +12 back)
>> 2HP (double meaty)
No Recovery
> 2LP > 2MP FK (+66 state)
>> 2HP FK (+33 state)
>>> 5HP FK (+4 state)
>>>> Throw 3AF
>>>> 5LK 3AF
>>>> 5MP
>>>> 2MP
>>>> 5MK
>>>> 5HP
* 2MP > 5MK > 214MK (3 hits), 170/286, 39/44/98
Mid Screen
Both Recoveries
> 66 x2 FK (+7 normal, +12 back)
>> 2HP (double meaty)
No Recovery
> 66 x2 > 2HP FK (+33 state)
>> 5HP FK (+4 state)
>>> Throw 3AF
>>> 5LK 3AF
>>> 5MP
>>> 2MP
>>> 5MK
>>> 5HP
* 2MP > 5MK > VS K > 41236MK > P, 232/375, 23/28/82;
* (Corner Only) 2HP CC > 66 > 4HP >> 41236HK > P, 259/420, 23/28/82;
* (Corner Only) 2MP > 5MK > 63214PPP > VS P >, 259/420, 23/28/82
Mid Screen
Both Recoveries
> 66 FK (+7 normal, +12 back)
>> 2HP (double meaty)
No Recovery
> 66 > 2HP FK (+33 state)
>> 5HP FK (+4 state)
>>> Throw 3AF
>>> 5LK 3AF
>>> 5MP
>>> 2MP
>>> 5MK
>>> 5HP
Corner Only
Normal Recovery
> 66 FK (+7 state)
>> IAOH 7LP/9LP
>> 2HP
* 2MP > 5MK > 214LK > 623MP (623LP), 231/359 (224/359), 28/33/87
* I only listed corner setups for this since his mid screen okizeme for this setup is not that useful.
* Same okizeme applies if you replace 623MP with 623LP. I didn’t list this variant since you get less damage for the same situation.
Corner Only
Normal Recovery
> 2MK/44 FK (+7 state)
>> IAOH 7LP/9LP
Both Recoveries
> 2MK/44 FK (+7 state)
>> 2HP (double meaty)
No Recovery
> 2MK/44 > 2HP FK (+33 state)
>> 5HP FK (+4 state)
>>> Throw 3AF
>>> 5LK 3AF
>>> 5MP
>>> 2MP
>>> 5MK
>>> 5HP
2MP > 5MK > 63214PPP, 210/350, 51/56/110
Mid Screen
Normal Recovery
> 5LP/2LP FK (+40 state)
>> 4F safe jump
> 66 x3 FK (+3 state)
>> Throw 2AF
>> 2LP 2AF
>> 5LP 2AF
>> 2LK 2AF
>> 5LK 2AF
>> 5MK
>> 2MP
>> 2MK
>> 5MP (against 4F characters)
2MP > 5MK > 214LK > 41236KKK, 250/401, 25/30/74
Mid Screen
Normal Recovery
> 5MP FK (+2 state)
>> Throw
>> 5LP
>> 2LP
>> 2LK
>> 5LK
>> 2MP (against 4F characters)
OR
> 2MK FK (+4 state)
>>> Throw 3AF
>>> 5LK 3AF
>>> 5MP
>>> 2MP
>>> 5MK
>>> 5HP
2MP > 5MK > 214LK > 41236KKK > K Follow-Up > VS P, 243/406, 25/30/84
Corner Only
Normal Recovery
> 5MP FK (+2 state)
>> Throw
>> 5LP
>> 2LP
>> 2LK
>> 5LK
>> 2MP (against 4F characters)
OR
> 2MK FK (+4 state)
>> Throw 3AF
>> 5LK 3AF
>> 5MP
>> 2MP
>> 5MK
>> 5HP
2MP > 5MK > VS K > VS P, 211/340, 24/29/83
Mid Screen
N/A
2MP > 5MK > 236PPP, 194/326, 36/41/94
Mid Screen
Normal Recovery
> 66 x2 FK (+4 state)
>> Throw 3AF
>> 5LK 3AF
>> 5MP
>> 2MP
>> 5MK
>> 5HP
Back Recovery
> 66 x2 (+9 state)
>> 2HP
* Corner Only
Normal Recovery
> 2HP/5HP FK (+7 state)
>> IAOH 7LP/9LP
Both Recoveries
> 2HP/5HP FK (+7 normal, +12 back)
>> 2HP
No Recovery
> 5HP > 2HP FK (+32 state)
>> 2LK > 66/5LK FK (+4 state)
>>> Throw 3AF
>>> 5LK 3AF
>>> 5MP
>>> 2MP
>>> 5MK
>>> 5HP
2MP > 5MK > VS K > 214LK > 623HP, 246/375, 24/29/83
Corner Only
Normal Recovery
> 2MK FK (+3 state)
>> Throw 2AF
>> 2LP 2AF
>> 5LP 2AF
>> 2LK 2AF
>> 5LK 2AF
>> 5MK
>> 2MP
>> 2MK
>> 5MP (double meaty vs 4F)
Back Recovery
> 2MK FK (+8 state)
>> 2HP
>> 5MP
>> 5HP
>> IAOH 7LP
No Recovery
> 2MK FK (+62 state)
2MP > 5MK > 214LK > 623HP, 238/359, 25/30/84
Mid Screen
Normal Recovery
> 5MP FK (+2 state)
>> Throw
>> 5LP
>> 2LP
>> 2LK
>> 5LK
>> 2MP (against 4F characters)
OR
> 2MK FK (+4 state)
>> Throw 3AF
>> 5LK 3AF
>> 5MP
>> 2MP
>> 5MK
>> 5HP
2MP > 5MK > 214KKK > 623HP, 294/415, 24/29/83
Corner Only
Normal Recovery
> 5LK/66 FK (+8 state)
>> 2HP
>> 5MP
>> 5HP
>> IAOH 7LP
OR
> 2MK FK (+3 state)
>> Throw 2AF
>> 2LP 2AF
>> 5LP 2AF
>> 2LK 2AF
>> 5LK 2AF
>> 5MK
>> 2MP
>> 2MK
>> 5MP (double meaty vs 4F)
2MP > 5MK > 214MK > 623HP, 191/300, 21/26/80
2MP > 5MK > 63214LP, 170/286, 38/43/97
IA VT 236LP > 4HP > VT 236LP > 41236KKK > 236P (in air) > VT 623P, 427/633, 35/35/35;
VT 623P, 200/230, 35/35/35;
Mid Screen
Both Recoveries
> 2LP > 2MK FK (+3 state)
>> Throw 2AF
>> 2LP 2AF
>> 5LP 2AF
>> 2LK 2AF
>> 5LK 2AF
>> 5MK
>> 2MP
>> 2MK
>> 5MP (double meaty vs 4F)
OR
> 2LP > 2MP FK (+4 state)
>> Throw 3AF
>> 5LK 3AF
>> 5MP
>> 2MP
>> 5MK
>> 5HP
OR
> 66 > 2LK FK (+7 state)
>> 2HP (double meaty)
>> 2MP 3AF
>> IAOH 7LP/9LP
4HP > 63214MP, 132/258, 34/39/93
Corner Only
Both Recoveries
> 5LP > 66 FK (+7 normal, +12 back)
>> 2HP (double meaty)
* Normal recovery works Mid-Screen
No Recovery
> 5LP > 66 > 2HP FK (+33 state)
>> 5HP FK (+4 state)
>>> Throw 3AF
>>> 5LK 3AF
>>> 5MP
>>> 2MP
>>> 5MK
>>> 5HP
2MP > 5MK > 214LK > 623LP > 236236P, 416/359, 38/43/105;
2MP > 5MK > 214LK > 623HP > 236236P, 409/345, 38/43/105;
2MP > 5MK > 214LK > 236P > 623HP, 236236P, 440/359, 38/43/105
Corner Only
Both Recoveries
> 2MP > 2LP/5LP FK (+7 state)
>> 2HP (double meaty)
No Recovery
> 2MP > 2LP/5LP > 2HP FK (+41 state)
>> 2MK > 66 FK (+4 state)
>>> Throw 3AF
>>> 5LK 3AF
>>> 5MP
>>> 2MP
>>> 5MK
>>> 5HP
2MP > 5MK > 236P, 162/286, 29/34/88
Corner Only
Both Recoveries
> 2MK (+8 state)
>> 2HP (double meaty)
No Recovery
> 2MK > 2HP FK (+34 state)
>> 66 x2 FK (+2 state)
2MK > 5MK > 236PPP, 194/326, 36/41/94
Corner Only
Both Recoveries
> 5HP (+7 state)
>> 2HP (double meaty)
No Recovery
> 5HP > 2HP FK (+32 state)
>> 2LK > 5LK/66 FK (+4 state)
>>> Throw 3AF
>>> 5LK 3AF
>>> 5MP
>>> 2MP
>>> 5MK
>>> 5HP
2MK > 5MK > 63214LP > 623MP, 247/391, 27/32/86
Corner Only
Both Recoveries
> 2MP (+7 state)
>> 2HP (double meaty)
No Recovery
> 2MP > 2HP FK (+33 state)
>> 5HP FK (+4 state)
>>> Throw 3AF
>>> 5LK 3AF
>>> 5MP
>>> 2MP
>>> 5MK
>>> 5HP
Match-Ups
Abigail
Health 1100
Stun 1050
Back Jump 50(8+36+6)
Neutral Jump 50(8+36+6)
Forward Jump 50(8+36+6)
Forward Dash 25
Back Dash 25
Forward Walk 3.2
Back Walk 2.5
F.Jump Distance 108
B.Jump Distance 108
Throw Range 0.9
Throw Hurtbox Range 0.4
Normals/Specials:
2LK (4/2/12 17, +2 oB)
> Abigail lands early on an air reset, so this button is used very often
> Far reaching light that can VTC into huge frame advantage (+8 oB)
5MP (9/3/18 29) (+5 state if standing, +6 state if crouching)
> Best bet is to block it standing to reduce the frame advantage and backdash out of the situation when blocking this normal at the fist; contest with 5LP if one feels that it’s coming again
2MK (12/2/21 34, 0 oH, -3 oB)
2HP (11/5/35 50, -15 oH, -18 oB)
> 2HP VTC is +15 oB
> If done raw, can be punished with Akuma’s 2HK
> Another option is to forward dash and put Abigail in a +2 guessing situation
6HP (10/5/18 22)
> This move is mainly used to contest someone jumping and is mainly for a preemptive callout for someone jumping
5HK (18/14/29 60, -8 oB)
> This move crush counters and causes a knockdown state
> Punishable with super oB
LP/MP/HP/EX Giant Flip (0/+1/+2/-2 oB)
Block Strings:
2LK > 5LP > 2HP > 63214LP; 2HP > 63214LP (2F gap)
> Use 623PPP, VT 623P, or Raging Demon
> Possible to use 421KKK to get out of the situation
2LK > 5LP > 2HP > 63214LP; 2HP > 63214LP (2F gap)
2HP > KK Hold
> Used to gauge how one reacts to 2HP and whether one can get away with Abigail run into command grab or well spaced P
> Back dashing resets the situation, a well spaced punch sets up a trap for whiff punishing a retaliation normal into 2HP xx whatever he wants
2HP > Abigail Flip
>
2MP > any special cancel (5F gap at best)
> Can all be beaten with 623LP
> Cancels into Abigail flip can be VS1 parried into launcher into oki
2MK > any special cancel (7F gap at best)
> Can all be beaten with 623LP
> Cancels into Abigail flip can be VS1 parried into launcher into oki
5MP > 5MP (4F gap if standing, 3F gap if crouching)
> Can interrupt with 5LP, LP/HP/EX uppercut
5MP > 4HP (2F gap, -6 oB)
> Punish options are in VT1
>> 623HP
>> Demon
4HP > 63214LP (true string)
> 63214LP is +0 oB
> If spaced right, you can contest with Akuma’s 5HP and you’ll pretty much beat all the options
>> Only if Abigail has meter is when it becomes threatening, as the only thing that will win is 2LP xx EX Abigail Punch
KK > P (max range)
> Can be punished with CA
Common Knockdown Situations (Advantage states assume quick rise):
4HP > HP (28/33/87)
> 66 FK (+3 state)
KK > P (26/31/85)
> 66 FK (+1 state)
>> Can trade with 5LP, LP uppercut, or beat clean with HP/EX uppercut, or even wake up VS1
KK > K (20/25/79)
> If he forward dashes, you can reversal 5MK to punish
LP/MP/HP Abigail Flip (31/36/90; 30/35/89)
> MP/HP Abigail Flip can be neutral/jumped jumped
LP/MP/HP Abigail Punch (Non-Mash: 28/33/87 Mash: 26/31/85)
> 66 FK (+3 state on non-mash, +1 state on mash)
>> When not mashed, it sets up a meaty command grab on quick rise to beat your 3F jab
>>> Answers to this would be to wake up backdash on quick rise, wake up LP uppercut, or wake up forward jump to be airborne
>> When mashed, you can trade his meaty with 5LP, LP uppercut, or beat clean with HP/EX uppercut, or even wake up VS1
V-Reversal OS:
> 5LP/2LP > 2MP OS Throw
> 2MP > 2LK OS VS – +14 state
> 63214PPP > 2HP OS VS – +19 state
Akuma
V-Reversal OS:
> 5LP/2LP > 2MP OS Throw
> 2MP > 2LK OS VS – +12 state
> 63214PPP > 2HP OS VS – +17 state
Alex
Normals:
5MP (+5 state if standing, +6 state if crouching)
V-Reversal OS:
> 5LP/2LP > 2MP OS Throw
> 2MP > 2LK OS VS – +11 state
> 63214PPP > 2HP OS VS – +16 state
Balrog
V-Reversal OS:
> 5LP/2LP > 2MP OS Throw
> 2MP > 2LK OS VS – +12 state
> 63214PPP > 2HP OS VS – +17 state
Birdie
V-Reversal OS:
> 5LP/2LP > 2MP OS Throw
> 2MP > 2LK OS VS – +7 state
> 63214PPP > 2HP OS VS – +12 state
Blanka
V-Reversal OS:
> 5LP/2LP > 2MP OS Throw
> 63214PPP > 2HP OS VS – +16 state
Cammy
V-Reversal OS:
> 5LP/2LP > 2MP OS Throw
> 2MP > 2LK OS VS – +12 state (spacing dependent for the punish)
> 63214PPP > 2HP OS VS – +17 state (spacing dependent for the punish)
Chun-Li
V-Reversal OS:
> 5LP/2LP > 2MP OS Throw
> 63214PPP > 2HP OS VS – +12 state
Cody
Normals:
5HK
> Requires to walk forward
V-Reversal OS:
> 5LP/2LP > 2MP OS Throw
> 2MP > 2LK OS VS – +11 state
> 63214PPP > 2HP OS VS – +16 state
Dhalsim
V-Reversal OS:
> 5LP/2LP > 2MP OS Throw
> 2MP > 2LK OS VS – +11 state
> 63214PPP > 2HP OS VS – +16 state
Ed
V-Reversal OS:
N/A
Falke
Specifics:
Falke’s 2MK in the air has a follow up where she can either stay in front or cross up. Best option after blocking that situation is to jump back medium kick to escape and cover both options; reclaim the neutral this way.
V-Reversal OS:
> 5LP/2LP > 2MP OS Throw
F.A.N.G.
V-Reversal OS:
N/A
G
V-Reversal OS:
> 5LP/2LP > 2MP OS Throw
> 2MP > 2LK OS VS – +12 state
> 63214PPP > 2HP OS VS – +17 state
Guile
V-Reversal OS:
> 5LP/2LP > 2MP OS Throw
> 2MP > 2LK OS VS – +11 state
> 63214PPP > 2HP OS VS – +16 state
Ibuki
V-Reversal OS:
> 2MP > 2LK OS VS – +5 state
> 63214PPP > 2HP OS VS – +10 state
Juri
V-Reversal OS:
> 5LP/2LP > 2MP OS Throw
> 2MP > 2LK OS VS – +15 state
> 63214PPP > 2HP OS VS – +20 state
Kage
V-Reversal OS:
Kage’s v-reversal comes out too fast to be able to OS with 2MP > 2LK OS VS; need to use 2LP/5LP > 2LK OS VS instead.
> 2LP/5LP > 2LK VS OS – +14 state
Karin
Block Strings:
5LK > 2MP (3F gap)
> MIxes between this and throw, since 5LK is +2 oB and 2MP has a 3F startup
> LP uppercut to call out this string; worst case in the commit is a trade that resets neutral
2MP > 2MK (4F gap)
> Best option is to backdash after this, if possible
> If they’re being predictable with this string and going into 2MK for the one-hit confirm into JF Tenko, you can do the following
>> Air reset with the backdash and punish the reactionary hit on the back dash air juggle if they commit to the Tenko
>> Call out the string with LP or HP uppercut
>> 3F jab to interrupt this string (?)
V-Reversal OS:
> 5LP/2LP > 2MP OS Throw
> 63214PPP > 2HP OS VS – +16 state
Ken
V-Reversal OS:
N/A
Kolin
V-Reversal Counters:
Her v-reversal is reactable to punish upon her recovery. Best bet is to use normals at max range to make use of your active frames and catch her as she is switching sides.
> 2MP > 2LK OS Throw
> 2MP > 2MP/5LP OS Throw
> 63214PPP > 2HP OS Throw
Laura
V-Reversal OS:
> 5LP/2LP > 2MP OS Throw
> 2MP > 2LK OS VS – +12 state
> 63214PPP > 2HP OS VS – +17 state
Common Scenarios:
> After regular command grab, she is +13; if she forward dashes, she is -4
M. Bison
V-Reversal OS:
> 5LP/2LP > 2MP OS Throw
> 2MP > 2LK OS VS – +8 state
> 63214PPP > 2HP OS VS – +13 state
Menat
V-Reversal OS:
Menat’s v-reversal switches sides, so you can actually OS walk back and use 5LK to catch her during the recover of her v-reversal. 5LK is 4F startup and 3F active, so it’s long enough to catch her during her recovery.
> 2MP > 2MP/5MP > 236P with throw input
Nash
V-Reversal OS:
> 5LP/2LP > 2MP OS Throw
> 63214PPP > 2HP OS Throw
Necalli
Okizeme:
5MK > 5HK > VS > 66 x2 (1/6/?)
V-Reversal OS:
> 5LP/2LP > 2MP OS Throw
> 2MP > 2LK OS VS – +12 state
> 63214PPP > 2HP OS VS – +17 state
Rashid
Normals:
5LK (+1 state)
> Point blank leads to tick throw; respond with backdash or 5LP
2MP (+1 state)
> Point blank leads to tick throw; respond with backdash or 5LP
> Can frame trap with 5LK to give it a 2F gap to beat 3F normals
2MK (-4 state)
> Usually a string ender for this move; can be canceled into Whirlwind Shot to end pressure, usually the LK variant
Block Strings:
5MP > 236LK (LK Whirlwind Shot)
2LP > 2LK > 2LP > 236HK > 2VS K (HK Whirlwind Shot, +2 state if blocked)
> Large gap between 2LP and 236HK
> Punish with 2HK or 5HP > 5HP TC
5MP > 5MP (2F gap)
5LP > 5MP (2F gap)
Any > 236KKK (EX Whirlwind Shot)
> Can be interrupted with EX uppercut, forward jump, or 5LK
Okizeme:
236MP (MP Spinning Mixer, Max Level), 35/40/94
> 236HK (HK Whirlwind Shot); react to the wind-up and EX uppercut
> 8HK in corner (4F safe jump on back recovery)
F. Throw, 12/12/71
> 236KKK (EX Whirlwind Shot)
>> Jump on reaction to EX Whirlwind Shot as a meaty
2VS K > 236 MP (MP Spinning Mixer Level 1), 40/45/99
> Empty neutral jump (safe jump)
> Neutral jump attack (loses to 4F uppercut on normal recovery)
Specifics:
Rashid can VT2 on reaction to Akuma’s VT1 air fireballs and get a huge punish. Be more conservative with your v-meter and don’t be impatient.
R.Mika
V-Reversal OS:
> 5LP/2LP > 2MP OS Throw
> 2MP > 2LK OS VS – +12 state
> 63214PPP > 2HP OS VS – +17 state
Ryu
V-Reversal OS:
> 5LP/2LP > 2MP OS Throw
> 2MP > 2LK OS VS – +12 state
> 63214PPP > 2HP OS VS – +17 state
Sagat
V-Reversal OS:
> 5LP/2LP > 2MP OS Throw
> 2MP > 2LK OS VS – +12 state
> 63214PPP > 2HP OS VS – +17 state
Sakura
V-Reversal OS:
> 5LP/2LP > 2MP OS Throw
> 2MP > 2LK OS VS – +15 state
> 63214PPP > 2HP OS VS – +20 state
* Enough frame advantage to even activate v-trigger and punish
Urien
V-Reversal OS:
> 5LP/2LP > 2MP OS Throw
> 2MP > 2LK OS VS – +12 state
> 63214PPP > 2HP OS VS – +17 state
Vega
V-Reversal OS:
> Look into OS 66 in the corner and explore
Zangief
V-Reversal OS:
N/A
Zeku
V-Reversal OS:
N/A