Tamer Guide
Table of Contents
- Tamer Lore
- Gear
- Accessories
- Skills
- Addons
- Ani-Cancels
- Crowd Controls
- Combos
- Tips
- Resources
- Final Thoughts
Table of Contents
Tamer Lore
“The Princess of the Fallen Kingdom Seeks the Power of the Legendary Beast”
At the farthest point of the Orient is a huge island, full of ferocious beasts. A woman, with a newborn in her arms, found herself upon this island, named Haemo, which was almost untouched by human civilization.
She was severely injured, and died while attempting to traverse the forest, leaving the infant alone and defenseless. A beast passing by approached the baby out of curiosity and decided to take care of it. As time passed, the beast grew attached to the infant’s purity of heart, and raised her alongside its own cubs.
As the baby grew into girlhood, the sage of Haemo Island, Hwisa, returned with his Legendary Beast, Heilang. Hwisa had been journeying to find a successor, but returned when it became clear that no one was suited for the task. Intrigued by the little girl, who had been raised by a wild beast, Hwisa decided to take her on as his pupil.
She was not intimidated by the fearsome appearance of the Heilang, due to her childhood amongst wild beasts, and absorbed her master’s teachings naturally.
As she transitioned from a life among beasts, to one among humans, the girl began to question her background and true identity. Though no one had an answer, there was one clue; a woman that had come to Haemo Island with a newborn in her arms. With this single insight into who she was, the little girl decided to step into civilization without her master’s knowledge or guidance.
It took several years for the girl to realize her identity, and the news was far from pleasing. She found herself caught in the turmoil of an exhausting civil war, where a revolt had eradicated the entire royal family. One of the royal handmaidens was able to escape the palace with the youngest princess, and made her way to Haemo Island, an area restricted to travelers.
After learning the truth, the girl decided to return to Haemo island only to find it war torn and ravaged. Her investigation into her past and the truth of her identity must have been detected by a higher power. Hwisa, her mentor, was dead and she grieved his demise deeply, holding a funeral to honor his memory. It would be impossible for her to continue living in this country, so she made ready to leave, placing her most prized possession, the “Celestial Bo Staff”, on her master’s grave.
As she was leaving the foothills, a fluffy, dark shadow appeared in front of her. The shadow turned out to be one of the late mother Heilang’s cubs, and though it was frail, she decided to take it with her on her journey so that she would not be alone.
The duo headed West, enduring hardship along the way. The little girl had to confront the Black Energy, which had been at the heart of the civil war responsible for the death of her family and beloved teacher. After coming close to her death on several occasions, the girl recalled what Hwisa told her when she was much younger:
“The power to shake the heavens shall follow the true master of Heilang.”
Gear
Weapons

Rosar Set Effect: Ignore All Resistance +10% Enhancement Effect: All AP Up, All Accuracy Up

Krea Set Effect: All Accuracy +20 Enhancement Effect: All AP Up, All Accuracy Up

Yuria Item effect: Additional Damage to Humans +5 Enhancement effect: AP, Accuracy, & Additional Damage to Humans

Liverto Item effect: Critical Hit Rate +3 Enhancement effect: Increased AP, & Accuracy

Kzarka Item effect: Attack Speed +3 Enhancement effect: Increased AP, & Accuracy
Rosar and Krea have more AP than Yuria by 1, cost efficient, and 2 gem slots as well, so it’s an option. Aside from that, do your best to aim for Kzarka, otherwise you can do just fine with Liverto, only thing is you miss out an extra small amount of Accuracy and the +3 attack speed where you would have to make up elsewhere with crystal setup. Kzarka would be considered the BiS item for your Mainhand Weapon.
Starting Out: Rosar, Krea, Bares, or Yuria Shortsword – Sub-BiS: Liverto Shortsword – BiS: Kzarka Shortsword
Offhands

Incense Item Effect: Accuracy +7 Enhancement Effect: Increased Accuracy

Needle Item Effect: N/A Enhancement Effect: Increased AP

Blade Item Effect: Evason +3, Damage Reduction +1, & Max HP +100 Enhancement Effect: Increased Evasion

Rosar Item Effect: N/A Set Effect: Ignore All Resistance 10% Enhancement Effect: Evasion Increase

Nouver Item Effect: All Resistance +10% Enhancement Effect: Attack Increase

Kutum Item Effect: Ignore All Resistance +10% Enhancement Effect: AP, DP, & Accuracy Increase
Incense: Accuracy + Special Attack Modifier
Needle: AP + Special Attack Modifier
Blade/Rosar: Both of these are defensive offhands, however Rosar would be preferred because it gives more ap with small difference in evasion compared to Blade.
Nouver: Pure AP Offhand, doesn’t hurt but Needle with the modifier is better.
Kutum: This Offhand will help with Grinding, also has some hidden evasion.
Needle/Kutum offhands would benefit you the most, however if you want more evasion then you’d want Rosar or Blade. Needle is better than Nouver because of the Special attack modifier, you could say the same for the other offhands with special attack modifiers. Kutum will help with grinding, it’s best for PvE and helps in PvP as well. If you wanna just roll with one offhand everywhere, Kutum will help all around.
Awakening

Practice Celestial Bo Staff Item Effect: Extra Damage to All Species +5 Enhancement Effect: All Ap Up, Extra Damage to All Species Up

Azure Thunder Celestial Bo Staff Item Effect: Additional Damage to Humans +7 Enhancement Effect: All Ap Up, Additional Damage to Humans

Dandelion Bo Staff Item Effect: N/A Enhancement Effect: All Ap Up
Practice Celestial Staff: Enhance or Buy at Tri if unable to buy or enhance Azure Staff to Tri
Azure Thunder Celestial Staff: Enhance or Buy at Pri-Tri
Dandelion Staff: BiS, one of the hardest boss pieces to get aside from Tree armor.
Once you do your Awakening quest, you’re going to be given a Azure Thunder Bo Staff, however whether you can enhance it to tri or not depends on your luck. Starting out I’d try to invest in getting a Pri – Tri one while grinding to start your awakening quest, that way once you obtain Awakening you can equip and then continue grinding or try out your abilities. Dandelion is going to be tough to get, you’ll have to be lucky with Karanda boss or with Night Vendor. I highly suggest doing Night Vendor since you’ll also have a chance at getting other boss pieces.
Armor
Grunil Heve Roaring Dim Magical


Damage Reduction +2 Damage Reduction +2 60 DP


Damage Reduction +2 Damage Reduction +2 Item Effect: Max HP +50, All Accuracy +20


Damage Reduction +2 Damage Reduction +2


Damage Reduction +2 Damage Reduction +2
Armor, Shoes Set effect: Max HP +150 2 Piece Set Effect: Max HP +250
Helmet , Gloves Set effect: All AP +5 3 Piece Set effect: Max HP +50
4 Piece Set Effect: All AP +2
In the previous guide I had mentioned Taritas/Rocaba, and although they can be viable, eventually you’re going to end up with full boss gear. So here’s 2 options, Grunil weighs more but has that Ap set effect that makes it attractive, however once you start getting boss pieces the set effects will be disabled depending on what piece you obtain. Heve will not be affected by any boss piece you’ll get until you get more than 1 and even then you’re safe with set effects until you obtain your final boss piece. Dim Magical Armor is another option to go for since it’s equivalent to PRI armor.
Boss

Giath Helmet: Max HP +100

Hebetate Tree Spirit’s Armor: Max HP +200 & Max MP/WP/SP +100

Red Nose’s Armor: Increased HP Recovery & Max MP/WP/SP +100

Bheg’s Gloves: Increased Accuracy & Effect Increases during Enhancement

Muskan’s Shoes: Increased Evasion & Effect Increases during Enhancement
3 Piece Set Effect: Max Stamina +200
4 Piece Set Effect: Attack Speed +1 & Casting Speed +1
When getting Boss gear, prioritize Bheg Gloves and Muskan’s Shoes. If you happen to land both of those, then I’d suggest going the Heve Helmet and Armor piece so you get a set effect.


IF you have Giath , Bheg’s , and Muskan’s , it is completely fine to run Red Nose Armor, if you have it or want to consider getting it
I’m running Red Nose until I’m able to get Tree armor with the Shakatu’s Seals, so no shame in using it until you’re able to obtain Tree Armor.
Crystals
Prioritize your crystals based on your stats. In this case we would like to have +5 attack speed, and +5 Movement Speed. The highest you’ll be able to achieve is +4 attack speed with crystals if you are using Liverto, +5 is possible if you’re using Kzarka. As for Movement speed the most you’ll achieve is +4 without buffs.
Weapon: Black Magic Crystal Precision
Offhand: Black Spirit Crystal
Awakened Spirit’s Crystal
Magic Crystal of Infinity – Critical
Helmet: Ancient Magic Crystal of Enchantment – Agility
Black Magic Crystal – Harphia
Black Magic Crystal – Agility
Armor: Magic Crystal of Infinity – Evasion
Ancient Magic Crystal – Cobelinus
Black Magic Crystal Cobelinus
Gloves: Ancient Magic Crystal – Viper
Black Magic Crystal – Assault
Black Magic Crystal – Valor
Magic Crystal of Infinity – Assault
Shoes: Ancient Magic Crystal – Hystria
Magic Crystal of Infinity – Swiftness
Black Magic Crystal Swiftness
Gear is all about how you want to optimize your character, there isn’t really a set way of doing so other than just achieving full boss gear. After that it comes down to how much more AP/DP you’d like to attain with accessories, including Accuracy, Evasion or Resistances. DO NOT view this section as a single and only way you should build your character.
Accessories
Accessories are dependent on what kind of build your trying to make, and min/maxing stats.
Necklace +0 +1 +2 +3 +4 +5

Bares Necklace 4 AP 6 AP 8 AP 10 AP 12 AP 15 AP

Scarla Necklace 5 AP/ 5 DP 6 AP/ 6 DP 7 AP/ 7 DP 8 AP/ 8 DP 9 AP/ 9 DP 10 AP/ 10 DP

Ancient Guardian Seal 6 AP/ 3 DP 8 AP/ 4 DP 10 AP/ 5 DP 12 AP/ 6 DP 14 AP/ 7 DP 16 AP/ 8 DP

Necklace of Shultz 7 AP 10 AP 13 AP 16 AP 19 AP 22 AP

Serap Necklace 8 AP 12 AP 16 AP 20 AP 24 AP 28 AP
Item Effect: Max HP +50

Sicil’s Necklace 7 AP/ 3 DP 10 AP/ 5 DP 13 AP/ 7 DP 16 AP/ 9 DP 19 AP/ 11 DP 22 AP/ 13 DP

Laytenn’s Power Stone 10 AP 15 AP 20 AP 25 AP 30 AP 35 AP

Ogre Ring 10 AP 15 AP 20 AP 25 AP 30 AP 35 AP
Bares, Scarla, Guadian Seal, and Shultz are good backup options, after that it comes down to what Yellow accessory you’ll want. Laytenn’s and Ogre’s are the same just obtained in different locations. If you don’t wanna go through a lot of hassle, Serap’s is a good option. For Evasion builds, Sicil’s Necklace is viable because it has hidden evasion. Keep in mind, the Item effects do go up every time you enhance.
Rings
+0 +1 +2 +3 +4 +5

Blue Coral 5 AP 6 AP 7 AP 8 AP 9 AP 10 AP

Red Coral 4 AP/ 3 DP 5 AP/ 4 DP 6 AP/ 5 DP 7 AP/ 6 DP 8 AP/ 7 DP 9 AP/ 8 DP

Outlaw 3 AP/ 4 DP 4 AP/ 5 DP 5 AP/ 6 DP 6 AP/ 7 DP 7 AP/ 8 DP 8 AP/ 9 DP

Mark of Shadow 5 AP 7 AP 9 AP 11 AP 13 AP 15 AP

Crescent Guardian 5 AP 8 AP 11 AP 14 AP 17 AP 20 AP

Cadry Guardian 5 DP 8 DP 11 DP 14 DP 17 DP 20 DP
Item Effect: Max HP +25 & Max MP/WP/SP +25 (+15 HP per enhancement)
Blue and Red Coral rings are a great place to start, otherwise you can go straight for MoS until you decide to reach for Crescent rings. Keep in mind, the Item effects do go up every time you enhance.
Belt
+0 +1 +2 +3 +4 +5

Belt of Shultz the Gladiator 3 AP 5 AP 7 AP 9 AP 11 AP 13 AP
Item Effect: Max Stamina +50 & Weight Limit +60 LT (+10 LT per enhancement)

Tree Spirit Belt 5 AP 7 AP 9 AP 11 AP 13 AP 15 AP
Item Effect: Accurcy +1 & Weight Limit +80 LT (Accuracy +1 per enhancement)

Basilisk Belt 5 AP 8 AP 11 AP 14 AP 17 AP 20 AP
Item Effect: Weight Limit +80 LT

Centaurus Belt 5 DP 8 DP 11 DP 14 DP 17 DP 20 DP
Item Effect: Max HP +25 Weight Limit +80LT
Belt of Schultz is where you’d wanna start then go straight for Basilisk Belt, if you feel like you want more accuracy then Tree will be the other option. If you’re running an Evasion build or want to run with one, then you’ll want to grab Centaurus’ belt because it has hidden evasion. Centaurus’ belt + Sicil’s necklace hidden evasion is equal to Rosar evasion from Pri – Pen. Keep in mind, the Item effects do go up every time you enhance.
Earrings
+0 +1 +2 +3 +4 +5

Red Coral 2 AP 4 AP 6 AP 8 AP 10 AP 12 AP
Item Effect: Accuracy +3 & Max Stamina +50 (Accuracy +1 per enhancement)

Blue Coral 4 AP 6 AP 8 AP 10 AP 12 AP 14 AP
Item Effect: Max MP/WP/SP +25

Witch 5 AP 7 AP 9 AP 11 AP 13 AP 15 AP

Tungrade 7 AP 9 AP 11 AP 13 AP 15 AP 17 AP
Try to make Tri Red Coral Earrings, and Tri Blue Coral Earrings, either two of them or one of each. If you already have witches, keep’em otherwise you’ll want to use x1 Tri RCE and x1 Tri Witch. Blue Coral Earrings are cost efficient, if you wanna spend more money for a measly 1 AP gain from each earring with witches then go ahead. X2 Tri RCE Accuracy will help in the long run. No Accuracy means you’re gonna have a hard time hitting things, keep in mind when building your char.
Asula Accessory Set
Cannot be enhanced

Asula’s Crimson Eye 7~7 AP / 2 DP
3 Set Effect: Max HP +300
5 Set Effect: All Accuracy +20

Asula Crimson Eye Necklace 11~11 AP / 3 DP
3 Set Effect: Max HP +300
5 Set Effect: All Accuracy +20

Asula Crimson Eye Earring 7~7 AP
Item Effect: Max HP +25
3 Set Effect: Max HP +300
5 Set Effect: All Accuracy +20

Asula Crimson Eye Belt 6~6 AP
Item Effect: Weight Limit +100 LT
3 Set Effect: Max HP +300
5 Set Effect: All Accuracy +20
Good set to start out with if you able to obtain the pieces, based on what it says on the database, you’ll be able to obtain from Helms, Iron Mine, and Elrics.
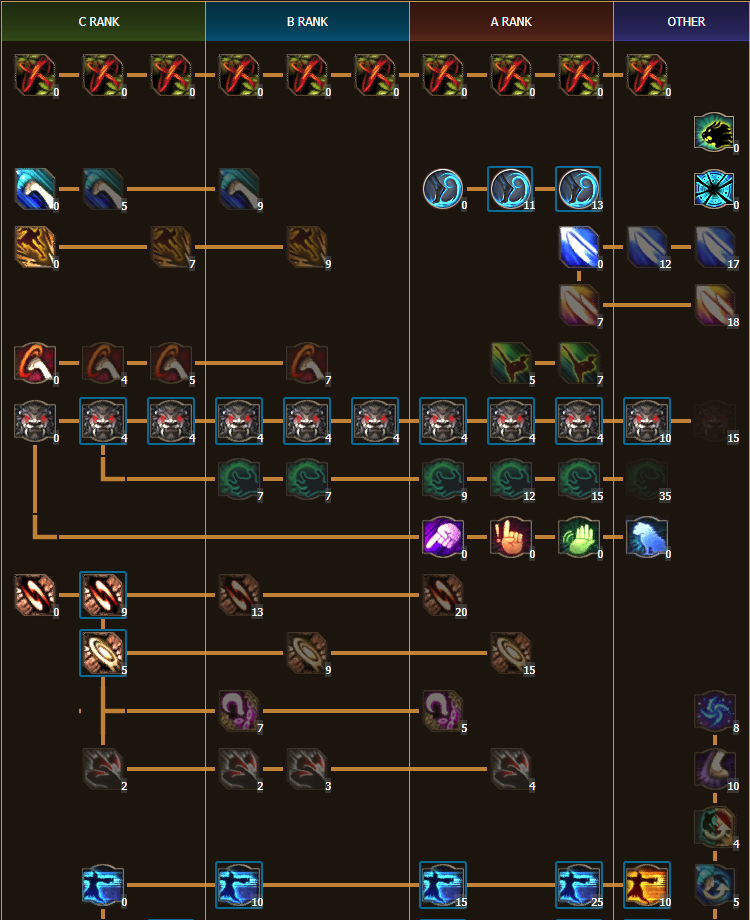
Skills
Level 50 – 392 Skill Points
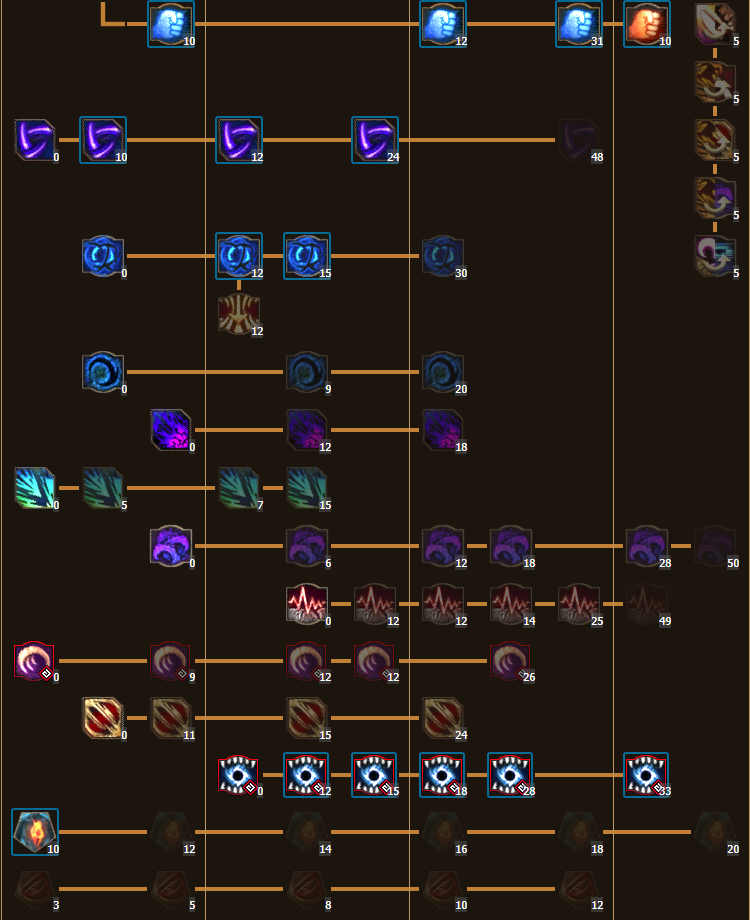
Level 56 – 511 Skill Points
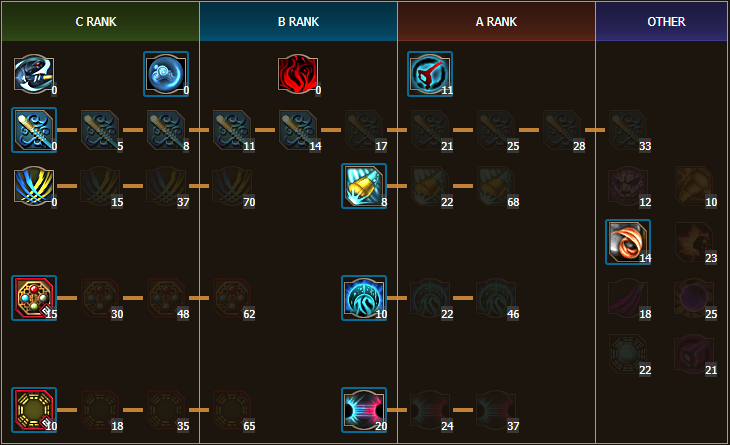
Asking for 392 Skill points at Level 50 is a lot, and if you’re getting power leveled, the amount of SP you’ll gain will be somewhere in the 200’s. The same will apply for when hitting 56 and obtaining 511 SP, however as you’re gaining SP, you’ll have a good idea of what you’ll want to get. In the end, you’re gonna get all the skills anyway, just gotta invest in the ones that are important for now.
Addons
Normal Skill

Bolt Wave – All Evasion +4% for 10 sec. for self
All Accuracy +5% for 12 sec. for self

Jolt Wave – Critical Hit Rate +10% for 9 sec. for self
Attack Speed +10% for 5 sec. for self

Surging Tide – All Defense +15 for 10 sec. for self
All Accuracy +5% for 12 sec. for self
Awakening Weapon Skill

Echo Pierce – All Evasion +4% for 10 sec. for self
All Accuracy +4% for 12 sec. for self

Moonlight Strike – Attack Speed +10% for 5 sec. for self
Movement Speed +7% for 10 sec. for self

Allround Spinner – PvP attack +15 for 5 sec. for self
Attack Speed +10% for 5 sec for self
These are the addons I use on my Tamer, the only thing I would suggest changing is getting Flash for Mana Return. I like to use pots a lot, so most of the time you’ll see me buying a lot of pots on stream. The only way to get past the level 5 attack speed is by getting %’s from your addons or buffs, this is why you’ll move and attack very quickly with the addons, buffs, and alchemy stone all activated.
Alternative to get Mana Return.

Flash – Instantly Recover 30 HP per hit
Instantly Recover 30 MP/WP/SP per hit
List of the other Addons available to us
Pre-Awakening


Trample Whiplash Evasive Attack
All Evasion +3% for 10 sec. for self All Accuracy +3% for 12 sec. for self All Evasion +3% for 10 sec. for self
Attack against monsters +20 for 8 sec. for self All Critical Hit Rate +10% for 9 sec. for self All Attack Speed +4% for 5 sec. for self
All Accuracy +3% for 12 sec. for self All Attack Speed +4% for 5 sec. for self All Movement Speed +7% for 10 sec. for self
All Attack Speed +4% for 5 sec for self All Attack Speed -4% for 7 sec. for target All Movement Speed -4% for 7 sec. for target
Instantly Recover 3 HP per hit Instantly Recover 3 HP per hit Inflict 59 Bleeding Damage per 3 sec. for 15 sec. for target
Instantly Recover 3 MP/WP/SP per hit Instantly Recover 3 MP/WP/SP per hit Instantly reduce 14 MP per 3 sec. for 9 sec. for target


Flash Flash: Pole Thrust Void Lightning
PvP Attack +5 for 5 sec. for self All Defense +10 for 10 sec. for self All Defense +15 for 10 sec. for self
All Critical Hit Rate +10% for 9 sec. for self All Critical Hit Rate +10% for 9 sec. for self All Attack Speed -7% for 7 sec. for target
All Evasion +3% for 10 sec. for self All Attack Speed -4% for 7 sec. for target All Casting Speed -7% for 7 sec. for target
All Movement Speed -4% for 7 sec. for target All Casting Speed -4% for 7 sec. for target All Movement Speed -7% for 7 sec. for target
Instantly Recover 30 HP per hit All Movement Speed -4% for 7 sec. for target Instantly Recover 10 HP per hit
Instantly Recover 30 MP/WP/SP per hit 3% chance to Stiffness for target Instantly Recover 10 MP/WP/SP per hit


Scratch Throat Burn Surging Tide
All Defense +10 for 10 sec. for self PvP Attack +5 for 5 sec. for self Attack against monster +25 for 8 sec. for self
All Evasion +3% for 10 sec. for self All Defense +10 for 10 sec. for self PvP attack +10 for 5 sec. for self
All Attack Speed +4% for 5 sec. for self All Critical Hit Rate +10% for 9 sec. for self All Defense +15 for 10 sec. for self
All Movement Speed +4% for 10 sec. for self All Attack Speed +7% for 5 sec. for self All Accuracy +5 % for 12 sec. for self
All Movement Speed -4% for 7 sec. for target All Movement Speed -4% for 7 sec. for target All Critical Hit Rate +20% for 9 sec. for self
Instantly Reduce 10 MP/WP/SP for target Instantly Recover 6 HP per hit All Attack Speed +10% for 5 sec. for self


Upward Claw Lightning of Earth Stretch Kick
PvP attack +10 for 5 sec. for self Attack against monster +25 for 8 sec. for self All Defense +10 for 10 sec. for self
All Defense +15 for 10 sec. for self All Defense +10 for 10 sec. for self All Evasion +4% for 10 sec. for self
All Critical Hit Rate +10% for 9 sec. for self All Critical Hit Rate +10% for 9 sec. for self All Attack Speed +7% for 5 sec. for self
All Attack Speed +10 % for 5 sec. for self All Attack Speed +7% for 5 sec. for self All Movement Speed +4% for 10 sec. for self
All Attack Speed -7% for 7 sec. for target Instantly Recover 6 HP per hit All Attack Speed -4% for 7 sec. for target
All Movement Speed -7% for 7 sec. for target Instantly Recover 6 MP/WP/SP per hit All Movement Speed -4% for 7 sec. for target


Heilang: Roaring Bolt Wave Fearful Trembling
Attack against monster +20 for 8 sec. for self All Defense +10 for 10 sec. for self Attack against monster +30 for 8 sec. for self
PvP Attack +5 for 5 sec. for self All Evasion +4% for 10 sec. for self PvP Attack +15 for 5 sec. for self
All Defense +20 for 10 sec. for self All Accuracy +5% for 12 sec. for self All Critical Hit Rate +20% for 9 sec. for self
All Critical Hit Rate +20% for 9 sec. for self All Attack Speed +7% for 5 sec. for self All Attack Speed +10% for 5 sec. for self
All Attack Speed -10% for 7 sec. for target All Attack Speed -4% for 7 sec. for target All Movement Speed -10% for 7 sec. for target
Inflicts 42 Bleeding Damage per 3 sec. for 15 sec. for target All Movement Speed -4% for 7 sec. for target Inflicts 45 Pain Damage per 3 sec. for 12 sec. for
target
Jolt Wave
Attack against monsters +20 for 8 sec. for self
PvP Attack +5 for 5 sec. for self
All Critical Hit Rate +10% for 9 sec. for self
All Attack Speed +10% for 5 sec. for self
Instantly Recovers 3 HP per hit
Instantly Recovers 3 MP/WP/SP per hit
Awakening

Moonlight Strike Allround Spinner Garuda
All Evasion +4% for 10 sec. for self Attack against monster +30 for 8 sec. for self Attack against monsters +20 for 8 sec. for self
All Accuracy +4% for 12 sec. for self PvP Attack +15 for 5 sec. for self PvP Attack +5 for 5 sec. for self
All Attack Speed +10% for 5 sec. for self All Attack Speed +10% for 5 sec. for self All Attack Speed +7% for 5 sec. for self
All Movement Speed +7% for 10 sec. for self All Attack Speed -7% for 7 sec. for target All Attack Speed -7% for 7 sec. for target
All Movement Speed -7% for 7 sec. for target All Casting Speed -7% for 7 sec. for target All Casting Speed -7% for 7 sec. for target
Instantly Recover 6 HP per hit Instantly Recover 6 HP per hit All Movement Speed -7% for 7 sec. for target


Flow: Ascension Beast Rampage Echo Pierce
All Attack Speed -7% for 7 sec. for target Attack against monster +25 for 8 sec. for self All Defense +10 for 10 sec. for self
All Casting Speed -7% for 7 sec. for target All Defense +20 for 10 sec. for self All Evasion +4% for 12 sec. for self
Inflicts 45 Pain Damage per 3 sec. for 12 sec. for target All Critical Hit Rate +20% for 9 sec. for self All Accuracy +4% for 12 sec. for self
Instantly Reduce 20 MP/WP/SP for target All Attack Speed +10% for 5 sec. for self All Attack Speed +10% for 5 sec. for self
15% chance of Down Smash for target All Attack Speed -10% for 7 sec. for target Instantly Recover 3 HP per hit
15% chance of Air Smash for target Inflicts 54 Pain Damage per 3 sec. for 12 sec. for target Instantly Recover 3 MP/WP/SP per hit


Legendary Beast Dance Cloud Stomping Flow: Full Moon
Attack against monsters +20 for 8 sec. for self All Evasion +5% for 10 sec. for self All Critical Hit Rate +10% for 9 sec. for self
PvP Attack +5 for 5 sec. for self All Movement Speed +10% for 10 sec. for self All Movement Speed -7% for 7 sec. for target
All Critical Hit Rate +20% for 9 sec. for self All Attack Speed -10% for 7 sec. for target Instantly Recover 10 HP per hit
All Attack Speed +7% for 5 sec. for self All Casting Speed -10% for 7 sec. for target Instantly Recover 10 MP/WP/SP per hit
All Attack Speed -4% for 7 sec. for target All Movement Speed -10% for 7 sec. for target Instantly Reduce 5 MP/WP/SP per 3 sec. for 15 sec. for target
All Casting Speed -4% for 7 sec. for target Inflicts 42 Bleeding Damage per 3 sec. for 15 sec. for target 3% chance to Stun for target
Ani-Cancels
Instead of putting Gif’s with each cancel, I’ve included a link on top of each text to RAW footage of the cancel on Youtube.
Pre-Awakening
Void Lightning Cancel (Req. Void Lightning Rank 3+) Bolt/Jolt Cancel I-Frame into LBP**1


(Q) (Shift+LMB) (Shift+LMB) (Spacebar) (Shift+LMB) (WW) (LMB) (Shift+Space)
Void into Trembling Cancel (Requires Void Lightning Rank 3+) Heilang Roaring Cancel Spatial Lightning (Pet CC)**2
Activated through Void lightning


(Q) (Shift+Q) Press S during the animation
**1 – WW is set on a keybind. Go into Settings > Input > Scroll down to the “Assigned Key (WW)” and set a key. You’ll also want to do the same for (SS). (AA) and (DD) are optional, personally I wouldn’t bother.
**2 – Spatial Lightning Stiffness CC is not applicable when it is on CD.
Awakening Cancels
Guard and Leaves Cancel (Cancels practically everything) Entering Awakening from Pre-Awakening


after using LMB+RMB
Entering Awakening with Echo Entering Pre-Awakening From Awakening**


and after
(Hotbar) (Shift+A/D)


**A pvp usage, Leaves / Flow: Gust is NOT necessary for swapping into awakening. Doing bolt wave from awakening stance will put you into pre-awakening stance.
Echo after Awakening Abilities Cloud Stomp During Cloud Ride


Spacebar during
(S+F) (RMB) (LMB while flying)
Pre-awakening to Awakening with LBP** Pre-Awakening to Awakening with LBP+Moonlight


(Hotbar) (Shift+Space) (Hotbar) (Shift+Space) (W+F)


**For the 2nd one, I’ve locked Garuda , because when trying to do Moonlight if you misclick it you’ll end up doing Garuda instead of closing the gap quickly. THAT DOES NOT MEAN YOU CAN’T USE GARUDA! Practice the mobility, and failures will be less likely to happen.
Leaves into Trample Echo to Guard (Pre-awakening to Awakening) Moonlight to LBP cancel


or
(Shift+A/D) (Spacebar) (Hotbar) (Q) (W+F) (Shift+Space)
Trample to LBP (Awakening to Pre-Awakening Swap)


(QuickSlot) (Shift+Space)
PLAYLIST OF ALL THE ANI-CANCELS
Tamer CC’s By category


Stiffness:


Stun:


Float:


Bound:

Knockdown:


Knockback:
Pet contains Stiffness, Bound, Knockback, and Knockdown. The only CC of the pet you have control over is Stiffness, by using Void Lightning, which allows pet to do Heilang’s Spatial Thunderbolt.
Crowd Control (CC)
Stiffness: Cringe Animation Stun: Dizzy Animation Float: Launched up then down

Bound: Direct Contact to Ground Knockdown: Lifted slightly then down Knockback: Pushed Back
Combos
Pre-Awakening then follow up with Grab combo


(S+LMB) (Spacebar) (Shift+LMB) (Spacebar) (Shift+LMB) (E)


(A/D+RMB) (Spacebar) (Shift+LMB) (Spacebar) (Shift+LMB) (E)


Above Combo’s or Above Combo’s (depends on positioning)
(Shift+Q) (Shift+Q) (Shift+Space)


(Shift+F) (Shift+Spacebar) (S+LMB) (Spacebar) (Shift+LMB) (Spacebar) (Shift+LMB) (E)


(Shift+RMB) (Shift+Spacebar) (S+LMB) (Spacebar) (Shift+LMB) (Spacebar) (Shift+LMB) (E)
This is what I can remember, Pre-awakening there wasn’t too much aside from taking advantage of your Pet’s CC
Awakening and Pre-Awakening then follow up with Grab Combo


Gap closers / Repositioning will be ,and


(W+F) (RMB) (Shift+RMB) (E)


(W+F) (Shift+A/D) (F) (Spacebar) (LMB+Spacebar) (E)


(W+F) (Spacebar) (S+LMB) (E)


(W+F) (S+RMB) (Spacebar) (LMB+Spacebar) (E)


(W+F) (Spacebar) (Shift+A/D) (F) (Spacebar) (E)


(W+F) (Spacebar) (A+RMB) (Spacebar) (E)


(S+LMB) (Spacebar) (LMB+RMB) (Shift+S) (W+F) (E)

(S+LMB) (Spacebar) (LMB+RMB) (Shift+S) (W+F) (E)


(W+F) (RMB) (Spacebar) (LMB+Spacebar) (E)


(W+F) (S+RMB) (S+LMB) (Spacebar) (LMB+Spacebar) (E)


(W+F) (A+RMB) (Spacebar) (Shift+S) (S+LMB) (Spacebar) (LMB+Spacebar) (E)


(W+F) (D+RMB) (S+LMB) (Spacebar) (LMB+Spacebar) (E)


(W+F) (S+RMB) (S+LMB) (S+RMB) (S+LMB) (E)


(W+F) (S+LMB) (Spacebar) (E)


(W+F) (LMB) (S+RMB) (S+LMB) (Spacebar) (LMB+Spacebar) (E)


(W+F) (LMB) (RMB) (Spacebar) (LMB+Spacebar) (E)


(W+F) (LMB) (RMB) (Shift+RMB) (E)


(W+F) (LMB) (Spacebar) (E)

(W+F) (LMB) (Spacebar) (LMB+Spacebar) (E)


(W+F) (F) (Shift+RMB) (E)


(Shift+RMB) (Shift+LMB) (Spacebar) (Shift+LMB) (E)


(Shift+RMB) (Spacebar) (LMB+Spacebar) (E)


(W+RMB) (Shift+Space) (Hotbar) (LMB+RMB) (LMB+Spacebar) (E)


(W+RMB) (Shift+Space) (Hotbar) (LMB+RMB) (W+F) (E)


(W+RMB) (Shift+Space) (Hotbar) (LMB+RMB) (W+F) (Spacebar) (E)


(W+RMB) (Shift+Space) (Shift+Q) (Hotbar) (Shift+A/D/S) (W+F) (Spacebar) (E)


(W+RMB) (Shift+Space) (Shift+Q) (Hotbar) (S+RMB) (S+LMB) (Spacebar) (LMB+Spacebar) (E)


(W+RMB) (Shift+Space) (Shift+Q) (Hotbar) (RMB) (Shift+RMB) (E)


(W+RMB) (Shift+Space) (Shift+Q) (Hotbar) (Shift+A/D) (F) (Spacebar) (LMB+Spacebar) (E)

(W+RMB) (Shift+Space) (Shift+Q) (Hotbar) (Shift+A/D) (F) (F) (E)


(S+F) (LMB) (W+F) (Spacebar) (E)


(S+F) (LMB) (Shift+RMB) (E)


(S+F) (LMB) (Shift+LMB) (Spacebar) (Shift+LMB) (E)


(S+F) (RMB) (W+F) (Spacebar) (LMB+Spacebar) (E)


(S+F) (RMB) (LMB) (Shift+A/D) (W+F) (Spacebar) (LMB+Spacebar) (E)


(S+F) (RMB) (LMB) (S+RMB) (S+LMB) (E)


(S+F) (RMB) (LMB) (W+F) (RMB) (E)


(S+F) (RMB) (LMB) (Shift+RMB) (E)
After Grab Pre-Awakening and Awakening


(E) (Shift+LMB) (Spacebar) (Shift+LMB) (Shift+F)


(E) (Shift+LMB) (Spacebar) (Shift+LMB) (LMB+RMB) (W+F) (LMB) (Spacebar)


(E) (Shift+LMB) (LMB+RMB) (Shift+RMB)


(E) (Shift+LMB) (Spacebar) (Shift+LMB) (Shift+RMB)


(E) (Shift+LMB) (Spacebar) (Shift+LMB) (Spacebar) (LMB+RMB)


(E) (Shift+LMB) (Spacebar) (Shift+LMB) (Hotkey**)


***
(E) (Shift+LMB) (Spacebar) (Shift+LMB) (LMB+RMB) (W+F) (Spacebar) (W+RMB/RMB) (Shift+A/D)


(E) (Shift+LMB) (Spacebar) (Shift+LMB) (LMB+RMB) (Shift+A/D/S) (W+F) (Spacebar)


(E) (Shift+LMB) (Spacebar) (Shift+LMB) (LMB+RMB) (Shift+A/D) (S+LMB) (Spacebar)
Instead of having to do Bolt/Jolt x2, you can also do it just once and follow it up with Echo, this is something that’s pretty commonly done. I’m just old fashioned I guess. I’ve seen some people using U pward Claw, but i don’t agree with it.
Ultimate Echo is great in PvE and does a significant amount of damage, it can be used in PvP, however for some it feels kind of clunky. It up to you if you want to use it all the time or turn it off occasionally.
Tips
Learning combo’s for the class is great, but you must also learn when you’re able to continue it and when to cut it short and move away from your target.
Master the mobility of the class, do your best not to roll. Rolling is when both your Leaves Dropping and Flow Gust are on CD. Learn to swap back and forth from awakening to pre-awakening quickly to avoid rolling.
There’s many combo’s but some are preferred over others, because of the damage it deals and it’s easy to do. I personally like a bit of variety with combos. When it comes down to 1vX then I’ll tend to stick to a couple of combos over others, because of vulnerability that some combos can put you in.
Legendary Beast Power, LBP, can be used in Quick Slot/Hotbar to get into attack stance quicker.
PRACTICE, PRACTICE, and PRACTICE.
Resources
Final Thoughts
Tamer’s are still fun to play, I’m sure many of you have seen the first guide and found it helpful. I can only hope that this revision of the guide is just as helpful if not more. Tamer’s are amazing, I love the class, I was told when I first started playing that the class was bad. Honestly, I don’t really care, I was determined to find out how to get better with it. Majority of this information I found out on my own, talked to other Tamers, observed Tamer fights, and fought other Tamer’s. There isn’t really much I need to say about Tamer’s except for the fact that they are fun to play.
I no longer play BDO, was a fun 2 years of playing, time to put it away.
Special Thanks
RomanX, Envision, Gaaratemari2, Activity, Namede, Nox, Kaught, Rain, Endoor, Balance, Trap, Harl, Khonen, Trey, and anyone else I’ve fought.
Thanks to the Community of Tamers that help with information for the guide!
Thanks for being Partner Dummies, Practice Partners, and allowing for the exchange of ideas, couldn’t have made this guide without you.