Hotspot Fishing Guide
Up to 35m/hr!
Lifeskill Requirements:
- Artisan 2+ trading (Desert trade buff)
- Master 1+ Fishing (Vision of the majority of hotspots + Decent durability reduction)
- Skilled 1 Sailing (Breezy Sails, Power Accell) – not 100% needed but travel time difference is night and day.
* Having a higher trade level will increase your bargain bonus and therefore the silver you get from selling your fish.
* Having a higher fishing level will reduce the amount of durability you use per trip which means you save on rods!
Setup/Item Requirements:
- Plenty of inventory slots (130~ minimum but max is preferred)
- Triple Float Rods – The bottleneck
A fully connected node network from epheria -> valencia- Epheria Sailboat/Frigate (Enhanced boat gear is advised for faster travel but not required)
- A fast horse (Unicorn is the best here due to desert travel but not required)
- 5/5 Fishing level (Guild buff, Food, Alch Stone, Silver Embroidered, Pets, Elixirs etc.)
Which island nodes will I need to connect?
By using the route shown in this guide the 4 islands that my fish commonly originate from are: Randis Island, Daton Island, Rameda Island and Padix Island. Note: I have actually had hotspot fish that have originated from Ross Sea but this is extremely rare and not worth the permanent connection.
Tips/Tricks
- Wearing an awakening weapon pearl skin will increase the durability reduction of your rod so make sure to wear one if you have it!
- Use durability reduction pets if you have them (yes, they stack)
- Fish during node war times if possible to get free hops between the node war channels. This will help you find hotspots quickly and get the best chance to get good trade prices when you get to valencia!
- Parking your boat in open areas during the route and zooming the camera into first person perspective will give you a much greater vision range and therefore make it easier to spot hotspots if you are struggling.
- Using a tailored traders costume (Equipment Tailor Coupon (1500 pearls) on a Professionals traders cloths purchasable from any Luxury Vendor) will allow you to have 3 more rolls on the bargain mini-game. Due to the amount of potential bargain games needed for this method having this item is a huge save on energy. Node level and Amity with the traders also add even more rolls!
- Due to the Fever Time event you can actually get relic shards from hotspots! Only possible on the weekends. The rate isn’t amazing but it can add a little more value per trip.
How to obtain Triple Float Rods
Triple Float Rods will be the bottleneck to this method so it’s important to know how to obtain them. The three methods to obtain them are as follows:
Sniping them from the marketplace (1.8m)Pre-ordering them from the marketplace (will significantly reduce your silver/hr, pre-orders are upwards of 15m!)- Purchasing from the central marketplace for 9-10m
- A recurring quest in velia which is available every 51 hours and rewards 3 of them!
* There is also a weekly fishing quest in mediah that you can do but the pre-quest line(s) are extremely long and the quest itself isn’t pretty either so in my opinion it isn’t worth your time and effort. https://bdocodex.com/us/quest/4532/1/
* Occasionally events will give them out so be on the lookout as this will be the best time to stock up / camp the market.
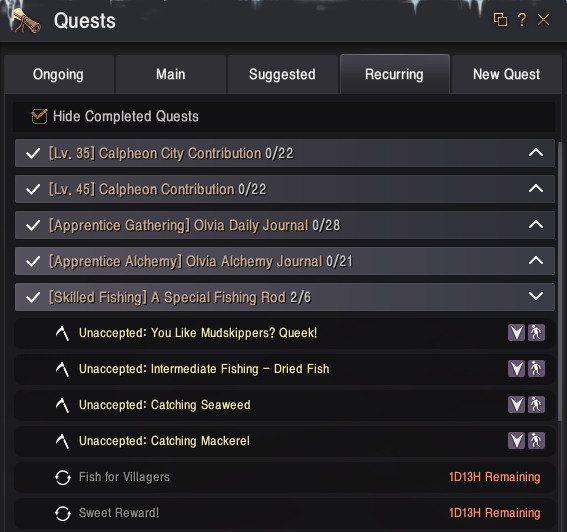
Velia quest for Triple Float Rods
This is a recurring quest that can be found by pressing ‘O’ > Recurring Tab > [Skilled Fishing] A Special Fishing Rod. The quest requires Skilled fishing however I recommend Artisan+ so that you are able to see the hotspots required to make this quest easier. The first 4 quests are one-time only and are quite tedious but shouldn’t take more than a day to complete. You can repeat the Fish for Villagers quest and Sweet Reward! every 51 hours. The quest should take around 30 mins – 1 hr depending on rng and will reward 3 rods!
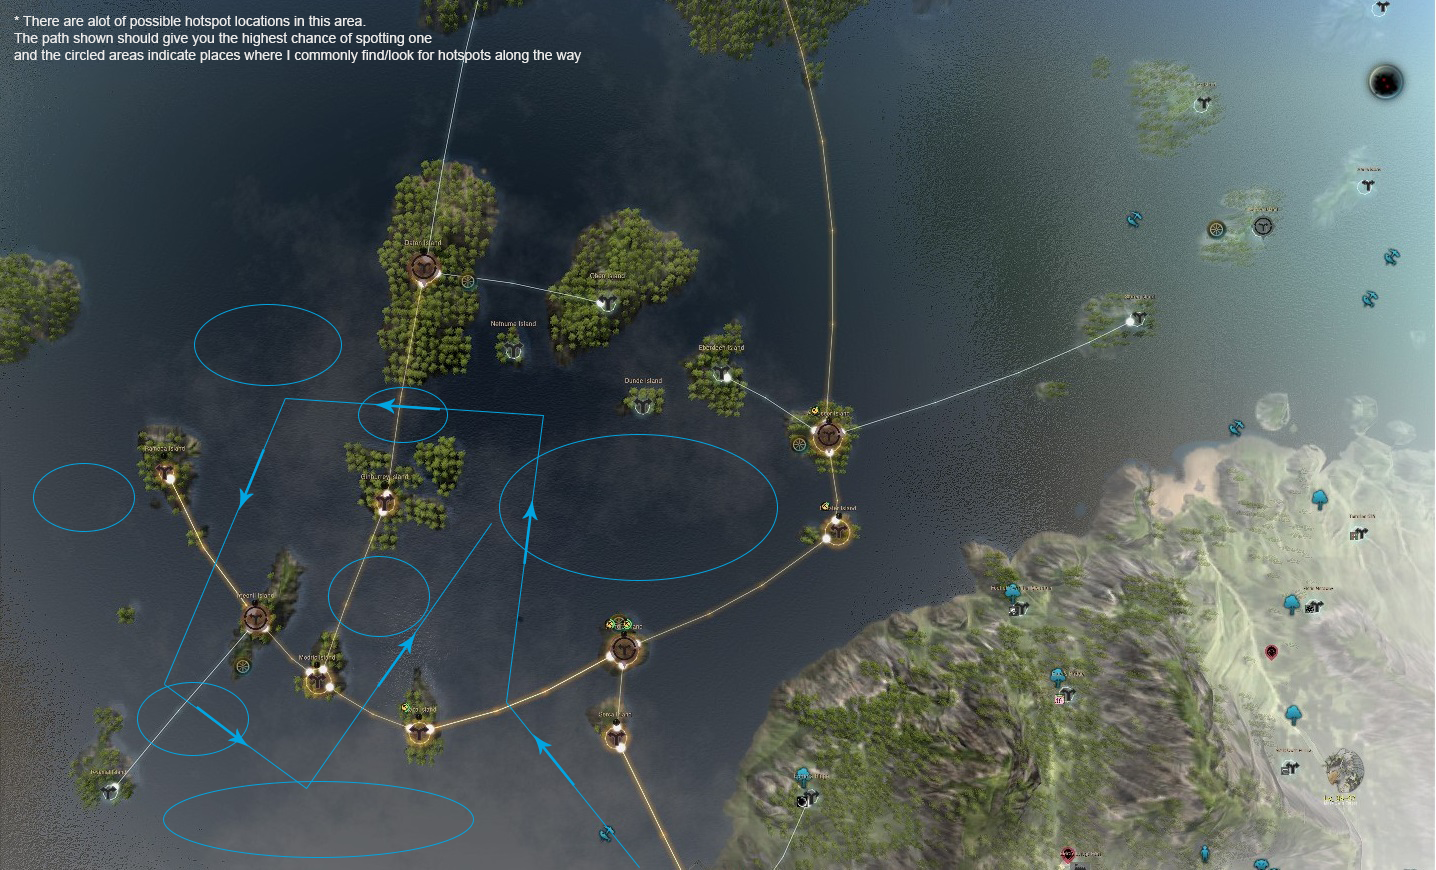
This map should give you the best chance of finding the hotspots needed for the quest “Fish for Villagers”. Please note that expired fish will not work for the quest.
http://www.somethinglovely.net/bdo/ > Check Fishing Hotspots.

A Fishing Trip
Estimate Time: 2.5 hrs – 3 hrs depending on efficiency and a little bit of rng
Estimated silver per trip: 90-130m based on max inventory depending on trade level and a little bit of trade price rng. * For reference I am averaging 120m with M12 trading.
Step 1 – Inventory: Empty out your inventory as much as possible. Don’t forget to bring your rods!, 3 per trip should be fine but expect to use 1.5 – 2.5 depending on your fishing level/durability reduction.
* For reference I am using 1.5-1.7 rods per trip with Guru 1 fishing, awakening weapon skin and 4% reduction from pets.
Step 2 – Start of your trip: Depart from epheria wharf on your Sailboat/Frigate and immediately look for Coelacanth hotspots (pretty much any hotspot up to Randis Island), If you see some then head there first (Don’t forget to do a 10 energy cast for these!) before continuing on the route shown.
Step 3 – Finding hotspots and filling your inventory: From this point onwards you will want to follow the route shown below. This route will give you the best chance of spotting hotspots and reducing your travel time between them (this is very important for efficiency). You should never be picky when it comes to hotspots and should aim to take whatever you can get as quickly as possible. In the rare case that 2 or more hotspots are available near each other then the priority is Coelacanth > Sea Bass/Eyespot Puffer > Porgy > Smokey Chromis (based on fish price). If you have travelled the entire route without seeing a hotspot then it’s time to channel hop.
* A note on using energy for fishing: When holding space to cast you can use energy for a chance one additional fish. This chance is based on the amount of energy you spend (up to 10 per cast) and it stacks with your triple float rod meaning you can catch upto 5 fish in one cast!
If you are not going to be using energy on anything else during the day then I’d suggest doing this while still remaining with enough energy for the desert buff for maximum efficiency. However if you are like me and want to save your energy for other activities then id suggest only using 10 energy casts if you are capped on energy or at a Coelacanth hotspot. If you plan on doing multiple trips during the day then I’d also recommend my method (especially if you don’t run a kama blessing!)
Map of the route that I take:https://imgur.com/CwO2wgO
Step 4 – Moving your fish: Once you have filled your inventory, head back to epheria (check for Coel spots one more time if you want) and hop onto your horse. Actively run your horse for best results (afk if you want, it will just add time) all the way to Sand Grain Bazaar and then across to Pilgrim’s Sanctum: Sharing to grab the trade buff (make sure to have 100 energy!) before finally arriving in Valencia ready to trade in.
* If you do not have a Unicorn then it might be better to hop over to a fast camel/elephant once you reach Sand Grain in-order to be more efficient when crossing the desert.
Step 5: – Selling your fish: Now that you have reached valencia you may be thinking it’s just as simple as going to the trader, bargaining and pressing the sell all button. WRONG. Fish still function on the pre-communism system of trading which means the prices fluctuate from 80-130% based on how many people have traded in that particular fish recently and a number of other factors that I won’t go into in this guide.
There are two traders in valencia, one to the west and one to the north, both of which have independent prices so we will be checking both of them across 2 channels to get the best overall value for the fish.

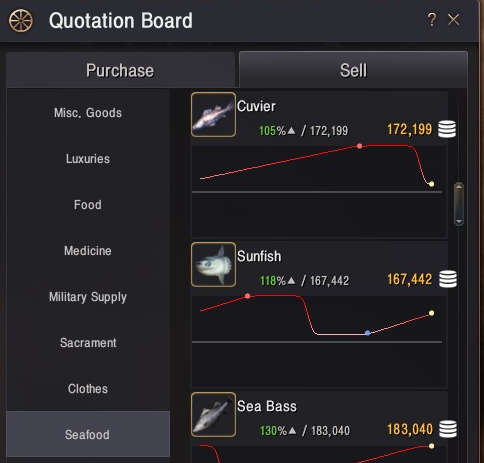
You can actually check the fish prices before you even reach valencia (and get friends/guild members to check) by simply clicking on the wagon wheel icon circled above from the map screen and spending 1-2 energy. This will open up the trader’s buy and sell list. Fish will be listed under Sell > Seafood. Sadly there is currently no search option so finding the fish will just come down to experience.
I recommend selling between the 120-130% mark. So for example if the trader had 130% for Porgy I would sell one-by-one after bargaining until the price reached 119%.
You may end up having to sell slightly below this, especially towards the end of your inventory but that is fine and is better than waiting for another channel hop in my opinion. Selling during node war makes this process significantly easier due to the free hops and It shouldn’t be hard to get very close to 130% for all of your fish!

Best of luck with your fishing adventures!