Table of Contents
Table of Contents
- Foreword
- Introduction
2.1 Introduction to BDO
2.2 Introduction to classes in BDO
2.3 Is Ninja the right class for me?
2.3.1 Ninja or Kunoichi? - Introduction to Ninja
2.1 Pre-awakening skills
2.2 Awakening Skills
2.3 Absolute Skills And Rahm’s Enlightenment
2.3.1 Rabam’s Enlightenment Skills
Set 1
Set 2
2.3.2 Absolute Skills
2.3.3 Absolute Skills Priority List
2.4 Skill Builds
2.5 Skill Add-ons
2.6 Gearing
Gearing Theory
Crystal Build Examples and Explanations
New Player
Road to Boss Gear
Road to TET
Road to Softcap and Beyond
Beyond Softcap Examples
2.6.1 What Offhand should I use? - Strategy and Tactics
3.1 Movement and Weapon Swaps
3.1.1 Gap Closing and Engage
3.1.2 Escaping and Disengaging
3.2 Animation Cancelling
3.3 Combo Chaining and CC System
3.4 Large Scale Gameplay
3.4.1 Cannon Teams
3.4.2 Disruption
3.4.3 Slayer
3.4.4 Scout
3.6 Class Matchups
3.6.1 Warrior
3.6.2 Sorceress
3.6.3 Ranger
3.6.4 Tamer
3.6.5 Valkyrie
3.6.6 Wizard
3.6.7 Witch
3.6.8 Ninja
3.6.9 Kunoichi
3.6.10 Berserker
3.6.11 Dark Knight
3.6.12 Maehwa
3.6.13 Musa
3.6.14 Striker
3.6.15 Mystic
3.6.16 Lahn
3.6.17 Archer
3.7 Miscellaneous Techniques
3.7.1 Countering Block Jump with Smokescreen and Suicide Fall - Other Resources
Glossary of Terms
1. Foreword
This guide exists thanks to the collaborative efforts of the Ninja/Kunoichi Discord community at https://discord.gg/VSuuF5g. If you have any feedback, want to learn more from the people behind the guide, or just want other Ninja and Kunoichi players to talk to, the discord server is the number one place to go to.
If you’re a Kunoichi, you’re more than welcome to read this guide. There will still be some sections relevant to you, particularly in the early Shortsword/Pre-Awakening sections of the guide. That said, Cid#9398 has written an excellent and in-depth guide specifically tailored for Kunoichis over here that you should really check out. In fact, his hard work was what inspired this guide in the first place, and several of the generic sections here were kindly donated by him.
Special thanks to Shadowtrance and Ihm of BDOPlanner.com. They’ve developed and maintained a very useful resource for the community and done so in their free time for years now.
Link to Kuno/Ninja Discord found here. Link to resources for Kuno and Ninja players here.
2. Introduction
2.1 Introduction to BDO
Black Desert Online (BDO) is an action-combat MMORPG. BDO’s PvP is centered around large scale combat, with wars of massive scale (generally 100+ people) as the main focus. There are node wars throughout the week, except for Saturday nights, on which the most competitive guilds will fight over entire regions. Node wars are usually composed of 1-8 guilds each with 20-70 people fighting for the territory. Saturday nights are when sieges, for the region castles, take place. Sieges generally have hundreds of players in them. This is generally considered the end goal of BDO; to be able to effectively compete in this type of PvP.
However, there are other forms of PvP in BDO. For smaller scale PvP, there is Red Battlefield (RBF), an arena mode in which two teams battle and points are gained for each kill (dependent on the amount of points your slaughtered opponent had). There are multiple practice arenas throughout BDO, with one in each major city, and a battle arena that can be teleported to from anywhere in the game. These arenas allow free PvP and respawns, where anyone can fight another player. The Arena of Arsha is where 1v1, 2v2, 3v3, 4v4, and 5v5 fights can take place. This feature is more geared towards player-run tournaments.
Besides PvP, there is a wide variety of activities to do in BDO, including: life skilling (fishing, cooking, trading, etc.), exploring the large map, farming, grinding mobs, breeding horses, sailing across the seas etc. You will likely never run out of things to do in BDO, even if you don’t enjoy PvP.
That said, BDO is a PvP oriented game and you will most likely have to fight another player at some point in your BDO career, whether it’s over a lucrative grind spot in the open world or in a guild vs guild declaration of open war. Whether you relish the fight or avoid it as much as you can, there is great benefit in being a confident, capable combatant with your class, and it’s highly encouraged to read as much external material (e.g. guides like this one) as you can to stay one step ahead of your opponents.
2.2 Introduction to classes in BDO
Each class tends to cover at least one specific role in BDO PvP. Some classes excel at large scale PvP while others excel at small skirmishes and duels. Some classes are very good in all types of PvP, but each class has weaknesses and no one class is unbeatable. However, some classes are certainly weaker than others in terms of damage, mobility, utility, etc. Regardless, you should play the class that you think seems the most fun, whether that be from experience, or watching someone else’s gameplay. BDO is a game that will last you a long, long time if you’re serious about it, so you should really pick the class you think you’ll enjoy most rather than the current overpowered classes – after all, the tides of balance are ever changing.
2.3 Is Ninja the right class for me?
The Ninja is a melee skirmisher that excels in small scale situations but does somewhat poorly in messy large scale situations. Ninja wields a Shortsword (same mainhand weapon as a Tamer or Kunoichi) as its Pre-awakening or Mainhand weapon with an offhand Shuriken, and wields the Sura Katana, a set of 6 katanas, as its Awakening weapon, which is unlocked after a level 56 story quest.
Ninja is a high APM class that, depending on your personal playstyle, can viably be built to be a burst DPS or evasive tank build, or a hybrid of both. With Kunoichi, Ninja is one of the only classes to have the ability to go invisible for an extended period of time.
Ninjas need levels, gear (to a certain extent), and skill points. The more skill points you have, the more efficient you are, as Ninjas are one of the few classes that utilize almost everything in their kit.
Ninja is a slightly above average PvE class. We need effort, AP and skill points to be able to be effective, but we’re by no means a slow or bad grinder. That said, you will be outfarmed by a class like Musa, Sorceress or Mystic by a significant margin.
Ninja has been through many ups and downs in terms of balance, being overpowered for the few months at its launch, then underpowered as Awakenings rolled out for over 2 years, and then overpowered again after the massive overhauls of combat systems in April 2018 onwards, and then earning itself some big nerfs in January 2019.
2.3.1 Ninja or Kunoichi?
This is a very common question asked by new players, Ninja and Kunoichi do share many similarities in their Pre-awakenings. However, they take very different gameplay styles after unlocking Awakening weapons. Kunoichi provides more defensive capabilities (but that doesn’t stop you from being aggressive, just most of their kit is designed around defensive/bait gameplay), while Ninja provides more burst and generally more protection in the form of iframes/frontal guards. A summary comparison is below:
| Ninja | Kunoichi |
| Male | Female |
| 2 grabs | 1 grab |
| More burst | Less burst |
| Good overall sustain | Average HP sustain in combat, bad HP sustain out of combat, good WP sustain |
| More protection | Less protection |
| Good early/mid game PVE, average end game PVE (Requires effort to be effective) | Average early/mid game PVE, bad end game PVE (Requires effort to be effective) |
| More protected mobility options | Less protected mobility options |
| More engage potential | Less engage potential |
2. Introduction to Ninja
2.1 Pre-awakening skills
This section of the guide will go through each pre-awakened skill. It will go through the pros/cons of the skill, whether it is useful in PvE/PvP (or both), how to use it (hotkey/key input), and any other miscellaneous things about the skill. Do not consider this section as a replacement for in-game tooltips – you are expected to read them thoroughly yourself.
- Wind Slash (PVE, key input)
- This is the basic auto attack for Ninja left mouse button (LMB). It will be useful for super early-game PvE since it restores WP. It will increase in rank on its own as you level up without consuming any SP.
- Flow: Sky Stepping (PVP/PVE, Spacebar midair)
- This is the double jump for Ninja. It can be useful when trying to reach high places. Uses might include: scaling vertical objects to place cannons, escaping from enemies, etc.
- Ninjutsu: Block Jump (PVP, hotkey, key input)
- This skill is very important in PvP. On use, your character will disappear for about 2 seconds, during which you can press any directional key to perform an action towards your current target. Each direction casts a different animation. It provides +6 AP upon use and provides a long invincibility frame (iframe) while in use and stiffens the enemy if you land near them. This can be useful to avoid damage and/or to engage/disengage in PvP. The 2 main animations you’ll probably use most are the W cast to get behind an enemy or the S cast to do a small dash backwards for a quick escape, or you can use a WW Bind (Settings > Interface > Evasion WW > Set that to a key you like using) to do an extra dash after you appear behind whoever you target.
Example of Block Jump grab initiation.

Example of Block Jump Shadow Stomp initiation.
Example of Block Jump stiffen.

Example of a WW Bind after Block Jump
- Fatal Wind (N/A)
- Only applies to basic attack. Not extremely useful. If you don’t have points to spare, don’t level this.
- Target Chase (PVE/PVP, key input)
- An active buff that allows you to sprint for no stamina cost with increased movement speed. At max level, it has 100% uptime other than the slight delay of the cast animation. Using the buff from Hotkey will always put you into Shortsword but it will continue to be active in Awakening if you swap after using it. Using S+Q in Awakening will not swap you. Useful as a quality of life skill for PvE/getting around towns, and occasionally useful as a PvP long distance movement tool and conserving stamina.
- Ghost Step (PVE/PVP, key input)
- Extremely important skill all around. Short IFrame during the portion of the step in which you are invisible; SA after you reappear towards the end of the animation. Important to move, reposition, and avoid damage. Ghost Step can cancel out of almost any skill animation. This is an INCREDIBLY important technique to learn, especially when you get your Awakening and its relatively slower skill casts.
Ghost step used to iframe a golem stun.
- Ninja Step (PVP/PVE, key input)
- A quick, medium distance dash that puts you in a short iframe and passes through enemies. Usable with both Shortsword and Sura Katana, this is one of our biggest sources of mobility.

- Ninja Evasion (PVP, key input)
- Useful in situations where you do not travel far enough with ghost step to get out of harm’s way. DOES NOT PROVIDE AN I FRAME OR SUPER ARMOR EXCEPT FOR PART WHEN YOU ARE IN THE AIR. This move can get you killed as you can get cc’d while using it. However, you can control whether or not you use it by letting go of the direction key before you use it after ghost stepping. This ability also heavily drains your stamina, keep this in mind if you choose to use it.
- An example of where Ninja Evasion might be useful: Suppose you are in a fight and someone is in front of you pelting you with cc. you can attempt to ghost step backwards and turn your camera to Ninja Step but you may get cc’d. If you ghost step into ninja evasion and then turn to Ninja Step, you may have enough distance between you and the opponent to not get cc’d and to make a get away. It is a tool make you travel more distance quickly.
Ghost step without ninja evasion (let go of the direction key (s) after the ghost step).

Ghost Step with the first part of ninja evasion (hold the direction key for a moment after Ghost Step).
Ghost Step with the full animation of Ninja Evasion (hold the direction key for the full duration).
- Fatal Blow (PVE/PVP, key input, air attack)
- Provides good filler damage when other important DPS skills are on cooldown. Can be used while in cooldown (5 seconds) but stiffens the target if used while not on cooldown. Its area of effect, however, is rather small, so it’s usually not optimal in group scenarios unless you’re picking off a specific enemy (PvE or PvP). It has a very fast animation that makes it a good way to squeeze in an extra attack in your combos.
- Flow: Fatal Blow Combo (PVE, key input)
- Provides a good second hit for Fatal Blow.
- Brace (PVE, key input)
- Fast cancel skill that provides 300 WP and 200 HP on use. Brace is unprotected, so there will be risk when used in PvP.
- Crescent Slash (PVE/PVP)
- May interfere with combos and does not provide much benefit. Cancels into Fox Claw very quickly, that way it’s very useful for high tier PVE grinding. Ghost Step chains into a faster animation of Crescent Slash when used in succession.
- Throwing Kick (Key input)
- Throwing kick may be a quick option when your other float skills are currently on cooldown. Throwing Kick chains into a faster animation of Fox Claw when used in succession.
- Floor Sweeping (PVP, key input)
- Provides a +10% down attack damage buff for 10 seconds. Can be used to animation cancel Shadow Stomp. It is good to use floor sweeping to cancel Shadow Stomp while using it to combo for the down attack buff. Be careful when using it in a combo, as the skill can mess up your cc chain by applying a bound.
- Flow: Kick Down
- Kick down can be activated from left/right Ninja evasion by pressing F, can be nice in some situations for a quick cc, not advisable to have ninja evasion unlocked if you don’t know how to control it as it can mess with your movement.
- Shuriken: Moving Throw
- Same as Evasive Throw. Allows you to throw stars while moving. Not very useful other then pulling mobs in some cases.
- Shuriken: Malice (PVE/PVP, key input)
- Your best shuriken skill. Stiffens your opponent, has decent damage (very decent once upgraded to Absolute ), has bonus critical chance and can cancel out of most skills (see 3.2). Ranged attack with a small AoE on impact.
- Shuriken: Flight
- Floats in a radial AoE. Unprotected and risky in most pvp scenarios. Can be used to cancel into Shadow Stomp, however shadow stomp will not gain air attack bonuses (Video proving it, made by QCP)
- Floats in a radial AoE. Unprotected and risky in most pvp scenarios. Can be used to cancel into Shadow Stomp, however shadow stomp will not gain air attack bonuses (Video proving it, made by QCP)
- Shining Blade (Passive)
- Attack speed is very important on Ninja; this passive is important and given to you for free.
- Attack speed is very important on Ninja; this passive is important and given to you for free.
- Shadow Slash (PVE/PVP, key input)
- Provides WP recovery on hit; good for PvE. Provides a +5% attack speed buff for 10 seconds when used, even if it does not damage anything. Very important to keep this attack speed buff up during PvP, but be careful as you can get cc’d during Shadow Slash. Be wary of your stamina as this skill can burn through it very fast.
- Smokescreen (PVP, key input)
- Smokescreen is one of the most important PvP skills in Ninja’s pre-awakened kit. It provides an evasion buff to help mitigate attacks, and at max rank, the buff has a down time of 4 seconds when used on cooldown. Smokescreen provides super armor during the skill animation, and if you cancel it fast with another, the super armor will linger a little bit into the animation of the second skill. Smokescreen stuns targets on good hits, and can be used through a hotkey, even while in the awakened stance. If used through the hotkey, its super armor animation has a longer duration. Smokescreen may cancel many of the pre awakened skills by tapping spacebar with example skills such as Blade Spin, Shuriken Throw, Shadow Slash, and Ninja Step.
Smokescreen using space after a Shadow Slash.

Smokescreen using space after Ankle Cutter.
- Ninjutsu: Concealment (PVP, key input)
- Important for mobility. Chains very well from Smokescreen using space after Smokescreen. DOES NOT HAVE SUPER ARMOR OR I FRAMES; YOU ARE VULNERABLE AND TAKING ANY HITS WILL REMOVE YOU FROM STEALTH. Used to go invisible to retreat or engage. This pre awakened Concealment is generally better suited for mobility, especially once better options like Oni Shadow become available to you. This is also going to be one of your main tools in positioning in large scale PvP and burst movement anywhere. Be cautious if you’re about to engage from stealth. Look at your stamina carefully to make sure it is high enough to be able to escape.
Example of conceal used after Smokescreen.
- Heart Aiming (PVP, key input)
- Can be used from stealth or most commonly from shadow slash (by simply holding LMB+RMB to chain together Heart Aiming and Fatal Blow), stuns target if landed. Its biggest issue is its massive cooldown, making it difficult to use reliably in your combos.
- Suicide Fall (PVP, key input)
- Incredibly important skill used to catch people in PvP. If landed, pressing Spacebar as your character is falling back down will prolong the animation, which may allow for your cooldowns to come up. Can be chained with Ghost Step and Ghost Greeting to get out of a bad situation. Grab (E) will cc anyone near the target when you hit the ground. You can get cc’d at any point during the animation so avoid using it in group PvP.
Suicide Fall chained with ghost step and ghost greeting.
- Ankle Cutter (PVP/PVE, key input)
- Provides a very important -20 DP debuff on enemies. Easy to use in chain combos due to its animation speed, and has a powerful set of skill addons available to it. However, keep in mind that this ability applies bound when NOT on cooldown, which will use up one of your 2 cc count. When used on or off cooldown, the -20 DP debuff will still apply.
- Ghost Greeting (PVP, key input)
- Very good gap closer and mobility. Provides very short iframe only during the dash forwards if used while off cooldown. Can be used during cooldown (9 seconds) but the lunge will only apply while off cd. Stiffness will also apply if you hit an enemy with this skill while it is off of cd.
- Fox Claw (PVP/PVE, key input)
- Good DPS filler skill along with Fatal Blow. Provides stiffness on good hit off of cd and heals for 50hp per good hit, a decent combat heal in PvE. Has Air Attack and Down Attack so it’s a good option to use after Float/Bound.
- Good DPS filler skill along with Fatal Blow. Provides stiffness on good hit off of cd and heals for 50hp per good hit, a decent combat heal in PvE. Has Air Attack and Down Attack so it’s a good option to use after Float/Bound.
- Shadow Stomp (PVP/PVE, key input)
- Very important skill, it is best utilized for movement, or a float. Shadow stomp can be animation cancelled with Shuriken Throw, Floor Sweeping, Shuriken: Flight and Smokescreen. Be careful when using stomp as you can easily get cced due to the lack of protection on it.
- Desync, high attack speed modifiers and terrain can cause you to not move the length of the normal stomp animation. The distance will still be covered and enemies in front of you can be floated, but you’ll essentially be stationary while you do the animation.
- Ninjutsu: Shadow Clone (PVP/PVE, key input or hotkey)
- Flow from Shadow Stomp. Air Smash and Down Smash. Provides 50 HP recovery per good hit at absolute rank. Can be used with key input (space) directly after shadow stomp, or through a hotkey for up to 6 seconds after shadow stomp or ground thrust.
Shadow clone used with space after Shadow Stomp.
- Beheading the Dead (PVP/PVE, key input)
- Good for clearing large packs of mobs before awakening. Beheading has a short IFrame when you disappear into the air. Stuns multiple targets on the initial wind-up. Hitting enemies with the damage portion will inflict a -15 DP debuff. Useful wide AoE stun for catching targets. Its long animation can be cancelled by Malice, Ghost Step or Smokescreen (Please note that if you cancel the damage part of beheading but not the stun part, your addons won’t proc); using Malice during the end of the animation can add some quick extra damage, as well as chain a stiffen after the stun. Cancelling Beheading makes it safer and the stun still applies even if cancelled. 200% Pre-awakened Black Spirit Rage Skill.
Beheading Cancel with Malice
- Ninjutsu: Shackles (PVP, hotkey)
- Provides a -50% movement speed slow on the enemy at absolute rank. However, it does not have any defensive traits and is risky to use unless the opponent is on the ground. It could be useful as a finisher against super mobile opponents you can’t one combo, such as Maehwa, Musa or Dark Knight because of the minus movement speed debuff on it. As with most Shortsword skills, the ending animation of this skill can be cancelled with Malice or Ghost Step.
- Ground Thrust (N/A)
- It provides little damage, has a long animation, and has no defensive traits. The best use out of this skill is when jumping off high places, and your character won’t get stuck in the falling animation upon landing. Shadow clone may be used after ground thrust like shadow stomp.
- If you do decide to keep it unlocked, it can be useful if you jump off a ledge : Hold S + F after double jump > Hold space to instantly stealth when hitting the ground. Do keep in mind that you’re only gonna have 15 sec of stealth when used after ground thrust.
Ground Thrust used to cancel smoke screen into conceal.
- Ninjutsu: Blade Spin (PVP/PVE, hotkey)
- A important skill that can down smash already downed opponents. It is one of the only ways to swap from Sura Katana to Shortsword without a manual C swap. As with most Shortsword skills, this skill can be cancelled with Malice, Ghost Step and smokescreen (ONLY CANCEL IF YOU DON’T NEED THE SUPER ARMOUR). This skill has super armor for its duration. It has Air Attack and Down Attack so consider using this after a Float/Bound for more damage.
- BEWARE that this skill is our Black Spirit Rage 100% skill in Shortsword. Using it out of Sura Katana will still trigger the 100% animation, which is an incredibly long and useless attack and will usually get you killed. The only way to cancel this is to use Emergency Escape. It is HIGHLY recommended to use the Black Spirit Rage lock feature (Alt+B) to prevent this from happening.

Blade Spin used to swap from Sura Katana to Shortsword
- Ninjutsu: Black Moonlight (PVP/PVE, hotkey)
- Decent damage filler with an AOE stiff, provides a very short iframe as your feet leaves the ground. The animation can be cancelled with ghost step if you accidentally use this at an inopportune time, although the damage doesn’t go through if the animation is cancelled. Most commonly used as an engage from stealth as it has little protection.

Black Moonlight cancelled with Ghost Step.
- Boss Slaughter (PvP, key input, recommended to be on a quickslot)
- A Ninja-unique single target gap closer with good range and speed at max rank. It’s prone to being blocked or resisted by super armor so you’ll usually want to grab immediately after it. It has 2 distinct animations depending on whether you hold W or S while using it (it will default to the S animation if you don’t). The W animation (uppercut) is noticeably faster so use that over the S animation. It is recommended to lock the skill, then use it on a quickslot due to most people finding the default binding weird/clunky to use.

Note that the range of Boss Slaughter III is slightly further than the target cursor
- Rage Absorption (PVP/PVE, key input)
- This buff gives a buff of +30 all AP and a 25% Attack/Casting Speed, For these buffs, try to absorb the 100% buff as often as possible.
2.2 Awakening Skills
- Transitional Stance (PVP)
- Transitional stance (RMB) gives you a frontal guard. This skill is a solid replacement for the regular block (Q) as transitional stance doesn’t lock you in place. Extremely useful to pull monsters at Gyfin or Hystria. You won’t get pushed back by the monsters hitting your block.

- Silent Charge (PVP/PVE)
- Your alternative mobility skill to ghost step. Silent charge can only be used in transitional stance. You can only move forwards and backwards with silent charge. This skill is an iframe and ignores collision, making it a good way to get behind opponents.
- Flow: Block Jump (PVP, hotkey, key input)
- This skill allows use of Ninjutsu: Block Jump with Sura Katana. It provides +12 AP for 10 seconds upon use and provides a long invincibility frame (iframe) while in use and stiffens the enemy if you land near them. Not getting this Flow will switch you back to Shortsword when you use Block Jump and only give 6 AP.
- Murderous Intent (PVP/PVE)
- Murderous intent is skill used to engage with. It stiffens the opponent. If Murderous Intent is allocated to a hotkey then the regular stance version will always be used. Silent Charge is a great skill to use to gap close before using murderous intent. Use it carefully to engage and try to aim for the back of your opponent.
Murderous intent used with a hotkey.
- Flash Bondage (PVP)
- Flash Bondage is a second grab usable only with the Sura Katana. It has a much longer cooldown than Suicide Fall (18s vs 10s), there is a iframe during the animation while the character is invisible, however if the grab gets resisted there is no protection.

Showcase of Flash Bondage’s range
- Drastic Measure (100%/PVP/PVE)
- Drastic measure is your 100% Black Spirit Rage skill for your awakening. The skill has super armor throughout during the 100% version. However, the regular version of the skill only has super armor during its charge up. You can use Silent Charge once before you cast the skill. Using Drastic Measure will automatically put you into Transitional Stance. If Black Spirit Rage is 100% or greater, if you use Murderous Intent into Drastic Measure, it will not use the 100% version.
Drastic measure with silent charge. Keep holding Shift+RMB while you tap a direction to use silent charge.
Murderous intent into Drastic Measure
- Serpent’s Ascension (PVP/PVE)
- Serpent is your strongest skill because it has 100% crit and air attack as a modifier. You can curve the attack by moving your frontal direction during the start of the animation to direct the damage in a cone instead of a straight line, sacrificing distance for AoE. Unfortunately, this skill has no super armor nor frontal guard. When in transitioned stance this ability will cast an additional, quick wave, which floats and does more damage at the cost of longer cast time (in which you are unprotected).
- Katana Shower (PVP/PVE)
- Katana shower is a very reliable skill with super armor. In fact, this could be our most reliable super armor other than Blade Spin. Only use this skill at the end of combo or if you’re really in danger (for the on-call SA, but be careful to not be grabbed if you use it). This ability does not have any form of cc, however, the air attack and down attack on it means that it’s damage is very solid against floated enemies or enemies who are on the ground. It also heals for 40 HP per good hit and reduces enemies DP by 12 for 10 seconds.
- You can press LMB + Shift + F to activate the 50% black spirit rage ability, this will change the animation along with increasing critical hit rate by 10%, increasing the AoE, adding one extra slash and making your target float on good hits, even in PvP. This makes it our only protected CC in PvP other than Smokescreen, which does no damage.
- Seamless (PVP/PVE)
- Seamless is a filler skill that can be used after most skills by holding spacebar. This skill recovers 100 HP per animation phase, up to 3 times in total. Seamless can be chained with Sudden Decapitation or Corrupt sword dance by holding RMB or LMB. Note that there is a bound CC on this ability and it also has no protection.
- Vacuum Slash (PVP/PVE)
- Vacuum Slash is a lackluster skill. The only good utility it has is the first 3 hits having a frontal guard effect. You may cancel Vacuum Slash with Ghost Step to stop the 4th, vulnerable hit. It’s hard to find a good use for it other then PVE filler damage.
- Sudden Decapitation (PVP/PVE)
- Sudden Decapitation is a filler that dishes out good damage and recovers WP. One important thing to note is that it does more damage when used after Seamless. A good way to use this skill is to use one swing of seamless into Sudden Decap (Space>RMB).
- You can press LMB + RMB + S to activate the 10% black spirit rage ability, this will change the animation along with the aoe and add one more hit (Note: You can activate Flow: Execution after this.) It’s not recommended to use this rage version over the original with Seamless.
One swing of Seamless (space)> Sudden Decapitation (RMB). The final skill shown in this GIF is Flow: Execution which activates by holding RMB after sudden decap.
- Flow:Execution (PVE)
- This skill isn’t that good and is only really used for filler damage. Using it is optional. While it has good damage potential, the fact that it’s at the end of Sudden Decapitation causes it to simply be too slow to use outside of PvE. This skill is also Ninja’s only Knockdown, which is a far stronger cc than Bound, but again, it’s too slow to use reliably in combos. You can “quick” cast Flow: Execution with jump C-Swap from Mainhand to Awakening the hold RMB, or jump forward holding LMB in Awakening then RMB when you land.

Using aerial C swap to skip Sudden Decapitation before Flow: Execution
- Corrupt Sword Dance (PVE)
- A weaker but faster version of Sudden Decapitation. It applies a bleed debuff that causes 50 HP damage per 3 seconds for 9 seconds. Can be input the same way as Sudden Decapitation after Seamless by pressing LMB.

- Sura Chaos Spree (PVP/PVE)
- This skill offers a decent PVE heal. Its damage is mediocre but it has full frontal block during its animation. Unfortunately, this skill locks you in place with no skills that can cancel the animation, rendering you a sitting duck. You can turn the camera while using Sura Chaos Spree to turn the frontal block or use mouse movement. You cannot cancel out with Ghost Step. Use it as an easy heal for potion savings in PvE or to heal off Node War buildings.
- You can press LMB + E + S to activate the 25% black spirit rage ability, this will change the animation along with increasing dp by 10, decreasing the target’s dp by 15, adding five more hits and a bit more damage. The extra hits will still heal, so use it situationally for the extra HP.

- Flow: Mach Explosion
- This is it. You’re level 60. This is your big, flashy Flow that you’ve been waiting for. Unfortunately, it’s a steaming pile of crap in its current state. It has no super armor or frontal guard, coming out of a long Drastic Measure animation which also has no super armor or frontal guard, which makes these 2 skills leave you EXTREMELY exposed for too long a time. Its damage is inferior to a clean Serpent Ascension hit and its risks far outweigh its rewards. That said, it’s a nice PvE nuke and heal (400 HP if all hits land), though be careful since even mobs can cc you during it. Killing a Ninja with this in a 1v1 is an expression of your dominance over them and more of a burn than a Shackles kill.
Mach Explosion in all its useless majesty.
2.3 Absolute Skills And Rahm’s Enlightenment
Rahm’s (or Rabam’s) Enlightenment, also known as Skill Fusion, is a system that allows players above level 56 to combine a primary and secondary pre awakening skill to give you a new, separate skill that has its own cooldown and skill slot. Each primary skill that has this system available will have 2 choices for secondary skills, of which you can only choose 1 at a time.
Absolute (or JIN) skills are an extra rank for several core pre awakening skills that drastically increase their damage (and in some cases utility) to make them on par with the Awakened skills. For most classes, this opens up a lot more potentially-viable strategies. For Ninja, we already use the flexibility of our mainhand, so this just makes our core gameplay even deadlier. For an initial look at the Ninja and Kunoichi Absolute skills at KR launch, you can check out this article by Inven Global.
2.3.1 Rabam’s Enlightenment Skills
Set 1
- Ninjutsu: Oni Shadow

- Smokescreen V + Concealment
- Level 56 Required
- Damage will reveal you while concealed
- Ghost Step can be used as an invisible dash during this skill only in pre awakening
- Ghost Step is also used to put you back into invisibility while the skill duration is up.
- Any Skills used during the skill will render you visible for the attack animation
- Magic DP +15 for 10 sec. upon using skill
- All Evasion Rate +18% for 10 sec. upon using skill
- 15 second duration for invisibility
- Cooldown 30 Seconds
- Shuriken: Moon Dive

- Smokescreen V + Shuriken: Flight III
- Level 56 Required
- Forward Push Hit Damage 611% X 7 + Extra Hit Damage 220% X 3
- Critical Hit Rate +30%
- Magic DP +15 for 10 sec. upon using skill
- All Evasion Rate +18% for 10 sec. upon using skill
- Cooldown 30 Seconds
Set 2
- Illusion of Restraint

- Block Jump + Shackles IV
- Forward Push Hit Damage 1428% X 6
- Critical Hit Rate +100%
- Movement Speed -30% for 10 sec on good hits
- Frontal Guard while using skill
- Blocking an attack with the Frontal Guard will push your character backwards. Similar to Ghost Step, you will have iframe during the movement.
- Down Attack
- Cooldown 24 Seconds
- Ninjutsu: Decapitation
- Block Jump + Beheading III
- Forward Push Hit Damage 412% X 3 + Extra Hit Damage 1236% X 4
- Basic Attack Critical Hit Rate +100%
- Invincible on warp
- Super Armor on attack
- Cooldown 20 Seconds
Most players will take Ninjutsu: Oni Shadow and Illusion of Restraint. Oni Shadow is a powerful stealth skill that allows you to reposition and reset a fight very quickly or set up a sneak attack without being slowed down as much as Concealment and use the same stamina. Illusion of Restraint is a protected nuke that deals a LOT of damage on a downed enemy and applies a heavy slow debuff. It’s AoE is very wide and it’s an ideal finisher.
2.3.2 Absolute Skills
- Absolute: Wind Slash

- The Absolute skill upgrade after Wind Slash X, this raises the damage from 229% to 495%. The amount of targets the skill is able to hit increases from 5 to 10. There is also a slight increase in accuracy.
- This upgrade is not needed for anything other than giving boss slaughter more damage.
- Absolute: Fatal Blow

- The Absolute skill upgrade after Fatal Blow V, this raises the damage from 646 x 2 (1252%) to 1542 x 2 (3184%). The max amount of targets also increases from 5 to 10. There is a visible blue aura added to the stabbing animation.
- There is a noticeable increase in damage so it is 100% worth to take it.
- Absolute: Brace

- The Absolute skill upgrade after Brace III, this increases the amount of wp gained to 300wp.
- The increase from 200wp to 300wp definitely helps when you grind without pots. But with no reduction to cooldown, it is still a skill to take if you can afford the points.
- Absolute: Crescent Slash

- The Absolute skill upgrade after Crescent Slash III, this increases the damage from 368% x 2 (736%) to 825% x 2 (1650%). The cooldown is reduced by 1 seconds, falling from 8 seconds to 7 seconds. There is also an increase in max targets from 5 to 10.
- There are not many scenarios to use this skill (apart from high tier grinding spots like Hystria/Aakman/Gyfin etc). The absolute damage compared to its pre-absolute version (Crescent Slash III) is marginal. This skill should only considering if you are trying to min-max the cooldown management of skills.
- Absolute: Throwing Kick

- The Absolute skill upgrade after Throwing Kick II. There is an increase of damage from 470% to 1080%. The accuracy is raised from 40% to 45%. WP regen is increased from 30wp to 40wp.
- It’s Throwing Kick. What did you expect from its Absolute version?
- Absolute: Floor Sweep

- The Absolute skill upgrade after Floor Sweep II, damage is increased from 489% to 1120%. The accuracy of the skill is increased from 45% to 50%.
- The skill’s absolute version should only be considered if you use it. It’s supposed three times increase shown in the tooltip does not translate well in actual combos. The increase in accuracy from 45% to 50% is not as much an impact as the jump from rank 1 to rank 2. Only take this skill if you have the points and want to maximize the damage output of your combos.
- Absolute: Kunai Throw

- The Absolute skill upgrade after Kunai Throw III. The increase in damage goes from 377% to 662%. The accuracy is increased from 9% to 11%.
- As a Ninja, you don’t need this.
- Absolute: Shuriken Throw

- The Absolute skill upgrade after Shuriken Throw III. The damage increased from 287% x 2 (574%) to 411% x 2 (822%). The accuracy increased by 2%, from 9% to 11%.
- Ninjas should only maximize the Shuriken Throw skill after they’ve taken all other skills.
- Absolute: Shuriken Malice

- The Absolute skill upgrade after Shuriken: Malice III. The damage is increased from 551% x 3 (1653%) to 1340% x 3 (4020%). The Range of the skill is also increased.
- Malice is a high priority pre-awakening skill that veteran ninja players use mainly for range CC, canceling other skills, and finishing off opponents. The exceptional damage increase is very visible between the two skills. The Attack range is a minor bonus, but a bonus nonetheless. Absolute Malice should be one of the first five skills a ninja chooses to upgrade.
- Absolute: Shuriken Flight

- The Absolute skill upgrade after Shuriken: Flight III. The damage is increased from 180% x 3 + 498% x 4 (2532%) to 541% x 3 + 1050% x 4 (5823%). The maximum amount of targets is increased from 7 to 10.
- The nature of Shuriken: Flight is situational at best. While the damage is an exceptional change, ninjas should only consider taking this skill if they have the skill points to afford it. Otherwise get your core skills first.
- Absolute: Shadow Slash

- The Absolute skill upgrade after Shadow Slash V. Increasing from 365% to 824%. The maximum amount of targets is increased from 7 to 10. The attack range of the swing is increased. The WP regen is increased from 15 WP per hit to 20 WP per hit.
- Most Ninjas use this skill for two things, the attack speed bonus and side-strafing when out of movement options. Upgrading the skill should be saved until the skill tree is maxed out.
- Absolute: Heart Aiming

- The Absolute skill upgrade after Heart Aiming III. The damage is increased from 1589% x 2 (3178%) to 1765% x 3 (5295%). The cooldown is reduced from 30 seconds to 27 seconds.
- Heart Aiming’s damage increase is there. The skill still suffers from a ridiculously long cooldown and its small range is still a problem for most ninjas. If you decide to take this skill, take the time to learn how to use it. When you are able to, it’s a considerable filler skill.
- Absolute: Suicide Fall

- The Absolute skill upgrade after Suicide Fall III. The increase in damage goes from 1862% x1 to 1862% x2 (3724%).
- Suicide Fall trades its 5% of max hp extra damage for an extra hit which hits 100% of the time, so it’s worth, but not as an immediate priority.
- Absolute: Ankle Cutter

- The Absolute skill upgrade after Ankle Cutter V. The damage is increased from 394% x 2 (782%) to 864% x 2 (1724%). The amount of targets is increased from 5 to 10. The cooldown of the skill is reduced by 1 second (from 11 seconds to 10 seconds).
- It is advised to only take this skill if you are min-maxing your damage output and cooldown of skills.This skill, like most of your pre-awakened skills, is still unprotected. The DP reduction applied by this skill is the main reason for maxing it to Ankle Cutter V. The overall increase of the skill’s damage is dwarfed in comparison to your other skills.
- Absolute: Ghost Greeting

- The Absolute skill upgrade after Ghost Greeting III. The damage is increased from 799% x 2 (1598%) to 1635% x 2 (3270%). The amount of targets is increased from 7 to 10. The skill applies a 5% attack bonus for 10 seconds on good hits.
- Ghost Greeting is mostly used as a pre-awakening gap closer and part of a pre-awaken movement chain. I personally wished this skill had a cooldown reduction with the addition of the Absolute skills. Sadly that did not happen. The increase in damage is marginal.
- Absolute: Fox Claw

- The Absolute skill upgrade after Fox Claw IV, damage increasing from 354% x 2 and 1207% x 3 (4329%) to 485% x 2 and 1652% x 4 (7578%). The Accuracy is increased from 11% to 15%. The max amount of targets is increased from 7 to 10.
- The skill sacrifices its 15% WP max damage modifier for additional damage. Though the damage is exceptional, it is dwarfed by other high priority skills. Absolute Fox Claw should be considered one of the better skills to get after your highest priorities.
- Absolute: Shadow Stomp

- The Absolute skill upgrade after Shadow Stomp IV. Increasing Damage from 715% x 7 (5005%) to 1157% x 8 (9256%). The max amount of targets is also increased from 5 to 10.
- This is the first skill you should upgrade to Absolute, hands down. Damage is exceptionally noticeable. With it’s innately low cooldown, it is a skill meant to be abused.
- Absolute: Shadow Clone

- The Absolute skill upgrade after Shadow Clone III. Damage is increased from 882% x 4 (3528%) to 1585% x 4 (6340%). The HP recovered is increased from 45 per hit to 50 per hit.
- Clone is one of those skills that have multiple purposes. But with the Absolute upgrade, always try to use it after Shadow Stomp. The air damage applied after Shadow Stomp’s float is significant. Take this skill when you reach the level 60 requirement.
- Absolute: Boss Slaughter

- The Absolute skill upgrade after Boss Slaughter III. The damage is increased from two basic hits to four basic hits. The Movement Distance and Attack speed of the skill is also increased. The cooldown is reduced by 1 second, from 10 seconds to 9 seconds.
- Absolute Boss Slaughter slightly increases the range and attack speed. This skill is worth it if you already use it. Due to the situational nature of the skill, take this upgrade after you learn how to use it effectively.
- Absolute: Shackles

- The Absolute skill upgrade after Ninjutsu: Shackles IV. Damage is increased from 888% x 4 (3552%) to 1668% x 4 (6672%). The amount of targets is increased from 7 to 10. The movement debuff applied on hit is increased from -45% to -50%. The cooldown is reduced from 24 seconds to 20 seconds.
- Absolute: Ground Thrust

- The Absolute skill upgrade after Ground Thrust III. The damage is increased from 1004% x 2 (2008%) to 1500% x 3 (4500%). The max amount of targets is increased from 7 to 10. The cooldown is reduced from 10 seconds to 9 seconds.
- Due to the nature of the skill, it is hard to recommend this skill. Take this skill only when you’ve filled out your skill build.
- Absolute: Bladespin

- The Absolute skill upgrade after Ninjutsu: Bladespin. The damage is increased from 624% x 4 and 680% x 3 (4536%) to 1456% x 4 and 1240% x 3 (9544%). The cooldown of the skill is reduced from 15 seconds to 13 seconds. The WP required is increased from 50 to 70.
- Absolute Blade Spin is up there at the top of the list for skills to be considered. The phenomenal damage increase is a blessing to have and a much needed upgrade.
- Absolute: Black Moonlight

- The Absolute skill upgrade after Ninjutsu: Black Moonlight V. Damage is increased form 671% x 7 (4697%) to 1356% x 7 (9499%). The amount of targets is increased from 7 to 10. The cooldown is reduced from 22 seconds to 20 seconds. The Attack Range is also increased.
- It is a handy skill for catching opponents with its large AoE and Stiffness CC. It also deals reasonable down-attack damage and the damage alone is very considerable for PvE/Grinding. Its long cooldown, however, means it’s not quite as useful as other options so get it after your other priorities.
- Absolute: Beheading the Dead

- The Absolute skill upgrade after Beheading the Dead III. The damage is increased from 1152% x 3 (3456%) to 1440% x 4 (5760%). The amount of targets is increased from 7 to 10. The cooldown is reduced from 20 seconds to 18 seconds.
- The skill trades its 15% of Max WP extra damage for a fourth additional hit. Combined with the 100% crit rate, this Absolute skill hits harder than its raw damage values would lead you to believe.
2.3.3 Absolute Skills Priority List
Highest Priority:
High Priority:
Mild Priority:
Low Priority:
Not a Priority at all:
2.4 Skill Builds
Green – Must have.
Orange – Luxury/playstyle dependent (When you have skill points to spare).
Red – Do not put points into the skill.

Extra notes: Complete order – Awakening > Pre-awakening green > Yellow (Don’t put points into red)
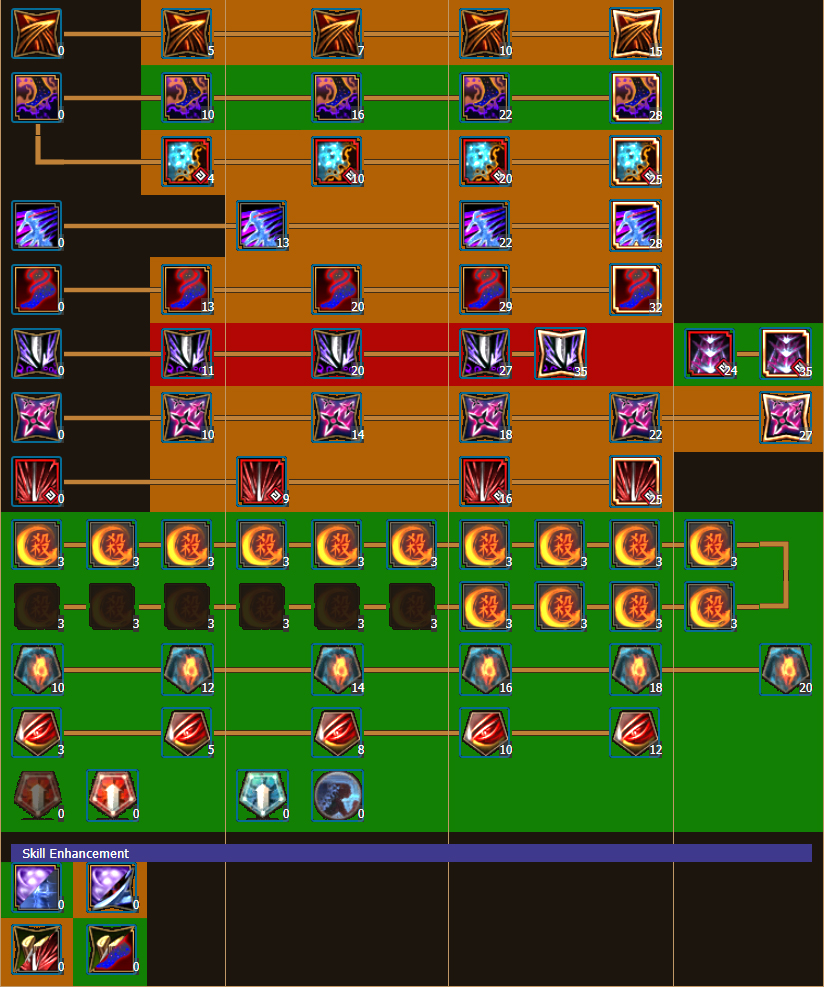

Keep in mind BDO has no skill point cap so you will eventually max everything. However, with the additions of Rabam’s Enlightenment and Absolute Skills, the SP requirement is much higher than it used to be.
2.5 Skill Add-ons
A set of curated options of skill add-ons for Ninja are available at this link in image form: https://imgur.com/a/FDbnIkf
Keep in mind that skill add-ons mostly depend on player preference, so use them as a guide rather than a cookie cutter “best in slot” style build.
2.6 Gearing
Gearing Theory
Note: Try to align your spending with current events to take advantage of drops in prices even if it’s not in your immediate gear goals.
AP vs Evasion vs Accuracy (Pre and Post 269ap)
Pre 269 AP:
AP: is currently the meta way to gear yourself up pre 269 AP. The two main reasons are that most people run DR based armour, and the counter to DR is AP. The other reason is because of PVE, which you’re going to have to do a lot in order to progress in the game. You aren’t going to be nearly as effective in PVE with Evasion or Accuracy based builds.
Evasion: in Ninja’s current state, we do not need evasion pre 269 AP. We have insane protection skills as is. Sure, you’re going to be able to one combo people in 1v1s with 220~ap but you aren’t going to combo multiple targets in large scale. The only time we would recommend people go Evasion is if you are a shotcaller for your guild, a negative karma (perma red) player or you are so geared you can pull of 269 AP with 600+ evasion.
Accuracy: Accuracy is the opposite stat to Evasion, but that doesn’t mean you could slap on all your accuracy based accessories and offhand and you’ll be able to kill every Evasion stacker. Chances are they’ll have a fair bit of DR, which will still need a reasonable amount of AP to overcome. Full AP build players nowadays can run around with 390-400 accuracy with the addition of Hoom crystals, which is sufficient for fighting most people (i.e. other AP/DR builds).
Post 269 AP:
AP:
Starting at 269 AP, you will start one shotting even the tankier softcap DP players with your heavy damage skills like Transition Serpent and even start two shotting players with a PEN armor or two. You should prioritize getting into this threshold, and each of the post-softcap AP brackets are very rewarding and will have noticeable impacts on grind speed and PvP.
Once you reach 269 AP, you may want to consider looking at PEN/Caphras on your armour for more DP as additional AP gains are pretty marginal for the cost by this point.
Evasion:
Once you reach 269 AP, you can consider branching out into evasion type builds. Which pieces you choose to swap out will depend on what TET AP accessories you have and what the AP to evasion trade-off is. Getting PEN boss armor, and then getting that to Caphras 3 is going to see the most impact to survivability to money spent, but pick whatever path is easiest for your situation. Some good options are:
- Swapping Nouver to Kutum and using Fiery Kutum
- TET or PEN Sicil instead of TET Ogre
- A PEN Sealed Magical Earring or two
- Getting TET or PEN Centaur Belt (this does drop you to a lower 260 AP tier with a steep climb to 269, assuming full TET AP accessories, Nouver and Caphras 3 PEN weapons)
- Going for TET Orkinrad Belt instead of TET Basilisk Bekt/TET Tungrad Belt
Accuracy:
Once you reach the 269 AP threshold, the AP gains for reaching additional brackets becomes significantly less impactful. This does allow one to gain additional accuracy at the expense of AP and it still work out well, assuming you can stay above 269. Please note, gaining additional accuracy at this point is about marginal gains on PEN armour/Caphras players. If someone is fully stacking evasion, you cannot gear enough accuracy to counter it. Period. You need % accuracy buffs (Valk) and to use high % acc skills (eg: Heart Aiming) to counter 700+ evasion stackers. Some good Accuracy item options:
- Kzarka instead of Offin
- PEN Red Coral Earring
Crystal Build Examples and Explanations
Hooms (Example: https://bdoplanner.com/VineKanveraKunai):
This build generally focuses on defensive stats like HP, damage reduction and evasion. Consider this sort of crystal build if you are softcap or above and starting to focus more on defensive stats and less on damage.
Macalods (Example: https://bdoplanner.com/ThiefLongbowOrnament):
Macalod is a damage focused crystal, the damage from them are a pretty considerable boost when you are below softcap and the stamina and ignore resist is a welcome stat as we generally need both.
Evasion (Example: https://bdoplanner.com/LouruveEarringDiochre):
Standard evasion set up, used at very high gear levels. Only useful if you are a shot caller, perma red or can handle having 269 AP with 600~ evasion.
Resist (Example: https://bdoplanner.com/HoboRuinedZahad):
Full Resist builds are generally a pretty bad option (except in some cases in 1v1) nowadays as resistance is an unreliable RNG stat that’s also capped at 60% in PvP.
Situational Crystals
MC – Evasion (Chest): Special evasion is extremely strong right now, with just your chest crystals being Evasion, it gives you a 20% chance to nullify special attack modifiers like Back, Air, Down and Crit, it’s even better if you manage to get a Fiery boss offhand, offering you 10% more special evasion.
JIN – Hystria (Boots): Depending on your ability to use your movement skills, the extra stamina from Hystrias might be really necessary for you, or it might be a wasted stat – play around with and without Hystrias to find out if you need them or not.
Kutum PVE Crystals:
Valtarra Spirit Crystals or 2x Critical can be a substitute for the below crystals if you plan to grind in Kamasylvia/not want to swap crystals to grind in a new area.
– Aakman/Manshaum: 1x Critical 1x Down Attack
– Hystria/Gyfin/Mirumok/Centaurs: 1x Critical 1x Back Attack
New Player
The armour is obtained though the main 1-50 questline. As you complete the quests and level up, the black spirit will give gifts to you. These gifts contain the armour and a bunch of other items like inventory expansions, skill points and some accessories. Your crystals should focus solely on you getting to +5 attack speed, which Ninjas need.
Your next steps should be getting the Roaring Magical Armour, three pieces (shoe, helmet, gloves) of Grunil, Heve or Hercules gear and the Asula Accessory Set (picture below, link if the picture is too small for you) while working to save up for the pieces in the next build.

NOTE: You CAN (this is extremely situational depending on the current marketplace said pieces) replace Asula Accessories with cheap blue accessories (Shultz Belt/Necklace, Mark of Shadows, etc) IF you are not getting the Asula pieces in a timely manner, however it’s generally not recommended as Asula Accessories are fairly easy to get as you’re going to be grinding said locations to level up and for various quests.
Road to Boss Gear
As a general note, the green gear shown in this build should be BOUGHT at the marketplace and not enhanced. You generally want to save up your enhancement materials (Memory Fragments, Sharp/Hard Black Crystal Shard and Armour/Weapon Stones) for boss gear enhancement.
Your next steps should be getting some boss gear. The general rule of boss gear prioritization is: TRI Kzarka > TRI Dande/Bhegs (whatever you get first) > TRI Dim Tree/Urugons > TRI Giath (HP, less DR) OR Griffon (Resistance, more DR) > Nouver (when you can reach 240 AP with it) > Kutum (when you can reach 230 AP with it and will grind places you don’t one shot like Mirumok/Gyfin/Manshaums, etc).
NOTE: Ultimate Green tier helmets such as Heve or Grunil are a more evasion heavy alternative to boss helmets. They have a little less DR and lack the bonus HP/resist/boss set but have more evasion and are still just as viable. If you’re looking at an evasion build or just want a cheap replacement for a boss helmet and save on some Memory Fragments, you can consider these instead.
Crystals: You should still be focusing on cheap crystals for the most part, just to get you to +5 attack speed. Other stats like movespeed/critical are optional but not needed at all.
Road to TET
At this stage you should be trying to TET your weapons and Bhegs. The best way to prepare for TET is to save up a large amount of enhancement materials in advance. The idea is to have enough materials to get multiple TET attempts, or at the very least restore your item safely up to TRI again if it fails. You definitely want to avoid grinding with PRI/DUO weapons with no durability.
Your next steps should be to TET your weapons and work on some accessories. A prioritization should look something like this: Kzarka > Dande > Bhegs > Accessories (Serap/Basi/Crescent/Witch) > Nouver (if you reach 240ap w/ it) > Kutum/Boss Armour (if it means you’ll be accepted into Mirumok or Gyfin groups)
Crystals: When you hit around 240+ AP with a nouver, you should start to focus on PVP related crystals like Macalods/Hooms, JIN Vipers, etc.
Road to Softcap and Beyond
● Traditional Softcap: https://bdoplanner.com/TranquilityStarBethel
● ‘New’ Softcap: https://bdoplanner.com/ImmaculateKoitBeias
253 AP/253 AP/294 DP (or more commonly 261 AP/261 AP/294 DP nowadays) is considered softcap as it’s generally where the “easy” gains stop. At this point you’ll start to be more relevant in PvP (especially if you’re at 261 AP) and be accepted into higher tier guilds (although top guilds normally take in 269+ AP, especially for Ninjas).
Note: We currently get +2 free AP from the Bartali’s Adventure Log and from hitting level 60, keep this in mind as you may not need some Caphras levels to hit AP brackets.
Your next steps should be TET Accessories and Vell’s Heart. Your priorities should look something like this: Vells/Garmoth Heart (whenever you get it) > TET Crescents > TET Ogre Ring/Tungrad Necklace/Laytenn’s Power Stone > TET Valtarra Eclipsed Belt/Basilisk Belt/Tungrad Belt > TET Tungrad Earrings.
Note: If you can hit 253+ AP with Offin, then it would be better than a Kzarka due to how important AP brackets are, however once you can hit 269+ AP with a Kzarka, then due to brackets meaning less above 269, a Kzarka would be better.
Note: BDO Korea has recently gained a higher tier of mainhand weapons, the “Black Star” weapons. They are much harder to enhance but will be best in slot when we get them. Keep this in mind before trading in your Kzarka or Offin for the other mainhand.
Beyond Softcap Examples
● Standard 269: https://bdoplanner.com/FemaleTheosVells
● Accuracy 269: https://bdoplanner.com/PiratesCostumeHelrick
● Evasion 269: https://bdoplanner.com/DumplingVixenLocusts
The reason it’s not as efficient to go beyond 269 AP is because the jump in bonus AP between each tier is lower than 250-269, so it’s smarter to min-max your gear so you keep 269 AP but have some extra accuracy or evasion on top of that. A good evasion number to hit is around 600-650+. It’s entirely your decision what you would like to do after you get to 269 AP but most either go accuracy or evasion. Play around with different set ups and see what works best for your playstyle and budget.
2.6.1 What Offhand should I use?
This is a very common question but the answer to it will vary based on what situation you’re in.
- Quitar (Accuracy offhand) There is no point to use this offhand anymore unless you’re facing some heavy evasion stackers and even then, they’ll still have enough DR for you to need some solid AP to push past it.
- Tadd/Rosar (Defensive Evasion Offhand) does well vs. pure AP builds because of the lack of accuracy AP stackers have (although most pure AP builds nowadays have 380-390 accuracy). This offhand gets progressively better the more evasion you have. If you only run tri/tet boss gear and a Tadd offhand, you will still be relatively squishy. This offhand does make you deal less damage. Tadd and Rosar are very close in their defensive value, but Tadd has higher raw defensive stats whereas Rosar has 2 gem slots allowing it the flexibility to be a little more offensive as well. Tadd is usually Best in slot for Evasion build.
- Estique (AP offhand / PvE offhand) This is the offhand to use at the beginning of the game for PvP and PvE until you have enough AP for Nouver (240+) or that you’re going for an off path build. This offhand is bad vs. evasion.
- Kutum (Boss PvE Offhand) This offhand is a jack-of-all-trades. It will make you tankier but not super tanky, and it will allow you to maintain damage but not amazing damage, and the ignore resistance (+10%) synergizes well with precision crystals.
- Nouver (Boss AP Offhand) does really well in this meta. It’s the highest gear score offhand, and has the highest AP. Estique offhand will do more damage with low AP (up to 240 AP) to players due to the special attack bonus but once you reach enough AP, Nouver is also better at PVE then a Kutum when you reach 261ap+ w/ it, and it stays being better til you reach 265ap w/ a Kutum. Only use Nouver if you can get 240 or above AP.
3. Strategy and Tactics
3.1 Movement and Weapon Swaps
GENERAL TIP: There are many resources online (YouTube/streams) of ninja movement. The only outdated factor lies in the heavy use of shadow slash and ghost step, which both cost increased stamina now. Ninja movement skill rotations are usually saved until you’re actually in combat.
- Universal Movement
- Shadow Slash, Ninja Step, Ghost Greeting, Ghost Step, Target Chase, Murderous Intent, Silent Charge and Smokescreen Into Concealment are your main mobility skills. You can also consider using Shadow Stomp for mobility as long as you’re confident you can cancel it reliably. Ninja requires very careful management of these cooldowns as they’re all very crucial skills that could be used for engaging or escaping, or even just as part of a combo – it’s not quite as trivial as other classes where they can just rely on 1 button to move pretty quickly with.
3.1.1 Gap Closing and Engage
- Defensive Engagement
- The animation to switch into Transition Stance has frontal guard. Weaving this with Ghost Step generally allows you a mostly safe frontal guard/iframe animation. The advantage of doing this over Q block is you can turn quickly and continue to move instead of being rooted in one spot.

Weaving Transitional Stance with Ghost Step (RMB > RMB > Ghost Step, repeat forever)
- QuickSlot SmokeScreen is used a lot to bait people in a Pre Awakening Grab. Often, you will Blade Spin into Smoke and you will Grab your target safely because of the back to back Super Armor. It’s usually an easy way to bait your opponent into attacking and getting into your grab range.
- Boss Slaughter -> Grab
- Can be used really quickly to surprise your opponent. Use carefully because there isn’t any protection during the whole animation of both skills
- Transition Into Silent Step Into Murderous
Probably the most used engage as a Ninja since it is quick and far reaching movement with a good degree of directional flexibility since you can turn the camera after Silent Charge. You should always try to go a bit off your target to catch them in the back. Be careful of the risks of this engage since you can easily get CC’d in the last part. You can also use the Murderous Intent defensively and switch directions to move away to avoid being hit and bait out important enemy skills.

.
- Transition into Silent Charge into Ghost Step into Murderous Intent
- Covers a slightly longer distance. This method also covers up the slight delay Silent Charge > Hotkey Murderous Intent has. It can occasionally make the enemy throw a CC too early thinking you will Murderous Intent directly after Silent Charge.

- SmokeScreen Into Concealment Into a CC
- This is a really good Gap Closing / Engagement combo to counter a Frontal Guard. Concealment is not protected at all so a quick enemy may catch you with an AoE CC.

Can be followed by Shadow Stomp.
3.1.2 Escaping and Disengaging
- Disengaging is basically reading what you’re enemy is trying to do, and reacting accordingly with your protected movement skills, for example if you are low HP and escaping a team fight, your goal would be to use as many protected movement skills you can to get the furthest away. (mainly frontal guards and frontal guards to avoid taking damage), a really important concept in disengaging and movement in general is to turn your frontal guards (transition stance and cswap) in the direction of your opponent(s).
- Another method is to grab (don’t Suicide Fall against tamer/wiz/witch or in large scale where you are risking getting cc’d out of your grab) your opponent when you have stood up from a grounding CC (float/knockdown/bound/knockback for some extra protection/combo potential
- To disengage, you will mostly use the same technique as Gap Closing or Engage. Keep an eye on the cooldowns and save a few abilities for escaping.
- Weaving in Ghost Step in between every movement ability (and damage ability in some cases) is essential to Ninja – it is one of our strongest animation canceling abilities.
- Block Jump is your most powerful iframe and you have a fairly long time to press a directional command while invulnerable. Learn the timing of this so you can press Block Jump > delay as long as possible > turn camera and press S to teleport backwards into the direction you want, however with a WW bind, you can simply Block Jump > WW Bind, this way you will go behind your target, following it with an automatic ghost step for further movement, example is below.

3.2 Animation Cancelling
Shadow Stomp: One of the strongest skills in shortsword due to its float and air attack modifiers, this skill normally has a very long windup animation. You can cancel that animation by preceding Shadow Stomp with either RMB (Shuriken Throw), Smokescreen, Floor Sweeping or Shuriken: Flight. The timing is fairly tight for these cancels and it really should be one of the first things you practice when learning Ninja. These all have their varying uses:
Smoke screen: No damage, but offers Super Armor protection and stun. Eg. Ninja Step > Smoke > Stomp
RMB (Shuriken Throw): Least damage (if you even hit the shuriken), but fastest cast time.
Floor Sweeping: Very little damage and bounds, if you hit this before a stomp it cancels out the float AND the air attack, although the down attack can be helpful in some situations and PVE.
Shuriken: Flight: Most damage, and also floats. Floating with Flight will also proc an Air Smash, which will make opponents immune to Shadow Stomp’s float AND air attack.
Universal Cancels: Ghost Step, Malice, Smokescreen, Brace and Seamless are “universal cancels”, in that they can cancel out of most skill animations. They generally follow the same rules as each other and can fairly consistently be used in the same frames. Some skills CANNOT be cancelled by these at any point during their animations. These skills include: Ninja Step, Serpent Ascension, Drastic Measure (but not Mach Explosion), Sura Chaospree, to name a few. Experiment with what you can and can’t cancel to make your combos and movement more fluid.

Ninjutsu: Shackles being cancelled by Malice to reduce its long aftercast animation.
3.3 Combo Chaining and CC System
CC SYSTEM (Video)
The new CC system only allows your target to be affected by a maximum of two hard CCs, which are all CCs except stiffness or Air Smash/Down Smash. All hard CCs add “1” to the CC count. Stiffness only adds 0.7 to the CC count. Air Smash and Down Smash can be applied as often as you want and add nothing to the CC count, but Down Smash only has a 30% chance to activate on hit. When the CC count reaches or exceeds 2.0, the target will become immune to any further CC for 5 seconds, with the exception of Down/Air Smash.
Examples:
Knockdown (1.0) > Float (2.0) => CC immune
Stiff (0.7) > Grab (1.7) > Float (2.7) => CC immune
Float (1.0) > Float (2.0) => CC immune
After you applied a CC the target will be immune to the same type of CC for 1 second, e.g. casting stun > stun in quick succession will only count as 1 CC.
Also, stun/stiffness/knockback effects are not applied to targets that are on the ground, meaning while the target is downed you can cast those spells freely to apply filler damage without using up any CC.
Examples:
Grab > stun > float
Stiff > float > stiff > float
Skills with down attack (150% damage) or air attack (200% damage) do bonus damage to targets that are in a downed or floated state, e.g. shadow stomp will hit the target for twice as much if it is able to successfully float. That’s why you want to combo your spells in a certain order to maximize damage.
Examples:
Grab > float > knockdown => target can be floated, extra damage from air attacks
Grab > knockdown > float => CC immune after knockdown, no float, no air attacks
Down Smash and Air Smash extend the respective CC, e.g. a successful down smash (30% chance to apply) will keep your target on the ground for longer. Since it’s not guaranteed to work this will introduce more RNG into your combo.
COMBOS:
Key combos will be below each combo.
A basic starting combo that starts in awakening, is:
Murderous Intent (Stiff, 0.7) > Serpent Ascension (Float, 1.0) > Illusion of Restraint + Malice (Damage, swaps you to preawk) > Shadow Slash (Attack speed, sets up for Heart Aiming) > Heart Aim (Damage, stun doesn’t apply since on ground) + Fatal Blow Flow (Damage, stiffen doesn’t apply since on ground) > RMB + Shadow Stomp (Float, 1.0) > Blade Spin (Damage, air attack off stomp.)
______
Shift + LMB (Murderous Intent) > S + F (Serpent Ascension) > Quickslot OR Shift + Z (Illusion of Restraint) > Q (Malice) > A + LMB OR D + LMB (Shadow Slash) > RMB+LMB (Heart Aim + Fatal Blow Flow) > RMB + S + E (Shadow Stomp) + Quickslot (Blade Spin)
There’s a lot of room in this combo where you can fill in the gaps with your own filler damage such as Malice right after Blade Spin, or swap out the RMB Shadow Stomp cancel, with your own preferred or situational Shadow Stomp cancel (However rmb and smoke screen are the best cancels, as the other two cancel out the float from shadow stomp.)
A basic combo starting from pre awakening form is a bit trickier, since there are so many different ways of catching your opponent, here is one to get you going:
Beheading + Malice cancel (Stun + Stiff, 1.7) > RMB + Shadow Stomp (Float, 1.0) > Bladespin (Damage, air attack off stomp) > cswap > Serpent Ascension (Damage, float doesn’t apply because cc immune) > Illusion of Restraint (Damage)
______
Shift + E + Q (Beheading the Dead + Malice) > RMB + S + E (Shadow Stomp) + Quickslot (Bladespin) > C (cswap) > S + F (Serpent Ascension) > Quickslot OR Shift + Z (Illusion of Restraint)
This is an advanced combo, but a pretty good example of how the cc system works (combo from Daynim)
Suicide Fall (Grapple/bound, 1.0) > Turn 180, miss Ankle Cutter (Put ankle on cd to waste bound) > Ghost step behind you (Sets up for malice+ankle) > Malice (Damage) + Hit Ankle Cutter (applies dp debuff) + cswap > Murderous Intent (Stiffs as they stand up, 0.7) > Illusion of Restraint (Damage, swaps to preawk) > RMB + Shadow Stomp (Float, 1.0) > Fatal Blow + Flow (Damage, air attack off stomp, stiffness doesn’t apply since on ground) > Shadow Slash (Attack speed buff, sets up for heart aim) > Heart Aim (Damage, stun doesn’t apply since on ground) > cswap > Serpent Ascension (Damage, float doesn’t apply because cc immune)
______
E (Suicide Fall) > Shift + LMB (Ankle Cutter) > Shift + S (Ghost Step Backwards) > Q (Malice) > Shift + LMB (Ankle Cutter) > C (cswap) > Shift + LMB (Murderous Intent) > Quickslot OR Shift + Z (Illusion of Restraint) > RMB + S + E (Shadow Stomp) > LMB+RMB (Fatal Blow Flow) > A + LMB OR D + LMB (Shadow Slash) > RMB+LMB (Heart Aim) > C (cswap) > S + F (Serpent Ascension)
Our most reliable CC is float. Float is hard to build resist against, and with our 20% ignore resist gems (built into mainhand), we have a pretty good chance to be able to land floats, whereas stiffs or stuns will be a bit more dependant on RNG. Our main float CC skills are: Serpent Ascension, Shadow Stomp, and Shuriken Flight. There are some long, stiff reliant combos that also do a lot of damage, however, those will be used for more specialised gameplay usually focussed around 1v1 scenarios.
Our 4 strongest abilities in terms of damage are: Serpent Ascension, Shadow Stomp, Blade Spin (when used after a float/bound), and Illusion of Restraint. When crafting your combos, it’s important to know as a general rule that the more of these abilities you can fit in, the stronger your combo will be.
It’s also very important to know the types of protection each ability in your combo offers, as this will become much more important in group PvP (Generally the order of importance is iframes > frontal guards > Super Armours for ninja’s case as we’re generally pretty squishy so sitting in super armours isn’t the best idea.)
There are many weird quirks between the interaction between our abilities, visit our Discord often to see if there are new quirks discovered, or just to share something you found that might be helpful.
3.4 Large Scale Gameplay
Your playstyle will change as you become more geared, higher levelled, start utilising more skill points, and getting more experienced overall. The following are just some examples of common ninja strategies. Realistically, you’ll be utilizing more than one of these strategies during each time you participate in large scale PvP.
Similar to everything else in this guide, there are many resources online of large scale ninja gameplay.
3.4.1 Cannon Teams
Ninja is very good at taking out cannons or using one. The potential of Ninja in small scale makes him very good at taking cannons out and with his triple jump, he can take other Ninja/Kuno cannon-teams out. If you’re shooting a cannon, you can get to a high building where other classes can’t reach you and basically shoot for free. Ninja does this through his double jump. You can also utilize a triple jump if you jump (space), double jump (space), and hit E (triple jump).
3.4.2 Disruption
Another important function of Ninja in large scale is his ability to disrupt base buildings very well. Through stealth, he can disrupt and generally live afterwards. Disrupting is basically cock-blocking the enemy base to repair their building. One of the thing you need to spot when you do this job is when an enemy is crouched on the ground. This means that he is building a new building. Wait for him to build it to kill it at the same time it pops or kill the guy building it and remember his name, he is probably the main builder and needs to be focused. Another part of being a disruptor if you have enough Gear is stealthing behind the enemy backline while they’re grouping and CCing all of them from behind their Frontal Guards while your group is about to go in.
3.4.3 Slayer
Slaying in node wars is probably the most fun part of large scale. Once you get comfortable with the concepts in this guide (and once you get the gear), you should have no problem slaying people. Stealth, and the rest of the kit allows Ninja to kill effectively and rapidly. It is hard to explain how to play a slayer role in a large scale battle, as these battles usually revolve around what your guild’s strategy is for a specific war, the gear of the enemies, the makeup of the enemy guilds, etc. Most of the time, you will try to get behind enemy line (with concealment) to rapidly delete/finish their main DPS and to disrupt them. Note that unlike most classes, Ninja’s main burst relies on Air Attacks and not Down Attacks – this means your DPS actually suffers from teammates CCing your target before you can float them so try to take the initiative and get your Floats out whenever an opportunity presents itself, before your teammates cut its damage (even though they mean well) by knocking your foe down. Similarly, if YOU don’t have enough damage, you’re potentially messing up your main groups cc potential in locking down the opponents.
3.4.4 Scout
Scout is a role that consists of staying around your main group of attack or your base and to find from where the enemy group is attacking or stop the enemy flank team from flanking your group. Most of the time, you will be in stealth alternating around your objective to protect it and disrupt a group that is coming to attack it. It is a bit like being a slayer but you will play a more protective role. If you’re a defense scout, you will often have the job to find enemy cannons.
3.6 Class Matchups
GENERAL TIP: Remember to focus on keeping your own protection up, instead of tunnel-visioning into a potential kill unless you are certain that you are going to get said kill. If you want to learn what an ability does, its animation and the name of that ability, you can use THIS website.
3.6.1 Warrior
- Warriors will generally spam their block which protects them from the front AND gives them super armor from the back. The only weakness to a warrior’s block is the susceptibility to being grabbed. Grab a warrior when they spam block.
- Warriors can only do one Dash every two Seconds in Awakening * If they do more than that, they won’t have any protection and will be easy to CC. This is important as you can bait the dash and go in for engage.
- Warrior’s solar flare 100% can probably one shot you/break your block, and can be manipulated with camera and mouse movements.
- Warriors have a grab. Make sure to go in and out to avoid being grabbed, for example, you don’t want to use Katana Shower for protection or if you don’t one combo them (unless you know their grab is on cooldown, even then it’s risky)
- Solar Flare can catch you behind a Frontal Block just like our Murderous, however Solar Flare is unprotected so make sure you punish that if you can with Block Jump or Smokescreen
- A Warrior can be grabbed in the animation of Slashing the Death.
- Be weary of Warrior’s Ground Roar, has a pretty big range (if absolute) that can reveal you from stealth.
- Warrior can cancel most of their skills with their block, offering protection in some cases.
3.6.2 Sorceress
- Sorceresses have a lot of reliable iframes – arguably the best in the game. This gives them an advantage to escaping and they are able to iframe out of a grab if you didn’t CC them first.
- Watch out for sorceresses when they charge up their scythe – they are going to unleash their Grim Reaper’s Judgement, get out when they charge or try to go for a quick grab. However during the attack animation they are vulnerable so it does leave an opening.
- Sorceress are really vulnerable when they use violation, as it is unprotected.
- They can disappear/reappear fast from Nightmare and they can use it twice in a row, be careful with frontal block when they use it.
- Sorceress run out of stamina when engaged in combat and can’t restore it when they’re invisible or charging Grim Reaper’s Judgement. Keep up the pressure with protected engages and eventually they’ll run out of options.
- Be careful of Blade of Darkness. The skill will actually knock you back even if you are blocking. You want to either i-frame/super armour when the skill is launched.
- Be careful about doing Murderous Intent directly towards a sorc, they have a lot of tools to punish this move easily.
3.6.3 Ranger
- Rangers have a longbow which has fairly long range and a sword which has quick mobility and a grab. Abuse transition stance. Higher geared Rangers will be able to easily blow up your block, in which case, either staying completely out of their range, or playing aggressive will be your better options.
- When a Ranger switches from bow to dagger, they have a frontal block and can bait out your ccs. Be careful.
- Rangers have very little protection while attacking. Play aggressive when you can, just keep an eye out for their wide range of CCs.
- If they’re able to outrun you with their Awakening, they will usually turn around and attempt to knock you down with arrows, when they do this, you usually want to abuse your protected movement skills/transition stance to still apply pressure to them.
- Be careful about Blasting Gust. It can shoot quite far and knockdown you.
- When Rangers use their Rabam skill Fury Arrow, don’t use any iframe other than Ghost Step into Transition Stance. If you use anything else, you’ll likely get cc’d and then killed.
- Rangers with high AP can blow up your block pretty easily, be weary of this.
3.6.4 Tamer
- Heiling has 100% accuracy and crazy CC capability. Avoid their pet at all costs. Their pet is probably stronger than the tamers themselves. Their pet is basically invincible, so don’t attempt to do any damage to it, also when they are summoning their pet, they have super armour.
- A lot of Tamers think that their Void Lightning is a safe zone. You can kill them by surprise in it by using every super armor you can. It is a risky way to kill them.
- You can use ranged skills when they sit in their Void Lightning to catch them. An example would be Malice.
- All around Spinner is one of their strongest skills since the pet attacks with it but it is a frontal block. If they use it and you are not CC’d, get away or engage. If you engage, be sure to dodge Heilang’s strong attack that can do half of your HP.
- If the Tamer does Command: Attack, their pet will follow you to try to do a knockback. It as an extremely large distance of attack.
- Tamer Grab has an excellent distance a bit like our awakening grab, be careful.
- Their pet can see you in Concealment like mobs can if they’ve gained aggro on you at any point.
- Tamer doesn’t really have any engage outside of their grab and Spray Scratch. If they miss their grab, you can play a lot more aggressive and punish them.
- Use Suicide Fall with care, as Tamer’s pet can CC you, instead try and use Flash Bondage.
3.6.5 Valkyrie
- The valkyrie is a similar matchup to warriors. However, she does have some skills that have a vacuum effect.
- You will face the opposite direction if they vacuum at the same time you try to grab her because the vacuum will turn you.
- Their awakening ultimate does A LOT of damage but you can grab her when she comes down from the sky or during their casting time and cancel most of the damage.
- Valkyrie’s grab has a pretty big range, be wary of this.
3.6.6 Wizard
- The Wizard has a grab and has better close range combat than the Witch.
- When the Wizard does an AoE such as Aqua Prison, you can easily Block Jump and grab the Wizard as he will be locked into place.
- Watch out for the Wizard’s heal. Like the Witch, the wizard can heal back to full health very very fast.
- Be careful about their 100%, it will easily kill your block or 100-0 you but it can be cancelled in time if you grab them.
- Their pets can see you when you’re in Concealment.
- Beware, most of the Wizard skills will continue and damage you even if grabbed.
- One good way to evade a lot of the Wizard damage is by ‘’baiting’’ their Cataclysm and to go for an engage after.
- Use Suicide Fall with care, as Wizard’s pet can CC you, instead try and use Flash Bondage.
3.6.7 Witch
- Witches do not have a grab but they do have a block.
- Like the Wizard, the Witch can heal up to full health very very fast.
- Electricity skills are the most dangerous skills and are super armor. All of their Earth Skills are frontal block which leaves her open in the back but she can turn them easily.
- Beware, most of the Witch skills will continue and damage you even if grabbed.
- Their pets can see you when you’re in Concealment.
- Like the Wizard’s Cataclysm, bait a Witch’s Voltaic Pulse to have a big advantage while it’s on cooldown.
- Most Witches will turn their earth skills when they will see you Block Jump. If you notice the turn, you can do another key input of Block Jump (A or D) to spawn in front of them instead of behind for an easy CC.
- Use Suicide Fall with care, as Witch’s pet can CC you, instead try and use Flash Bondage.
3.6.8 Ninja
- Use your grabs sparingly. When you grab a Ninja they can counter grab you.
- If you see a Ninja using Block Jump, instantly use your own as they will be forced out of Iframe before you, allowing you to get the drop on them or prevent their attack as they back away. If it’s you that uses Block Jump first, when you come out press space bar for Smokescreen as you’re coming out because it offers a CC and lets you come out with protection so you won’t get stiffed coming out from the opponents Block Jump, and grab behind you when you Smokescreen so you can have an iframe as well if they decide to try and grab you.
- Pay attention to what cooldowns your opponent has used, a Ninja who has already used Block Jump or Suicide Fall will find it hard to counter a head on attack effectively.
- Always go in for a grab when they’re using Katana Shower – it has no CC in PVP and they must go through the whole animation.
- If a Ninja goes invisible and you play on decent graphics, pay attention to grassy areas as you can see the grass move where they step.
- If a Ninja uses Concealment, you can use AOE damage to reveal them.
3.6.9 Kunoichi
- Kunoichi’s Lethal Spin Spree animation gives us enough time grab them.
- You can grab or damage them while they are in Tendon Cutter, though they are hard to target.
- Their Rabam skill Sinew Cut has a lingering Stiffen Effect. Even when the animation is done, there is still a small zone that will CC.
- Just like Ninja, pay attention to grassy areas if a Kunoichi goes invisible.
- Just like Ninja, you can Smokescreen into a grab behind you if the Kuno tries to Block Jump you, although this is still pretty risky.
- Tendon is now a pretty easy grab since it won’t cc you, but you still have to predict where they’re going to go, as they can move their Tendon Cutter randomly with camera movement.
3.6.10 Berserker
- If the Berserker starts to slam the ground (Devastation), run away or go for a REALLY QUICK grab. The slow on this attack is really strong (30%) but if you grab quick enough, it will interrupt the skill before debuff can hit you.
- Same as Ranger, be careful. Berserker can CC you from a great distance with their Awakening.
- Berserker’s Lava Piercer (their super armour sprint) is extremely dangerous and one of their only protected engage outside of range CC and Grab. They have a following attack call Ground Lifting which can catch you in your frontal guards by hitting your back. Either dodge the Berserker while they run with Block Jump/running away OR you can try to grab before them.
- Always be on the move against a Berserker, if you sit still they can quite easily dash into you and grab.
- If you see a Berserker use their Titan Syndrome buff, either run away, stealth or play super close to them and try to grab them as they cast it to try and interrupt. It’s one of the strongest Awakening buffs in the game.
3.6.11 Dark Knight
- The key weaknesses of Dark Knights are their Frontal Blocks and immobile Super Armor attacks, a bit like Wizard.
- You can grab a DK out of Twilight Dash.
- If the DK uses Seed of Catastrophe and doesn’t CC you, they lose their best ability to CC you from a distance and you can move more freely.
- Be careful about their Pre Awakening ability Wheel of Fortune, it’s a strong super armor which you need to grab them out of. It is pretty easy to do since their loading time before hitting.
- A lot of DKs will spawn behind you after using Nocturne. Try to do a 180 smoke grab when they spawn.
- Watch your frontal guard closely, a high AP DK can blow up your guard really quickly.
- Use Katana Shower carefully. The DK can burst you before the animation finishes if they predict it.
3.6.12 Maehwa
- Maehwa and Musa match up is almost the same and it is pretty easy. Wait for them to engage so that you can use Block Jump, Smokescreen or a grab.
- You can put pressure on them and get their Stamina to 0. They will be easy to catch after that since their dash costs Stamina to be usable. Same for Musa. The exception is in Tiger Blade, where they’ll have super armour and NO stamina cost for Chase, but they’ll also have no real way to engage against you.
- If you plan on baiting them for grabs (applies to all non-grab classes, and some grab classes depending on how good they are at reading you) , the main skills you can use that have lingering CC immunity are C Swap and Smokescreen (can be made longer if used via Hotbar). Test these out yourself so you can get a feel for how long they last to better maximise your potential.
- If you use a frontal block, watch your back carefully. A Maewha can quickly go behind you and CC you.
3.6.13 Musa
- It is the same as Maehwa, easy match up overall.
- Musa skills are a bit slower than Maehwa, it gives you a better chance to grab them than Maehwa.
- Flow: Backflow and Crosscut are lingering Super Armor skills and Musa can bait you with them.
- Musas can turn their Foul Play with mouse movement enabled so don’t assume you’re safe if you’re behind their Crust Crusher.
- Musas can turn their Fiery Angel with mouse movement enabled and can use it to weave behind your frontal guards. They can also aim it slightly off center like we do with Murderous Intent and let the attack AoE land behind your guard.
- Musas with high AP can blow up your block pretty easily even with their long range arrow.
3.6.14 Striker
- Striker clones have an 100% accuracy rate, so it will hit you 100% of the time regardless of evasion
- Striker can be grabbed in most of their skills pretty easily, abuse this.
- Most strikers don’t know how to use their mobility and lingering super armor making them easy to catch behind their block.
- Mass Destruction and Rage Hammer are one of Striker’s strongest lingering super armors and will be used to bait you into engaging, which they will then follow up with a grab.
- Our lingering frontal guard from going to Pre-Awakening from Awakening is one of our strongest tools to get a grab on a striker while they sit in their lingering SA.
- Sitting in frontal guard or superarmour is asking to be grabbed. Bait out their grabs then you can play a lot more aggressively, but stay very aware of their grab cooldowns (Awk has 10sec, preawk has 7sec).
3.6.15 Mystic
- Mystics generally have a lot of protected abilities, be weary when trying to engage and learn animations of said protected abilities.
- If you get debuffed by Dragon’s Pit then disengage and play safe OR delay by grappling (the slow increased the duration of your grapple allowing you to burn a bit of time on the slow), -30% attack and movement debuff will mess up all your combos. As soon as the debuff wears off then play aggressive as it has a 25 second CD.
- Mystic grab has a really fast animation and can catch you off guard a lot of the time.
- Same as Striker, they have pre awk lingering super armor with a Rabam which does the same as Rage Hammer.
- Try to be on the move against a Mystic. Their attack called Wolf Frenzy is extremely dangerous and almost a death button for Ninja. They will teleport 5 times on you. If they do it from the Pre Awakening, you need to try to Super Armor, frontal guard OR Block Jump since it will Stiff you. If they use it from Awakening, you need to either run at the end or Block Jump. They will come out of it and try to grab you.
- If a Mystic tries to use their vacuum ability on you, try and use our awakening grab because the range is surprisingly big.
3.6.16 Lahn
- Relatively unprotected skills mean you should be the aggressor here and keep pressure on them at all times to get their stamina low and force them to turtle.
- It is a pretty easy match up, just be really careful about the grab. They will usually try to run around and just try to grab you. Outside of that, they’re an easy class to grab.
- Be wary of their Blade of Blood lingering super armor especially if they haven’t attempted a grab on you yet.
- Salp’uri Purge is basically Lahn’s Blade Spin and is one of their few protected CC options but it has a 23 second CD.
- Lahn’s Nimbus Stride (their air run) allows them to disengage very easily and reset a fight similarly to Ninja/Kuno’s stealth. This skill leaves them in super armour during the entire run so don’t bother trying to cc them in it unless you can get a quick grab in (which is liable to desync against a fast moving target). It has a 15 second cooldown so try to burst them between casts if they manage to use it to get away.
3.6.17 Archer
- Relatively unprotected skills mean you should be the aggressor here and keep pressure on them at all times to get their stamina low and force them to kite.
- They can CC you from a VERY long range – even offscreen – so always try to keep their position in mind, especially in the chaos of a large scale battle.
- Their heavy hitters are generally well telegraphed, so you can react and dodge them easily, or punish them with a quick gap closer.
- They don’t have a grab, so they have no way of bypassing your protected skills.
- Archers with high AP can blow up your block pretty easily, be wary of this.
3.7 Miscellaneous Techniques
3.7.1 Countering Block Jump with Smokescreen and Suicide Fall
As of July 2018, the interaction between Smokescreen and Suicide Fall changed slightly due to the removal of iframe on Suicide Fall:
• Pre-patch Hotbar smoke allowed a generous amount of time to counter the stiffen from Block Jump (from the super armor duration) coupled with the I-frame from grab allowing us to counter grapple other Ninjas/Kunos due to being un-targetable as they exit Block Jump. There was also utility that you could go from awakened to pre-awake for the counter grab (can’t quick cast smoke in awakening).
Example as follows from pre-patch:
• Current Hotbar Smoke grapple has a much stricter timing, if you use smoke as someone Block Jumps or just a moment after and they exit it immediately you will get grappled in your own grab. Hotbar smoke bomb will need to be used before they fully go into the jump animation due to it having a longer animation than quicksmoke.
Getting caught in hotbar smoke (Block Jump point of view)
Awakened to pre-awake hotbar Smokescreen grapple being counter grappled by Block Jump grapple (look at cooldowns at left of screen)
Hotbar smoke grapple still can work if it come out the same time as Block Jump. Due to the nature of BDO being an online game with desync, it is very unreliable in who gets who.
• Post-patch quick Smokescreen is much more reliable (relatively) due to not being stuck in the longer animation. This means there is a stricter timing to counter the stiffen with Smokescreen, but you can get your grapple out before the ninja/kuno Block Jumping. It is done with right click (shuriken/kunai throw) cancel into spacebar.
Example of canceling Shuriken Throw into Smokescreen and grab
Example 2
4. Other Resources
The Ninja/Kunoichi Discord Server: https://discord.gg/VSuuF5g
Cid’s in-depth Kunoichi guide: https://goo.gl/zJQoz9
General Ninja/Kunoichi resources document: https://goo.gl/NqCLyt
New CC System Guide by Ink: https://www.youtube.com/watch?v=WeFoSJZKB9U
Daynim 1v1 Combo: https://www.youtube.com/watch?v=86tm2RS48LI
Second Daynim Combo: https://www.youtube.com/watch?v=78cN7AWSFBc
Faso’s video guide: https://www.youtube.com/watch?v=NBFjAP-JNL0
Glossary of Terms
AoE – Area of Effect. Technically, this term describes the radius or area of a skill effect, but the term “AoE” is typically used to describe skills that have a large area of effect.
PBAoE – Point Blank Area of Effect. An AoE skill that specifically centers its effect on the user, e.g. Ninja’s Blade Spin.
BDO – Black Desert Online
CC – Crowd Control. A common MMORPG term to describe an effect that causes the target to have their actions temporarily hindered or halted in some way. In BDO, this includes stuns, stiffens, knockdowns, grapples, bound, freeze, float, knockback and slow effects.
Discord – A free cross platform text and voice chat application intended for gamers and gaming communities available at https://discordapp.com/.
E buff – Every class has a long cooldown (usually 3 minutes) buff in their Awakening tree that usually lasts 30 seconds. These buffs are unique to each class and often have effects that can turn the tide of a fight. Because the default keybind for most classes is E, people often refer to these as E buffs, even if the keybind is something different (like on Ninja, where Asura is Shift+E).
IFrame – Invincibility Frame. A portion of an animation during which your character is completely immune to all damage or CC effects.
PvE – Player versus Environment. Any content that pits you against computer generated enemies or challenges.
PvP – Player versus Player. Gameplay that revolves around you competitively fighting other real world human players.