Table of Contents
Introduction
This guide was made in order to help players with the Kunoichi class in BDO(Black Desert Online). Will try to give as many specific tips, tricks, and combos as possible, but I won’t be able to cover everything. Take the guide as a set of tools that you can use to form your own style of gameplay. I will try to keep this guide as free of text as possible (the first few sections and the last few sections will have a lot of text). There will be gifs, video clips, and references to other sources throughout the guide. This guide assumes at least basic knowledge of the BDO pvp system (cc’s, etc.).
If you have any suggestions leave them in the Kuno/Ninja discord.
Table of Contents
- 1.1 Intro to BDO
- 1.2 Introduction to classes in BDO
- 1.3 Is Kuno the right class for me?
- 1.3.1 Kuno or Ninja?
- 1.4 Updated BDO CC system (important)
- 2 Introduction to Kunoichi
- 2.1 Pre-awakening skills
- 2.1.1 Farming
- 2.2 Awakening skills
- 2.2.1 Farming
- 2.3 Rabam’s Enlightenment & Jin (absolute) skills
- 2.3.1 JIN Skills
- 2.3.2 Rabam’s Skills
- 2.4 Skill builds
- 2.5 Skill addons
- 2.6 Basic skill combos and animation cancels
- 2.6.1 Building a combo
- 2.7 Gear and builds
- 2.7.1 Early-game build
- 2.7.2 Mid-game build
- 2.7.3 Late-game builds
- 2.7.4 Other stats
- 3. Kuno gameplay after getting comfortable with the basics
- 3.1 Movement and weapon swapping (important)
- 3.2 Damage combos
- 3.3 Survivability
- 3.4 Large-scale gameplay
- 3.4.1 Cannon teams
- 3.4.2 Disruption
- 3.4.3 Slayer
- 3.5 Small-scale gameplay
- 3.6 Dueling
- 3.6.1 General tips
- 3.6.2 Class-specific tips
- 3.6.2.1 Warrior
- 3.6.2.2 Ranger
- 3.6.2.3 Sorceress
- 3.6.2.4 Berserker
- 3.6.2.5 Tamer
- 3.6.2.6 Musa
- 3.6.2.7 Maehwa
- 3.6.2.8 Valkyrie
- 3.6.2.9 Witch
- 3.6.2.10 Wizard
- 3.6.2.11 Ninja
- 3.6.2.12 Kunoichi
- 3.6.2.13 Dark Knight
- 3.6.2.14 Striker
- 3.6.2.15 Mystic
- 3.6.2.16 Lahn
- 3.7 Grinding spots
- Manshaum Forest (235+ ap tet kutum)
- Aakman Temple (235+ ap tet kutum)
- Hystria Ruins (261+ ap nouver)
1. Introduction
1.1 Intro to BDO
Black Desert Online (BDO) is an action-combat mmorpg. The main reason I play mmo’s is for the Player-vs-Player (pvp), so that is what I will focus on here. BDO pvp is centered around large scale combat, with wars of large scale (generally 100+ people) as the main focus. There are node wars throughout the week, except for Saturday nights, in which opposing guilds will fight over small territories. Node wars are usually composed of 1-8 guilds with 20-70 people fighting for the territory. Saturday nights are when sieges, for the territory castles, take place. Sieges generally have hundreds of players in them. This is generally considered the end goal of BDO; to be able to effectively compete in this type of pvp.
However, there is other forms of pvp in BDO. For smaller scale pvp, there is Red Battlefield (rbf), in which two teams battle and points are gained for each kill (dependent on the amount of points your slaughtered opponent had). There are multiple duel arenas throughout BDO, with one in each major city, and a new arena that can be teleported to from anywhere in the game. These arena are free pvp and respawn, where anyone can fight another player. The newest pvp feature that has been added in the Arena of Arsha, where 1v1, 2v2, 3v3, 4v4, and 5v5 fights can take place.
Besides pvp, there is a wide variety of activities to do in BDO, including: life skilling (fishing, cooking, trading, etc.), exploring the large map, farming, etc. You will likely never run out of things to do in BDO, even if you don’t enjoy pvp.
1.2 Introduction to classes in BDO
Each class has a specific role in BDO pvp. Some classes excel at large scale pvp while others excel at small scale and duels. Some classes are very good in all types of pvp, but each class has weaknesses and no one class is unbeatable. However, some classes are certainly weaker than others in terms of damage, mobility, utility, etc. Regardless, you should play the class that you think seems the most fun, whether that be from experience, or watching someone else’s gameplay. I assume you have an interest in Kuno since you are reading this guide, so if you enjoy the class, stick with it.
1.3 Is Kuno the right class for me?
To be frank, Kuno seems like a weak class in comparison to the most played classes in the game. Her damage and mobility are lacking. Her awakening will seem slow and clunky compared to her pre awakening at first, but this gets better with practice. However, her survivability, aoe crowd controls (ccs), and flexibility allow for gameplay that few other classes can provide. Kuno will require more gear, patience, skill, and practice than most other classes in BDO; you won’t be able to simply “face roll”. If you really enjoy the class then stick with it, but it won’t be very easy to become a force in pvp. I don’t mean to turn anyone off of the class, but it is what it is. If you do stick with the class, then the rewards from her class-specific skills that she shares with ninja (e.g. block jump, invisibility, etc) and her own class-specific skills in awakening are high, and you will feel accomplished when you succeed.
1.3.1 Kuno or Ninja?
Ninja and Kuno are similar classes pre awakened. However, they take very different gameplay styles after awakening. Kuno provides more aoe cc’s and defensive capabilities, while ninja provides more enclosed damage and fewer defensive capabilities. A summary comparison is below:
Ninja:
- Male
- 2 grapples (one in pre awakening, one in awakening)
- Better lateral mobility; quicker directional changes; etc
- Higher damage
- Able to use lower attack power (ap) allowing for easier access to dp/evasion builds
Kuno:
- Female
- 1 grapple (pre awakening)
- Better self heals (not including E buff)
- Easier time farming post awakening; not necessarily a “better” farmer
1.4 Updated BDO CC system (important)
The BDO cc system was updated. I have attempted to update the guide to conform to the new system as best I can. A video that describes the cc system is here (thanks, Ink).
Here is an easy to read image showing the kuno skills that have protections, ccs and both at the same time for easy reference. Credits to Crispycrisp#0001
2. Introduction to Kunoichi
2.1 Pre-awakening skills
This section of the guide will go through each pre-awakened skill. It will go through the pros/cons of the skill, whether it is useful in pve/pvp (or both), how to use it (hotkey/key input), and any other miscellaneous things about the skill. I will assume you know how the skill works and how to use it.

- Windslash (PVE, key input)
- This is the basic auto attack for Kuno left mouse button (lmb). It will be useful for early-game player versus environment (pve) since it restores wp.
- Flow: Sky Stepping (PVP, key input)
- This is the double jump for Kuno. It can be useful when trying to reach high places. Uses might include: scaling vertical objects to place cannons, escaping from enemies, etc.
- Ninjutsu: Block Jump (PVP, key input)
- This skill is very important in pvp. It provides +6 ap upon use and switches you to shortsword (ss) instantly. This skill provides invincibility (i frame) while in use and stiffens the enemy if you land near them. This can be useful to avoid damage and/or to initiate in pvp. If you do not skill up Doppel dummy, and only skill block jump, then using block jump will automatically swap you to shortsword as opposed to keeping chakram out. In my opinion, this is the better option.
- The WW hotkey can be used to ghost step out of blockjump. An example of this, and how to set it up, can be found here.
Example of block jump (bj) grab initiation.
Example of bj shadow stomp initiation.
Example of bj stiffen.
- Fatal Wind (NA)
- Only applies to basic attack. Not extremely useful. If you don’t have points to spare, don’t level this.
- Target Chase (PVE/PVP, key input)
- Makes it so you do not consume stamina when sprinting along with a movement speed buff. Useful when moving between packs in pve or saving stamina between engagements in pvp.
- Ghost Step (PVE/PVP, key input)
- Extremely important skill all around. I frame during the portion of the step in which you are invisible ; SA after you reappear towards the end of the animation. Important to move, reposition, and avoid damage. Has a stamina cost. Be careful not to run yourself out of stamina.

Ghost step used to i frame a golem stun.
- Ninja Evasion (PVP, key input)
- Useful in situations where you do not travel far enough with ghost step to get out of harm’s way. DOES NOT PROVIDE AN I FRAME OR SUPER ARMOR (SA) EXCEPT FOR THE PART OF THE ANIMATION WHERE YOU ARE IN THE AIR. This move can get you killed as you can get cc’d while using it and you cannot cancel it. However, you can control whether or not you use it by letting go of the direction key before you use it after ghost stepping.
- An example of where ninja evasion might be useful: Suppose you are in a fight and someone is in front of you pelting you with cc. If you try to ghost step backwards while facing the cc (to block it) then you won’t move very far. You would need to ghost step a few times to gain distance, but because holding s activates block on kuno when you take damage, you will be stuck in block and may die. If you attempt to ghost step backwards and turn your camera to lunar dash, you may get cc’d. If you ghost step into ninja evasion and then turn to lunar dash, you may have enough distance between you and the opponent to not get cc’d and to make a get away.
Ghost step without ninja evasion (let go of the direction key (s) after the ghost step or lock ninja evasion).
Ghost step with the first part of ninja evasion (hold the direction key for a moment after ghost step).
Ghost step with the full animation of ninja evasion (hold the direction key for the full duration).

- Fatal Blow (PVE/PVP, key input, air attack)
- Provides good filler damage when other important dps skills are on cool down. Can be used while on cooldown (5 seconds) but stiffens the target if used while not on cooldown. Provides very good damage with air attack modifier (for example, if used after a float).
- Kunai Stab (PVE, key input)
- Extension of Fatal Blow, can only be used with kunai equipped. Can be used while on cooldown (7 seconds) but stiffens the target if used while not on cooldown. Good filler damage, but too long of an animation to be useful in pvp.
- Flow: Fatal Blow Combo (PVE, key input)
- Flow from Fatal Blow.
- Brace (PVE, key input)
- Provides useful WP and HP recovery for pve and empty moments in pvp.

- Crescent Slash (Lock skill)
- I have this skill locked. May interfere with combos and does not provide much benefit. Float
- Kunai Block (PVP, key input)
- Can only be used with kunai equipped. Important skill for pvp. Quicker than awakening block and nullifies damage until block runs out.
- S-block for kunai has been fixed to block all incoming damage until your block is 0.
- Throwing Kick (Key input)
- Useful in pvp if you need a quick float.
- Floor Sweeping (PVP, key input)
- Provides a +10% down attack damage buff for 10 seconds. Can be used to animation cancel Shadow Stomp. Puts the opponent in a bound state when they are already bound, not advised for pvp combo. Has a chance to down smash the opponent.
- Flow: Kick Down (Unsure, I do not use)
- Can be used as a swap from awakening to pre awakening, but I don’t think it’s that useful overall as a quick swap.
- Kunai Throw (PVP, key input)
- Provides a stiffness on the enemy if successfully used while airborne. This is risky, however.
- Kunai: Evasive Throw (PVP, key input)
- Not extremely useful, but allows you to throw kunais quicker than standing still.
- Kunai: Paralysis (PVP, key input)
- Provides an attack/casting speed debuff to the opponent. Can be useful if you are against a class that relies on attack speed for their damage combos, such as another Kuno, or a Ninja.
- Shuriken Skills – DO NOT TAKE ANY OF THESE. KUNO USES A KUNAI AS HER OFFHAND TO BE MOST EFFECTIVE.
- Shining Blade (Passive)
- Attack speed is very important on Kuno; this passive is important.
- Shadow Slash (PVE/PVP, key input)
- Provides wp recovery on hit; good for pve. Provides a +5% attack speed buff for 10 seconds when used, even if it does not damage anything. Very important to keep this attack speed buff up during pvp, but be careful as you can get cc’d during shadow slash. Uses a lot of stamina. Do not use for mobility unless you need the attack speed buff or you know your stamina will be okay.
- Smokescreen (PVP, key input)
- One of the most important pvp skills. Provides an important evasion buff to help mitigate damage. At max rank the buff has a down time of 4 seconds. Provides super armor during the skill animation. Stuns targets contacted by smokescreen. Smokescreen can be used through a hotkey for a longer duration super armor, but I recommend to use it through key input as it casts much faster. It can be used with space after many skills, but I recommend using very quickly in a shadow slash (you will use heart aiming if you press space too slow), or kunai throw, since it can be cast very quickly so you have a lower chance to get cc’d.
- Smokescreen can also be used to animation cancel shadow stomp. It will also swap from awakening to shortsword if used on hotkey with awakening active.

Smokescreen using space after a shadow slash.
Smokescreen using space after ankle cutter.
- Ninjutsu: Concealment (PVP, key input)
- Important for mobility. Chains very well from smokescreen using space after smokescreen. DOES NOT HAVE SUPER ARMOR OR I FRAMES; YOU ARE VULNERABLE. Used to go invisible to retreat or engage. In my opinion this pre awakened invisibility is better suited for mobility rather than engage.
- Be cautious when using stealth in large scale. If a teammate walks near you and someone throws a cc at your teammate then you will get cc’d as well.
- Concealment drains 100 stamina per second while movement occurs. Stamina is restored while standing still in concealment. If stamina reaches below 150, you will be unstealthed.
- Any damage taken while invisible will reveal except for dots, you will have to wait for concealment to be off cd again or you can resealth with onishadow using ghost step.


Example of conceal used after smokescreen.
- Heart Aiming (PVP, key input)
- Stuns target if landed. Can also be activated with lmb+rmb after shadow slash.

- Suicide Fall (PVP, key input)
- This skill is now completely unprotected hit or miss. You will take damage and can be cc’d in grab. Be careful not to extend grab with space bar while in the air as you will have a longer window in which to take damage and/or be cc’d.
- Ankle Cutter (PVP/PVE, key input)
- Provides a -20 dp debuff on enemies. This debuff is the difference between full TET and full TRI boss gear.
- Ankle cutter will bound the target when used for the first time, off cooldown. This will apply a cc count of 1 to the enemy, even if the enemy is on the ground. Only advised to use in a 1v1 setting
- Ghost Greeting (PVP, key input)
- Very good gap closer and mobility. Provides i frame if used while off of cooldown. Can be used during cooldown (9 seconds) but the lunge will only apply while off of cd. Stiffness will also apply if you hit an enemy with this skill while it is off of cd.
- Fox Claw (PVP/PVE, key input)
- Good dps filler skill along with fatal blow. Provides stiffness on good hit off of cd but it provides no defensive traits so it is not good to use as an initiation. It provides 50 hp recovery per hit if used off cooldown and has a strong air attack damage multiplier if used right after a float.
- Shadow Stomp (PVP/PVE, key input)
- Very important skill. Very good for mobility. Very good as a float on a stiffened target (or a non stiffened target). Can be animation canceled with kunai throw, floor sweeping, and smokescreen. DOES NOT HAVE SUPER ARMOR OR I FRAME. Be careful if you use this skill for mobility or initiation as you can easily get cc’d during it.
- Lag/Desync and terrain can cause you to not move the length of the normal stomp animation. The distance will still be covered and things in front of you can be floated, but you will essentially be stationary when you do the animation. This may happen if you lag, get body blocked by another player, or attempt to stomp up a lope or into a rock on the ground. I do not know of any way to control this.

- Ninjutsu: Shadow Clone (PVP/PVE, key input or hotkey)
- Flow from shadow stomp. Down Smash. Air Smash. Provides 30 hp recovery per hit. Can be used with key input (space) directly after shadow stomp, or through a hotkey for up to 6 seconds after shadow stomp. I have it bound to one of my mouse buttons, but I use it through key input as well. 200% Pre awakened Black Spirit Skill.
Shadow clone used with space after shadow stomp.

Shadow clone used with hotkey after fatal blow.
- Flash Slash (PVP/PVE, key input)
- Good for clearing large packs of mobs before awakening. I frame throughout the animation when disappeared and SA while appeared. Stiffens multiple targets. 100% pre awakened Black Spirit Skill.
- There is a small window to be grabbed out of flash slash right as you appear for the first aoe “slash”. It is difficult to time, so your opponent must know the timing very well. This skill is unprotected on the windup before you disappear for the non-100% BSR version. The 100% BSR version is the same as the non-100 version, but also has SA on windup.
- Flash slash can be canceled with ghost step or smokescreen after you appear for the first slash or the third when using the 100% BSR skill. This can be useful if you need to get out, or if you stiffen the enemy with the first hit and want to float him/her with shadow stomp. *Note that if the stiffen lands, you can let the second “slash” go off to get the damage through and then cancel with ghost step to shadow stomp.

Flash slash 100% used to stiffen mobs and clear the pack.
- Ninjutsu: Shackles (PVP, hotkey)
- Provides a -45% movement speed slow on the enemy. However, it does not have any defensive traits so it is risky to use unless the opponent is on the ground. Useful against super mobile opponents, such as maehwa/musa/dk.
- Animation has been sped up dramatically for a faster wind up. Ghost step or smokescreen after the first tick on target for movement speed slow.

- Tragic Blade (PVP?, NA)
- Unsure, I do not use this skill.
- Ground Thrust (NA)
- LOCK THE SKILL. It provides little damage, has a long animation, and has no defensive traits.
- If you do decide to keep it unlocked (which I don’t recommend), it can be useful if you jump off a ledge : Hold S + F after double jump > Hold space to instantly stealth when hitting the ground. Do keep in mind that you’re only gonna have 15 sec of stealth when used after ground thrust.

- Tendon Cutter (PVP/PVE, hotkey)
- A very, very important skill, can be used with chakram in hand. It provides super armor. It DOES NOT stiffen anymore. Its primary use is for protected mobility and the direction of the skill can be controlled by turning the camera while using the skill. An in depth explanation of tendon cutter manipulation can be found here.
- It is possible to be grabbed out of tendon cutter. Your opponent must time it well, however.
Standard tendon cutter without moving the camera.
Controlling the direction of tendon cutter through camera movement.

- Ninjutsu: Black moonlight (PVP/PVE, hotkey)
- Decent damage filler. Stiffens the opponent if landed, but no ‘protection’ anymore. Do not use if there is a chance an opponent will throw a cc at you as you will get cc’d during this. The animation can be canceled with ghost step if you accidentally use this at an inopportune time. Unfortunately, the damage does not go through if the animation is canceled.
- Two instances where I use this skill is when the opponent is on the ground and I have no other dps cooldowns up, or if the opponent is medium range away and they have cc skills on cooldowns. This second instance will stiffen the opponent, allowing you to start a combo.


Black moonlight canceled with ghost step.
- Ninjustu: Shadow Explosion (Lock skill)
- LOCK THE SKILL. It provides little damage, has a long animation, and has no defensive traits aside from absolute version.
- Rage Absorption (PVP/PVE, key input)
- Flash Slash 100% BSR is good damage, however it locks you in place for a long period. This Z buff gives a buff of +30 all AP. For this reason, try to absorb the 100% buff as often as possible.
- The “Universal Z Buff” that was added to the game gives +30 all AP and attack speed. Lock the Kuno-spceific Z buff and use this one.
2.1.1 Farming
Farming before awakening is extremely fun and combo based as Kuno does not have much aoe in her pre awakening kit! There is little innate sustain as well (only 30 hp per hit on shadow clone). Kuno will farm mobs that are tightly clustered better as opposed to mobs that are spread about. An example of mobs like this are side rotations at Gahaz bandits or a side rotation at pirates. A pre-awakening farming video example can be found here. Nouver and kutum swap roles as optimal offhand depending on the bracket you’re in; if you’re curious look at this graph and choose whichever offhand corresponds to the line that’s higher than the other.
2.2 Awakening skills

This section of the guide will go through each awakened skill. It will go through the pros/cons of the skill, whether it is useful in pve/pvp (or both), how to use it (hotkey/key input), and any other miscellaneous things about the skill. I will assume you know how the skill works and how to use it. Mouse movements can be used with some of the awakening skills. Examples can be found here.
- Lunar Veil (PVP/PVE, key input)
- Lunar Veil (Q), or the awakening block, can be activated automatically while walking backwards (holding S) and taking damage. It can manually be used by pressing Q. However, if you take damage and use awakening block, you can get stuck in it and this may cause you to inadvertently die. You can cancel this “stickiness” with ghost step or halo.
- Crimson Eclipse (PVP/PVE, key input)
- Extremely important self buff (E) that is used for nuking opponents. A good scenario is to use E buff before you go invisible and engage on the enemy. Provides a nice evasion buff, but it will be overridden by smokescreen evasion buff if you use it while crimson is active.
- Halo (PVP/PVE, key input)
- Used with space after most awakening attacks. Adds a bit of damage to combos, cancels certain animations (such as spin). Provides a frontal guard on and off cd.
- Sah Chakram training (NA)
- The game will automatically max this for you as of the patch on 11/1/17 to NA. It does not cost any SP.

Chakram training used after Lunar Dash to float an enemy.
- Sah Spree of Sonan (NA)
- Do not put any points into this skill at all. It provides little damage, little utility, and has no defensive traits.
- SPREE IS STILL A BAD SKILL AFTER THE ANIMATION SPEED INCREASES. THE DAMAGE IS STILL LACKLUSTER AND IT DOES NOT FIT INTO ANY COMBOS WELL. DO NOT INVEST SP INTO THIS SKILL STILL.
- Lunar Dash (PVP/PVE, key input)
- This is a very important skill used for mobility. It can be used with shortsword in hand and will swap you to chakram. Provides wp recovery on hit. Provides a +10 DP buff for 10 seconds when used. Stiffens the enemy on a successful hit. It is important to note that if something is in your way when you use lunar dash, you will collide and you dash will be stopped and will be open to any cc.
- Half Moon Slash (PVP/PVE, key input)
- This is an important skill for both PVP and PVE. It provides super armor on use while the skill is off of cd, until the animation finishes playing out. Provides decent filler damage to be used during combos.
- Delighted Blast (PVE/PVP, key input)
- Floats the enemy if the enemy is in range. The projectile explodes if it hits an enemy or at its full distance, it will knock down enemies hit through their block (this applies to all classes but warrior and valk). Follow with a quick c-swap to be safe
- Lethal Spin Spree (PVP/PVE, key input)
- To be honest, this is one of kuno’s “bread and butter” skills. It’s one of our main dps skills. It provides a super armor on use (until the animation ends) and heals for a max of 600 hp. This is the 200% BSR rage skill, and it is REALLY STRONG. If your guild will allow it in large scale, ask your party members to feed you rage so you can one shot everyone.
- Wheel of Wrath (PVP/PVE, key input)
- Floats the enemy if the uppercut lands. This is the awakening 100% BSR. It is quite lackluster and provides super armor.
- Danse Macabre (PVP/PVE, key input)
- Very good DPS skill. The tooltip says i frame during travel of animation and super armor on landing, but this is sketchy. You may get cc’d during the windup as it is unprotected but you should be fairly safe during the rest of the animation. provides a -20% movement and attack speed debuff on the enemy, which gives you a nice advantage.
- Flow: Chakram Rise (PVE/PVP, key input)
- Decent flow. Has a chance to float the enemy, and provides wp recovery and a +10 ap buff when used.
- Shadow Cloak (PVP, NA)
- Level this skill up but keep the pre-awakened concealment on the hotbar. This will allow you to go into invisibility with either shortsword or chakram out through the pre-awakened concealment skill.
- Like concealment, shadow cloak drains 100 stamina per second while in motion. Stamina is restored when standing still. If stamina reaches below 150, you will be unstealthed.
- You be revealed with any damage taken minus dots
- Flow: Block Jump (NA)
- Taking this will keep chakram out when you use block jump. It gives a +12 ap buff and applies the same stiffness to an opponent if you land near them. However, I do not recommend to take this as block jump swapping you to shortsword is more useful.
- Lunatic Discus (PVP/PVE, key input)
- Provides good damage, knocks the enemy back. I recommend to use it when the opponent is on the ground or if the opponent has no mobility skills up in duels.
- Chain Crash: Sah Chakram (PVE/PVP, key input)
- Provides massive aoe stun, extremely risky even with 50% BSR.
- Flow: Wrath (PVE/PVP, key input)
- Personally I do not use this skill. I do not keep it locked in case I feel I need it, but I do not use it regularly. It provides super armor during the skill.
- Flow: Indignation (PVP/PVE, key input)
- Very good flow. Has a quick cast animation, knocks the enemy down.
2.2.1 Farming
Farming post awakening is drastically quicker and more convenient than pre awakening. You have enough sustain to relinquish the use of pots. However, you will still want to swap between pre awakening and awakening if your ap is not high enough to kill the mobs you are farming in 1-2 awakening skills. An example of this can be found here, here, and here. Nouver and kutum swap roles as optimal offhand depending on the bracket you’re in. To determine what offhand is best for farming look at this graph and choose whichever offhand corresponds to the line that’s higher than the other.
2.3 Rabam’s Enlightenment & Jin (absolute) skills
2.3.1 JIN Skills
To max all of the JIN skills, you will need 519 SP. To max the bare-minimum, important JIN skills, it is (1) 137 SP. To max the bare-minimum and the semi-important skills, it is (2) 244 SP.
- Fatal Blow (27 SP) + Heart Aiming (22 SP) + Shadow Stomp (28 SP) + Shadow Clone (25 SP) + Tendon Cutter (35 SP) == 137 SP.
- Fatal Blow (27 SP) + Heart Aiming (22 SP) + Suicide Fall (20 SP) + Ankle Cutter (25 SP) + Ghost Greeting (20 SP) + Fox Claw (15 SP) + Shadow Stomp (28 SP) + Shadow Clone (25 SP) + Tendon Cutter (35 SP) + Black Moonlight (27 SP) == 244 SP.
Most of the JIN upgrades added more damage to the respective skill. However, there were a few other changes to certain skills that I will list below.
- Another “hit” was added to Suicide Fall. This only applies to the damage portion of the skill and does not add another chance for the grab to land.
- Ghost Greeting provides a 5% attack speed buff when it hits an enemy off of cooldown. This buff does not stack with the 5% Shadow Slash attack speed buff.
- Flash Slash got an animation speed increase.
- Tendon Cutter got an animation speed increase. Very noticable.
- Shadow Explosion got a super armor. The super armor does not appear to be active during the windup.
2.3.2 Rabam’s Skills

Each of the level 56 rabam’s skills are beneficial and present high potential use in different scenarios. I think each one is playstyle dependent, however. In my opinion, the Oni Shadow is a better choice (for the 56 rabams) in this patch. In order to skill up the rabams, you must have the two base skills for the rabams maxed (the max level before absolute).
Level 56:
- Oni Shadow (smokescreen/concealment) (PVP, hotkey)
- This stealth lasts 15 seconds and the cooldown is 30 seconds. This allows you to use ghost step while in stealth. It will swap you to shortsword upon use. If the skill is active, using ghost step with shortsword out will put you into stealth. Even if you break the oni stealth, the next ghost step with shortsword out will restealth you.
- Note: if you are in oni and you attempt to swap to awakening, you will slow swap. You must either auto attack into swap, or ghost step into swap.
- Very good for mobility (similar to concealment into smoke). Very good to disengage and engage.
- Oni shadow drains 100 stamina per second while movement occurs. Stamina is restored while standing still in Oni shadow. If stamina reaches below 150, you will be unstealthed. You will be able to restealth once stamina reached above 150 if Oni shadow is still active.
- A good trick is to bind the WW hotkey and use that to ghost step in Oni shadow but do not use the WASD keys to move. This will ensure stamina is plentiful, however, you will not move as quickly to your destination.

- Sinew Cut (smokescreen/tendon) (PVE/PVP, hotkey)
- Throws a tendon cutter in front of you and puts you into stealth with shortsword out. The tendon cutter from sinew cut still stiffs even though tendon cutter itself doesn’t anymore.
- Sinew cut drains 100 stamina per second (in invisibility) while movement occurs. Stamina is restored while standing still in Sinew cut. If stamina reaches below 150, you will be unstealthed.

Level 57:
- Assassin’s Trail (heart aim/ninja evasion) (PVP, hotkey)
- Places a trap on the ground in front of you that “detonates” and does damage if someone steps on it. Provides a frontal guard while placing the trap and then does a long backflip animation that provides i frame.
- Better as a disengage skill compared to Heart Snatch.

- Heart Snatch (heart aim/black moonlight) (PVP/PVE, hotkey)
- Provides a burst of damage in a semi circle in front of you. Propels you backwards in a short i frame over a short distance. Provides a movement speed and attack speed debuff to the opponent if it lands.
- This move is a good finisher or quick damage output.
2.4 Skill builds
Some skill builds can be found through these links (taken from the #resources section of the Kuno/ninja discord, located here):
Level 50, 201 SP (pve), Level 56, 454 SP (pve), Level 57, 506 SP(pve), Level 58, 695 SP (pve), Level 59, 793 SP (pve), Level 60, 1029 SP (pve), Level 60, 1216 SP (min pvp), Level 61+, 1462 SP (core pvp), Final build (too much SP to spare), 1919 SP (pvp)
2.5 Skill addons
Skill addons are specific to each skill and allow each skill to give you some benefit. You get 3 pre awakening addons, and 3 awakening addons (at levels 56, 58, and 60). Addons only apply if the skill hits an enemy. For example, if I have an addon for ankle cutter, the addon will only apply when ankle cutter hits an enemy. If you have multiple addons, the highest value will take precedence. For example, if I have attack speed addon (+10%) for shadow stomp and attack speed addon for ankle cutter (+7%) and I use stomp then ankle cutter, only the stomp addon will apply and the ankle cutter addon will not reset the attack speed buff. If I use ankle cutter and then stomp, the +7% buff will apply and then be reset by the +10% buff.
Skill addons should be tailored to your style of play. If you are still in the early phases of the game where you pve often and rarely pvp, then take addons that will cater to quicker pve. Some examples of this would be the hp on hit addons for shadow slash, attack speed addons, and the +20 monster damage half moon slash addon. Addons can be changed at a later date, repeatedly, for one memory fragment per skill. It is important to note that with damage over time (DoT) addons that two addons of the same effect (i.e. poison and poison) will not stack. Some examples of addons are below.
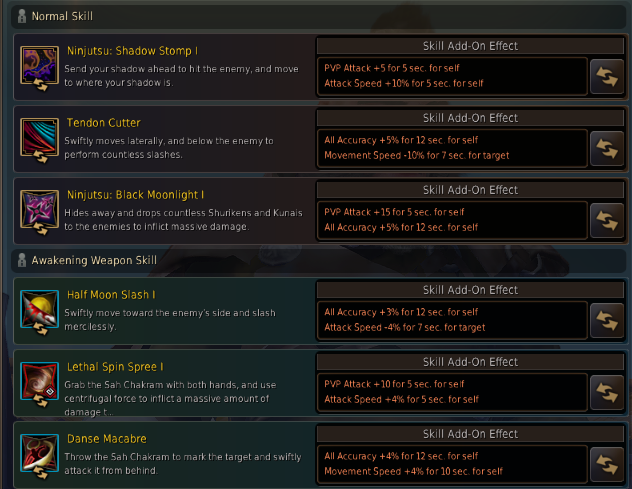
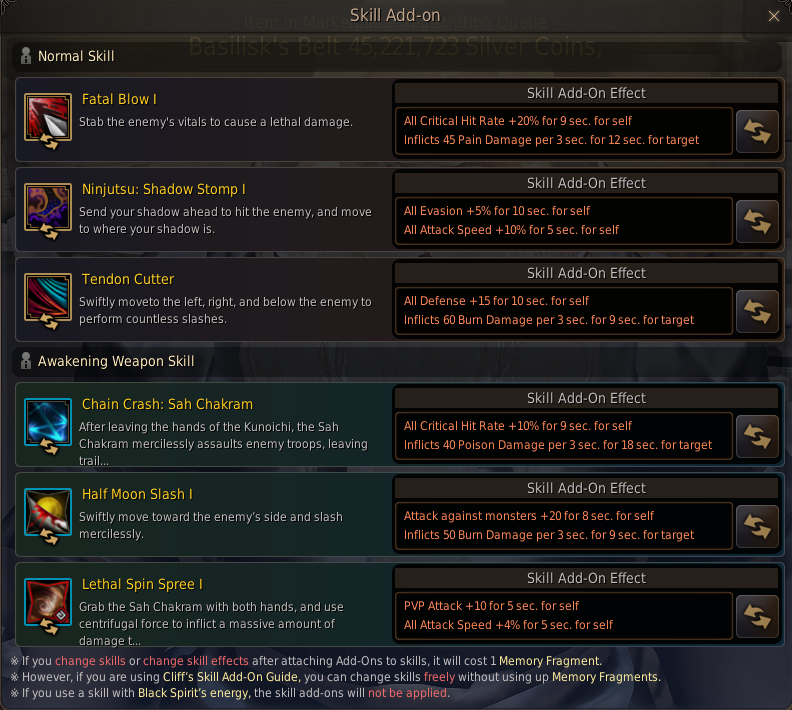
This is an example of my skill addons. I prefer to always have attack speed buffs up, and I prefer to have PvP attack addons as kuno does not have the highest damage. I do not have half moon slash as I am level 61 and do not feel the need for the monster damage anymore.
This is Paiz’s addons. Paiz takes more of a damage over time (DoT) approach along with his attack speed approach. A build like this will almost nullify pots for a while.

Ippo’s skill addons, a slightly more single target variation of the first example.
2.6 Basic skill combos and animation cancels
The goal of a combo is to initiate with some sort of cc (generally a stiffen or stun) and to chain that cc into other ccs. A generally “perfect” combo will look something like stiffen > float > damage > float > damage. There are multiple ways to execute a combo like this with Kuno.
First I will list some animation cancels. Second I will list some basic combos. The purpose of this section is not to list every combo that Kuno can execute. Rather, it is to get you to think about what ccs chain well together, and to think about which skills work in tandem throughout a combo.
- Shadow Stomp
Shadow stomp is a very important tool at all stages of pvp. Get used to its timing, get comfortable with using it from kunai throw and floor sweeping (smokescreen if you want as well).
- Kunai throw cancel

This is generally the safest, most reliable method of stomp animation cancel. You should rely on this for most situations, as debuffs such as attack speed and movespeed slows won’t affect you too much, and it is generally the quickest cancel. However, you should get comfortable with all three cancels.
- Floor sweep cancel
Floor sweeping cancel for stomp is a little less reliable than kunai throw. You are highly affected by attack speed debuffs. However, floor sweeping gives a +10% down attack damage buff, so it is good to have this cancel in your kit.
- Smokescreen cancel
The margin of error for this cancel is pretty high, and smokescreen is useful in many other situations, so don’t get too used to using this cancel. It is mostly for style, anyway ;).
2.6.1 Building a combo
Example 1
This combo will contain 2 parts (since the gifs are only so long). The full combo will be a stiffen->float->grab->damage.
(note as of the new cc system using a grab as an opener is better than as an extender, see section 3.2 for full damage combos)
Example
This combo can contain 1 or 2 parts. The full combo will be : float -> damage or float -> damage -> grab -> damage.
Example 2
This is a commonly used combo in any sort of large scale where another person is likely to cc you mid skills
Grab (bound) > shadow stomp (float) > c swap > danse (damage) > spin (damage) > snatch (if you have the rabam)
There are still some openings where you can be cc’d, but for the most part it’s a fairly safe and good damage combo in large scale setting.
2.7 Gear and builds
Kuno has very low damage multipliers and relatively low accuracy on the majority of her skills. She has high base crit on most skills. She is also a combo based class and relies on doing damage as quickly as possible. Keep this in mind as you gear up. For these reasons, you should focus on attack speed and attack power (ap). Preferably you want to get each piece of gear to TRI as early as you can, but go at your own pace! Do not feel rushed, and do not feel that you must pvp early on. I recommend at least level 61 with a gear score (gs) of 550+ to pvp seriously.
2.7.1 Early-game build
For early game, you should prioritize ap over dp since it will make farming easier and mobs won’t hit all that hard. My recommendations for the main slots are as follows:
Mainhand (best to worst – for early game) : +15 liverto (from lvl 55 reward) > Rosar > Krea/Bares > Yuria
Awakening Weapon (best to worst – for early game) : Sonan > Oeki’s > Dande
Kunai Offhand (best to worst) : Estique
Chest (best to worst) : Roaring Magical Armor *Obtained through quests > Heve > Grunil
Remaining armor slots (best to worst) : Heve > Taritas > Grunil
Accessories : Focus on AP accessories. Accuracy is not important in early game, especially in pve. For example, shultz belt/neck will perform better in early game pve than the ancient set, at a fraction of the cost. Red coral rings, and blue coral earrings are also good for early game. New items added into the game (Asula’s belt, necklace, earrings, and rings) are very good for beginning players. They drop throughout the Mediah region, and they cannot be enhanced or sold. Grana quest earrings are a good alternative to red coral earrings. One earring can be obtained per character for completing the Kamasylve 2 quest line. To get the ring of power you will need to be level 58 minimum and finish the Valencia part 1 and Kamasylvia part 1 + 2 questlines. A detailed guide to obtaining it can be found here. From the 4/10 patch you now get a +15 liverto box upon reaching level 55 from the rewards tab; you can use a cheap +10-15 green mainhand weapon to hold you over until then.
The main things that will help you clear faster are higher levels, more ap, and learning how to use your skills properly.
You will want to get to level 57/58 or so with this gear and then worry about starting to get your bheg’s gloves and kzarka. A solid early game build used to farm up to level 57 or 58 will look like this. A more updated build where asula accessories can and should be used along with other free quest accessories is here. Do not buy the liverto use the +15 you get from the level 55 reward and enhance to pri/duo until you can get a kzarka.
2.7.2 Mid-game build
Mid game builds still have very little flexibility, since you will eventually want to get up to level 61 with soft cap gear to start to use kunos kit. At this stage, you will want to start transitioning to boss gear, with bhegs and kzarka as your (hopeful) first purchases. A good example of a mid-game build is something along the lines of this. You will be able to start to compete in Tier 1 node wars.
Starting at Tier 2 node wars this should be minimum build you should have. You will still run into people who massively outgear you in Tier 2+ nodes and it will be discouraging, but don’t give up you too will get to the point where you can compete with them if you continue playing.
2.7.3 Late-game builds
You should be level 62, or approaching it at this point. This is where you start to get some flexibility in your gear as you will have the ap from accessories to support different offhands and vice versa. Personally, I run +2 movement speed in my pearl outfit and use Margoria Seafood Meal, so I have +4 movement speed in combat. This is why my gem setup is the way it is. The chest slot and boot slots are flexible. Some people prefer to use evasion gems in their chest over the cob gems. However, JIN crystals are what you want to shoot for. They can be extremely expensive to make.
With drieghan released, new crystals (Hoom, Gervish and Macalod) have been added to the game which use BON/WON/JIN crystals to make. The current recommendation is to get the 4 piece set effect as it provides all around stats with either: 2 in the helmet and 2 in the boots, or 2 in the helmet 1 in offhand 1 in chest/boot). If you are a pure evasion build however you may want to keep the Harphia crystal in your helmet. If you decide to use offin 4 piece set of hooms/macalod are a good way to recover from the accuracy loss.
Some example builds are below:
Standard Soft Cap Gear: Full AP. Griffon’s Helmet vs. Giath’s Helmet is not conclusive as to which is better. The extra DR from Griffon’s seems to be on par with the extra 100 HP from Giath’s. Heve or Rocaba helmet will fit better in a full or hybrid evasion build.
End Game Gear: Hybrid Build ; Full AP. When you get to the point of full tet accessories you have the option of going AP/Eva hybrid while keeping the 269 bracket, or continuing with full AP. It’s advised to get at least 620+ evasion with muskans for it to outperform urugons, for that you would need PEN heve, PEN tree and either PEN leeburs/muskans. If you do go hybrid you will give up nouver for kutum and focusing on DP upgrades like PEN amors with caphras while keeping the 269 bracket.
Going full AP is also a valid option on kuno as once you get to the 281+ AP brackets you start to really notice the decrease in your time to kill. Eventually you will want to caphras your tet armors while going for PEN on them for more dp as you will be extremely squishy with soft cap DP.
Upgrading your kutum/nouver to the fiery version with a Garmoth’s Heart will give you much needed extra survivability; especially with the extra added special attack evasion you will notice that you survive being on the ground for much longer.
Tank Gear: Memevasion #1 ; Memevasion #2 ; Memevasion #3. Your killing power is vastly decreased in this tier (Z/E buff management still important). Rocaba gloves and helm are only viable if you support them with an array of dp/eva accessories. There is no point in gimping your damage while not going full survival mode. It is not recommended to go evasion especially in the current meta as we do not have enough ccs to be effective with it. None of these builds are viable anymore, you will still get destroyed by someone with 269+ AP.
When going buffing for nodewar consider using elixir of shock, giant’s draught along with margoria meal or exquisite cron meal, to cap out crit. The remaining JIN, BON, and WON crystals are luxury and do not provide as much as the JIN: Viper, but they are still best in slot. When using the end game hybrid gear it is recommended to use exquisite cron meal for your food buffs to stack as much evasion as possible (+15 vs special valencias +10).
2.7.4 Other stats
Attack speed is the most important stat on kuno. Try to max attack speed with your gear and crystals. Crit and movement speed are nice, but they are not necessary, especially after level 60, when many of your skills’ crit rates are already quite high. It is important to eat food as well, to grow your health level, as this will also grow your wp pool. At level 30 health, you gain 200 total wp. Full-Bodied Exotic Herbal Wine is a good food to level up health as it is cheap and blue grade.
3. Kuno gameplay after getting comfortable with the basics
3.1 Movement and weapon swapping (important)
Movement and weapon swapping are the bread and butter of Kuno gameplay. They are what make Kuno gameplay smooth and effective.
Weapon Swapping
The most basic weapon swap is defaulted to the C key. This is the key that I use to weapon swap (my keybind), and it is the most used weapon swap for me, personally. No matter which swap you use (unless its an auto swap triggered by a skill), you will always have a forward guard during the swap and lasts until you are in idle stance (you will see your character snap to the idle position). It is important to get comfortable with swapping to and from awakening and shortsword using basic swap and other swaps. Doing so will allow you to have a frontal guard on call, allow you to be more mobile and flexible, and allow you to have a grab/shortsword skills or awakening skills on call at all times.
- Basic swaps
- Swapping to awakening from short sword with the c key can only be done in two ways (animations), w/a/d+c, and s+c. Both of these swaps are quick, with s+c as a more defensive swap, and w/a/d+c as a more offensive swap. It is important to note that if you only hit c and do not do a quick swap, you will be locked into a long unprotected weapon swap animation.
Example of s+c swap to awakening.
Example of w+c swap to awakening.
Example of a slow C swap, where you are stuck in the animation. This will get you killed in most situations.
- Swapping to shortsword from awakening through basic swap is similar, except that you can use the w/a/d (for different animations), and s keys, not just the w, and s.
Example of s+c swap to shortsword.
Example of w+c swap to shortsword.
Example of a+c and then d+c swaps to shortsword.
- Some skills can be “animation canceled” using swap. Moreso, it is just that some skills lend themselves very well to weapon swapping. This can be particularly useful if you need to swap quickly to grab someone during a combo chain. I will show some examples below.
Shadow stomp into a quick swap.
Delighted blast into a quick swap. Particularly useful after a float to do some filler damage into a grab.
Wheel of wrath into a quick swap. Same concept as Delighted blast, although at level 60, the Flow: Indignation is quite good, and the quick swap will mimic the quick swap using w+c from awakened to shortsword.
Usage of ww bind into cswap into awakening can result in an odd fg float,
To perform just press and hold ww bind then tap c right as the ghoststep ends, the timing is pretty forgiving.
- Some skills will automatically swap you to the other weapon. This can be useful in some situations where a quick swap will not work with the skill you used/will need.
Lunar dash used to automatically swap to awakening.
Tendon cutter used to automatically swap to shortsword.
Block jump used to automatically swap to shortsword.
Movement
Movement is another very important aspect of Kuno gameplay. Kuno does not have the best linear movement over long distances, but rather has good bursts of movement. For this reason, it is important to practice and master every aspect of movement, along with combos.
Ghost step, Ghost greeting, Smokescreen (for Concealment), Shadow stomp, Tendon cutter, and Block jump are all important pre awakened movement and mobility abilities. The awakening kit is less effective for movement, with Lunar dash as the main mobility element. However, be careful when using Lunar dash, as you will collide with things in front of you and your movement will be stopped, likely leading to death. Chaining these mobility abilities with weapon swaps will be the most effective way to move around. Similar to the basic combos section, I will show individual pieces of movement here, and then I will show what a full movement combo may look like. It is important to note that during most of these mobility abilities you are not protected with super armor or i frames. You must be careful when using them for mobility.

A simple ghost step into ghost greeting. Be careful to let go of shift after the greeting as you may use ankle cutter by accident.
Ghost step -> ghost greeting -> shadow slash -> smoke -> conceal -> ghost step.
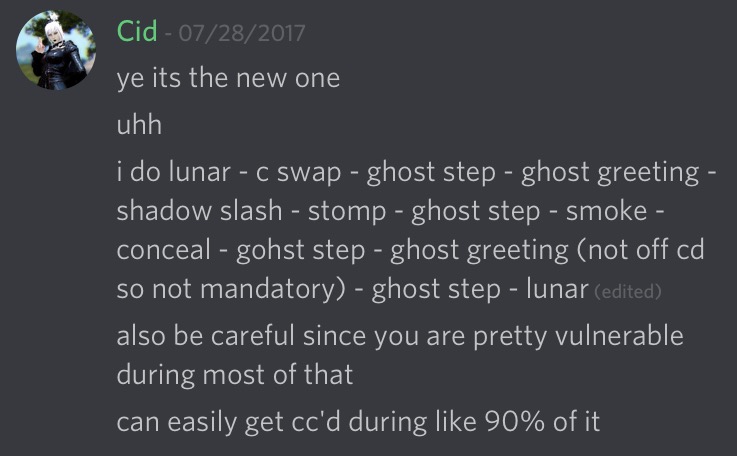
Putting it all together. Video example with voice over explanation can be found here (thanks Azuline).
How do you make practical use of this? It is unlikely that you will be allowed to use a full mobility combo like this in combat (especially larger scale), unless you are chasing one person. Instead, you need to learn to use the bits and pieces separately. You need to figure out when they work, when they don’t, and how to use them most effectively. Below I will post an example gif of mobility in action.
This is a combination of skills to survive a sticky situation. I use spin for the super armor, followed by block jump into a grab. From the grab I ghost step before I hit the ground, into a ghost greeting, followed by a shadow slash, another ghost step and then shadow stomp to gain even more distance from the skirmish, into a quick swap to awakening (s+c for the more defensive stance).
3.2 Damage combos
Due to the cc system update the general idea of a combo now is to either:
- Stiffen > float > filler damage > float > damage; or
- Grab > filler damage > stiffen > float > damage.
Do not rely on grab for anything in large scale now unless you are sure the opponent has a cc count left or there is no other option than to attempt a grab.
Unfortunately, since GIFs cannot be very long, I won’t have any specific moving examples here, but there will be many examples in the gameplay that I will link below, throughout the rest of section 3, and in section 4. Of course, any variation of these combos is possible if the situation calls for it. These are intended to be “full damage” combos. Similar to section 2.6, this section will list some potential highest-damaging combos, but it will not list all of them. It is to get you to think about how to build a damaging combo.
Grab combos
Combo 1:moonlight/flash slash (stiffen) -> stomp (float) -> fatal ( air attack filler damage) -> grab -> ankle (apply debuff) -> danse (damage) -> spin (damage)
Combo 2: moonlight/flash slash (stiffen) -> stomp (float) -> fatal (air attack filler damage) -> grab -> lunar (damage) -> spin -> discus (damage)
Combo 3: grab (engage/bound) -> moonlight (damage) -> shadow slash (attack speed buff) -> heart aim (damage) -> fatal (damage) -> stomp (float) -> swap -> delighted (damage) -> spin (damage) -> ghost step backwards -> discus (damage)
Combo 4: grab (engage/bound) -> moonlight (damage) -> shadow slash (attack speed buff) -> heart aim (damage) -> fatal (damage) -> stomp (float) -> swap -> danse (damage) > spin (damage) > snatch (damage)
Combo 5: grab (engage/bound) -> ankle cutter (miss on purpose to use up the bound) -> fatal (damage)-> ankle cutter (hit to apply debuff) -> moonlight (stiffen as the opponent stands up; damage) -> stomp (float) -> fatal (air attack damage) -> swap -> delighted (damage) -> ghost step backwards -> discus (damage)
Non-grab combos (generally better for large scale)
Combo 6: moonlight/flash slash (stiffen) -> stomp (float) -> swap -> delighted (float) -> danse (damage) -> spin (damage)
Combo 7: moonlight (stiffen) -> stomp (float) -> swap -> danse (damage) -> spin (damage) -> tendon (damage) -> snatch (damage)
Combo 8: stomp (float) -> fatal blow + fatal blow flow (damage) -> swap -> danse (damage) -> spin (damage) -> tendon (damage) -> snatch (damage)
There are certainly more combos and variations of combos, but again, this is just to get you to think about how certain skills can be used and in what order. It is also to get you think about the kind of combos that can be used in large scale and the kind that can not.
3.3 Survivability
Survivability is the most important factor in pvp as you will be able to do more alive than dead. Thankfully, Kuno has very good innate survivability, hindered mostly by her lack of movement over long distances, and grabs from other players. Her kit lends itself well to do damage and cc while being protected, at least to an extent. Kuno is very good at getting in and getting out. Oddly enough, I tend to use stealth more as an engage tool than an escape/survival tool. Just remember, survival is most important, and you cannot do your job if you are dead. For this reason, it is unwise to be greedy when opening up on a group in large scale, as you will likely get grabbed (even if you are in i frame/frontal/sa for the full combo) and die. It is okay to disengage even if you are close to killing someone but you do not kill them.
However, this is not to say that you can never complete a combo on a group of people. You just have to assess the situation and use that to determine if you should stop your combo. Below I will show a gif of a situation where I finish a full combo on a group of people because the situation was safe.
Here, I was able to assess the situation and I knew that no one was to either side of me or behind me. I was able to finish cleaning up the group of people (the skills used here are no longer applicable but a good example of awareness).
3.4 Large-scale gameplay
At this point, you should have the tools needed to both survive in large scale, and kill people in large scale. So, what next? Killing isn’t the only factor in large scale pvp, although it is important (and fun). Below, I will go over a few different positions that a Kuno can fulfill in large scale gameplay, along with my experience and tips (limited for some aspects).
3.4.1 Cannon teams
My experience with cannon team is limited; the extent of it is hunting or shooting cannons. However, I can say that Kuno is very good at taking out cannons. The mixture of her cc, aoe, and defensive traits make her a strong candidate to take out cannons and their defenders without dying. A good example of this can be found here. Kuno is also good at reaching places that most other classes can’t, in order to place a cannon for her to man, or for a teammate to man. She does this through her double jump. You can also utilize a triple jump if you jump (space), double jump (space), and hit E (triple jump).

Example of triple jump.
3.4.2 Disruption
Another important function of Kuno in large scale is her ability to disrupt base building very well. Through stealth, aoe, cc, and her sa/frontals, she can disrupt very well, and generally live afterwards. If you chain your defensive skills well, you should not get cc’d unless you get grabbed. A VERY good skill for disruption is delighted blast. This is because delighted will interrupt (knock down) an enemy, from a distance, who is building when the blast explodes on them.

Example of base disruption in a node war using discus to stop one side of repairs and spin to stop the other. I use block jump followed by Lunar to get out afterwards.
3.4.3 Slayer
Slaying in wars is probably the most fun part of large scale, at least in my opinion. Once you get comfortable with the concepts in this guide (and once you get the gear), you should have no problem slaying people. Stealth, and the rest of the kit allows Kuno to kill effectively and safely once you have around 261+ ap, if you manage your Z and E buffs well. It is hard to explain how to play a slayer role a large scale battle, as these battles usually revolve around what your guild’s strategy is for a specific war, the gear of the enemies, the makeup of the enemy guilds, etc. I will provide a good amount of large scale gameplay in section 4.
3.5 Small-scale gameplay
Small-scale gameplay is very similar to large-scale gameplay. Generally this will involve small node wars, guild v guilds (gvgs), and small skirmishes over grind spots. This generally works out in Kuno’s favor, as you have fewer opponents to worry about. The effectiveness of Kuno in small-scale (and large-scale) is highly dependent on whether or not the enemies have a berserker (or more than one) with them. If they do, be careful to avoid the zerker unless you need to save a teammate who is grabbed by one. If a zerker grabs you, you will die. Use the tools and concepts provided throughout the guide to inform your small-scale gameplay.
3.6 Dueling
3.6.1 General tips
Dueling is one of the most fun aspects of the game for me. Some classes are easier to duel as Kuno than others. Regardless, Kuno can compete and defeat any class in the game in a 1v1. Generally, you will want to maintain a defensive playstyle against many classes in a 1v1 (i’ll list which ones are good to aggress on below, in section 3.6.2). It is important to keep constant movement, keep track of specific cooldowns of the enemy, and recognize windows when you are able to capitalize and engage. The biggest mistake I see Kuno players make in duels is that they try to spam their skills without any rhyme or reason. A general tip to get better at dueling is to fight another highly-skilled Kuno or Ninja and have them coach you through what you are doing wrong. Block jump is an extremely important move and you should learn to time it well.
The most important thing to remember is that no one is magically gifted at dueling. It takes practice against each class, and lots of it.
3.6.2 Class-specific tips
Some class-specific dueling tips. I have limited experience dueling some classes, so there may not be too many tips due to this. There is no one set way to kill any specific class in a duel (or in a 1v1 engagement within a war, etc). Instead, you must be adaptable, and play to the strengths and weaknesses of the specific opponent (these are easier to gauge after a few duels with an opponent). Some general tips and guidelines for fighting each class are provided below. I will assume you have basic knowledge of each class.
3.6.2.1 Warrior
- A kutum will help against warrior due to the ignore resistance (kutum will generally be good against classes that stack resistances, especially grab resist.).
- Always keep constant movement; you can play aggressively against warriors. Warriors are pretty predictable and a lot of their moves are linear. Be careful of the solar flare and slashing the dead initiations. You can try to catch them with a smoke stun or smoke > grab from their initiations.
- Sometimes baiting our their grave digging with a block jump will work and then you can teleport behind them at the tail end of the grave digging for the grab. Be careful not to teleport too quickly, as the tail end of grave digging can hit you and the move speed and attack speed debuffs may be applied to you.
3.6.2.2 Ranger
- Ranger is a somewhat easy matchup for kuno; play aggressively. Utilize your pre awakening block if they play defensively. Be weary of their grab. They have very little super armor and rely on frontal guards
- Be aware that ranger does have 2 i frames that each last quite long if they hold them (similar to tamers tree climb) one of which also is buggy and sometimes is an i frame even while the skill is on cd (explosive evasive shot, the skill in bow form where you see them back flip and bounce).
- If you can get comfortable with movement and you can use it to reach a ranger, then this matchup will be okay.
3.6.2.3 Sorceress
- Sorceress is a tough matchup for Kuno if the sorc knows how to chain her i frames well. If this is the case, your best bet is to try to catch the sorc in a cc, such as smokescreen or shadow stomp while they are moving around as you may catch them in between i frames.
- Block jump is a good method to get out of a sorc ultimate (ball). It is also a good method to stiffen the sorc as she violates towards you.
- If a sorc uses Nightmare, try to guess where the sorc will reappear and grab her, nightmare also is unprotected while reappearing so a quick smokescreen can stun them as well.
3.6.2.4 Berserker
- Zerker is a tough matchup. Try to keep constant movement and play defensively. Be careful of the zerker grab range, as it is quite long. A good zerker will chain sa up to you and grab you through your own sa. You will have to try to catch the zerker in multiple combos while keeping your distance when your moves are on cooldown in order to kill (unless you can one combo the zerker).
3.6.2.5 Tamer
- I have limited experience fighting tamer, but what I do know is that block jump is your friend in this matchup. Try to imagine what the tamer will do next and play aggressively when the tamer’s pole vault is on cooldown. She has no protection at the tail end of pole vault, so this is a good time to throw a chain crash down, or to spin, where she will land.
- If you manage to catch the tamer in a cc, try to use a combo of moves that provide chained super armor to avoid getting cc’d by Heilang. If you use a frontal guard then try to make sure Heilang will not hit you from behind, or from the side.
- Do not fall for tamers baits, if you see them standing still they are either in a long super armor animation or long i frame animation. Void lighting (the tamer trap) is a very reliable skill and is a super armor they can cancel out of at will, it has a 13 second cooldown and doesn’t stiffen on cooldown.
3.6.2.6 Musa
- Musa and Maehwa are a somewhat similar matchup. Keep constant movement and play defensively. You will not catch a maehwa or musa.
- This matchup becomes much easier when you have better stats, as you will win the damage trade, even if you do not cc the musa.
- Grab is your friend in this matchup.
3.6.2.7 Maehwa
- Similar to fighting a musa, but Maehwa has more defensive traits on her attacks, so you have to play even more defensively.
- Do not let the maehwa get behind your frontal guard.
- Grab is your friend in this matchup.
3.6.2.8 Valkyrie
- Constant movement, play aggressively. Valk is somewhat predictable, like Warrior. If the valk is camping block, rush her and make her stop her block. You are then free to cc or block jump initiate.
- If the valk casts a ranged move, such as Verdict, she can not move during the cast, so bait it out with block jump. If the telegraphs a charge up move, use kunai block to mitigate the damage and grab the valk right after. You can also grab the valk out of her spells as she is charging them up.
3.6.2.9 Witch
- Witch and Wizard are a somewhat similar matchup, although Wizard is a bit tougher in my opinion because of the grab. Gauge how the Witch is playing. If aggressively, then wait for the teleport and engage with a super armor skill that has cc (such as tendon cutter), or a block jump.
- If the Witch is playing defensively, attempt to approach using super armor skills, such as tendon cutter. Don’t be afraid to keep your distance if needed.
- Always be careful of Protected Area and mana shield. If a Witch casts it, kite around and make her chase you until it’s out.
- Witch and wizard have a skill called “magical shield” it is a 30 second resistance and dr buff with a 60 second cooldown and has a little blue shield as the buff bar icon.
Throw a kunai at them to see if this buff is up and do not fight while it is unless you outgear them.
3.6.2.10 Wizard
- Similar to fighting a Witch. Most Wizards will play aggressively, which leaves them open to a block jump initiation. Since many of Wizard’s skills have sa or frontal, be careful of initiating from the front.
- Be careful of the wizard’s grab. Generally, do not try to win a super armor trade against a wizard. You will likely lose the trade.
- Witch and wizard have a skill called “magical shield” it is a 30 second resistance and dr buff with a 60 second cooldown and has a little blue shield as the buff bar icon.
Throw a kunai at them to see if this buff is up and do not fight while it is unless you outgear them.
3.6.2.11 Ninja
- One of Kuno’s harder matchups. Constant movement is important, but you can’t spam random abilities.You need to keep track of the ninja’s block jump cooldown; DO NOT use chain crash or discus while the ninja’s block jump is off of cooldown, you will die.
- If the ninja’s block jump is on cooldown, play aggressively.
- Predicting your opponent is very helpful in this matchup
3.6.2.12 Kunoichi
- Similar to fighting a ninja. You need to keep track of the Kuno’s block jump cooldown; DO NOT use chain crash or discus while the Kuno’s block jump is off of cooldown, you will die.
- If the kuno’s block jump is on cooldown, play aggressively.
- Predicting your opponent is very helpful in this matchup
3.6.2.13 Dark Knight
- The main advice I can give in this matchup is to keep shortsword out and use pre awk block (like a fight against a ranger). Move around until the DK uses a cc or damage ability in awakening since this makes her stationary. Block jump behind her at this point and try to start a combo.
- The objective of this fight is to get behind the DK. Use the tips in the mobility section to do so. If you can get behind the DK, throw out a cc.
3.6.2.14 Striker
- Striker is another hard matchup. Thankfully, most of his initiations are predictable. Keep constant movement and play aggressively if the striker is camping his S block. They have some holes in their kit where they don’t have super armor, so play it similarly to fighting a sorc.
3.6.2.15 Mystic
- Wolf’s Frenzy is an extremely strong skill. It provides an I frame to the mystic and will track you in any SA or I frame that you do and will likely cc you out of it. It can also stun if they mystic mouses it behind your frontal. This move will also unstealth you if the mystic uses it with you in front of her in stealth, even if she does not know you are there.
- If they use their fortitude skill they will be invulnerable to damage, even if you interrupt it with a grab, until they get up. Attempt to interrupt this skill with a grab and back off afterwards.
- Dragon’s Pit locks the mystic in place and does not provide any defensive traits.
3.6.2.16 Lahn
- Don’t use long animation-locked skills or hold super armors as lahn will just grab you. Bait out her grab and then go offensive. She has a lot of uptime on her protections.
3.6.2.17 Archer - Make usage of all your protections, archer has a large number of low cd ranged cc’s, only use unprotected mobility when you know you can, be very careful for luthraghon’s call (the get in a kneeling charging animation), this is a super armor knock back ranged heal that does very high damage.
- Once you have closed the gap watch out for meteor dive, it is a super armor stiffen and can punish any mistakes you make extremely quickly.
- Once you are able to get 1 cc off on an archer that usually will be the end of the fight as luckily they are quite squishy
3.7 Grinding spots
Manshaum Forest (235+ ap tet kutum)
Useful buffs:
- Monster damage addons on half moon slash or black moonlight
Consumables:
- Giant’s Draught (+10% damage to all special attacks)
- Ancient grindstone buff from tent or Physical Reinforcement villa buff
Make sure to loot Manshaum Totems too as they have a chance to drop extra trash loot. Stay close to Manshaum Great Warriors to avoid them doing the iframe jump animation.
Loot scrolls will not significantly increase your trash loot/h here since most manshaum mobs can only drop a fixed amount of trash.
Depending on market prices, doing the scrolls from combined Manshaum Voodoo Dolls yourself can greatly increase your money/h.
The lunar dash 10% bsr will help clear packs quicker.
Examples of grinding rotations:
Manshaum Forest main rotation 271 ap kutum (by Colin)
Manshaum Forest 243 ap kutum, 3500 trash/h (by Lumi)
Manshaum Forest 271 ap kutum, 4400 trash/h (by Lumi)
Aakman Temple (235+ ap tet kutum)
Useful buffs:
- Floor sweeping (+10% down attack damage)
- Ankle Cutter (-20 dp debuff at absolute for higher max targets hit)
- Monster damage addons on half moon slash, black moonlight or ankle cutter
- Fatal blow crit skill addon
- Shadow slash (5% attack speed)
Consumables:
- Giant’s Draught (+10% damage to all special attacks)
- Energizing cron meal (13 monster damage, +5% down attack damage)
- Serendia, Kamasylvia, Hamburg meals for a 3 food rotation (5% back attack, 5% crit)
- Physical Reinforcement villa buff
Start pulls with halfmoon slash or flash slash while waiting for the mobs to group up into a tidy pack. Aakman monsters can be affected by CC so save hard-hitting spells with down attack modifiers like black moonlight, shackles, lethal spin spree or lunatic discus for when the mobs are in a downed state to maximize your damage. Examples of good skills to put mobs on the ground are ankle cutter, danse macabre, heart snatch or suicide fall. Avoid initiating a pack with floats like shadow stomp as this will scatter the mobs far across the floor.
Try to keep up your buffs, debuffs and skill addons as those make a very big difference in grinding speed here.
Make sure not to skip Aakman Airbender (can drop red shards), Aakman Elite Guardian (can drop black shards or tungrad earrings) and Aakman Watcher or Aakman Punisher (can both drop tungrad earrings). Don’t waste your time with Ancient Civilization Priests.
Bamb’s dps guide
Grouping up mobs:
Halfmoon slash for the addon, next go into pre awaken with tendon or c swap once grouped, don’t heart snatch yet.
Damage rotation once all grouped:
Ankle cutter > floor sweep > shadow stomp > heart aiming + fatal blow and flow > fox claw > apply ankle cutter again > swap to awakening > danse to bound them if not already > spin/ wheel + indignation > discus > snatch and shackles and/or moonlight if pack is not dead yet. If still not dead rotate more pre awakening skills as necessary.
Examples of grinding rotations:
Aakman Temple 257 ap nouver, 5000 trash/h with loot scroll (by Mauku)
Aakman Temple 261 ap nouver, 4800 trash/h with loot scroll (by Bamb)
Hystria Ruins (269+ ap nouver)
Useful buffs:
- Monster damage on halfmoon
- Chakram rise (+10 ap)
- Ankle Cutter (-20 dp debuff at absolute for higher max targets hit)
Consumables:
- Giant’s draught (+10% damage to all special attacks)
- Exquisite or Simple cron meals
- Serendia, Kamasylvia, Hamburg meals for a 3 food rotation (5% back attack, 5% crit)
- Physical Reinforcement villa buff
Lumi’s dps guide
Mobs in hystria can be stunned so smokescreen is effective here, try to time it as the Tukar Balten is about to cc you.
At higher ap using a more awaken focused rotation is superior because of the aoe. Meaning you can start attacking sooner and dont need pulls to be as tight.
Start off by stacking some self buffs/ add ons. It is recommended to use monster damage on halfmoon but putting monster damage/ crit on ankle cutter is a really good choice if you don’t mind losing a pvp addon.
At 269+ ap with nouver
Mobs are grouping:
Lunar > chakram rise as they are still grouping for the ap buff, then half moon into spin since they will likely still be grouping. You can turn your camera around to use chakram rise after lunar dash so you don’t hit the mobs( they will stop if you hit them with a cc)
Mobs are grouped:
Ghost step to their backs and tendon cutter > ankle cutter > heart aiming > fatal blow > ankle cutter > smokescreen > lunar dash > halfmoon canceled with a backwards ghost step to make distance > lunatic discus > wheel of wrath > indignation > spin and hopefully they will be dead by then if not tendon cutter and add some more pre awakened skills as needed.
At 269+ ap with kutum
Mobs are grouping:
Lunar dash into chakram rise > halfmoon (if you have monster damage add-on).
Mobs are grouped:
Block jump> ankle cutter > smokescreen > lunar dash >half moon /spin > ghost step backwards> lunatic discus > wheel of wrath > indignation > danse > tenden here and use heartaim/ fatal blow if any mobs are still alive
Examples of grinding rotations:
Hystria Ruins 261 ap nouver, 2500-2600 trash/h with loot scroll (by Lumi)
Hystria Ruins 270 ap kutum, 3000 trash/h with loot scroll (by Lumi)
Hystria Ruins 261 ap nouver, 2500 trash/h with loot scroll (by Bamb)
Hystria Ruins 269 ap nouver, 2900 trash/h with loot scroll (by Bamb)