Table of Contents
Introduction To World Bosses
World bosses are spread across the Black Desert Online game and spawn at random intervals throughout the day and night. There are a total of eight world bosses to fight and each time, a world boss is defeated, its respawn timer is reset.
There is a mechanic to know when the world bosses are going to spawn. The easiest way to find out which world boss is due to spawn is to download a program named Discord.
Then you can join the International Hunting Associations discord channel, where there is a page called “Boss Timer” that informs which bosses are due to spawn or when their spawn windows will open. Once a world boss spawns, you are able to check live calls to see what percentage the bosses are on and which channels are still alive.
Preparations Before a World Boss Fight
You need around 120 AP and 150 DP before you venture to do any bosses. If you do not get this, you will probably get no loot because you are not going to do any damage and you are going to get one-shot by every single ability that the world boss throws at you.
You will also need to be level 50 or more because if you are at a lower level, you miss every attack on the boss and obtain no loot anyway. Stack up on health and mana potions for the bosses. Also, food buffs can be a great aid to these. Serendia specials, caffeine specials, and knight combat rations are all great choices as they are cheap and effective.
Gameplay Recommendations
A large majority of bosses spawn around the Serendia area so if you are stationed at Heidel from here, you will be able to get six out of the eight bosses easily. This is the recommended way to go if you only want to use one character for world bosses.
If you want to be able to do more bosses and be more efficient I would, however, recommend a different route.
Park the first character at Bandit’s Den Byway
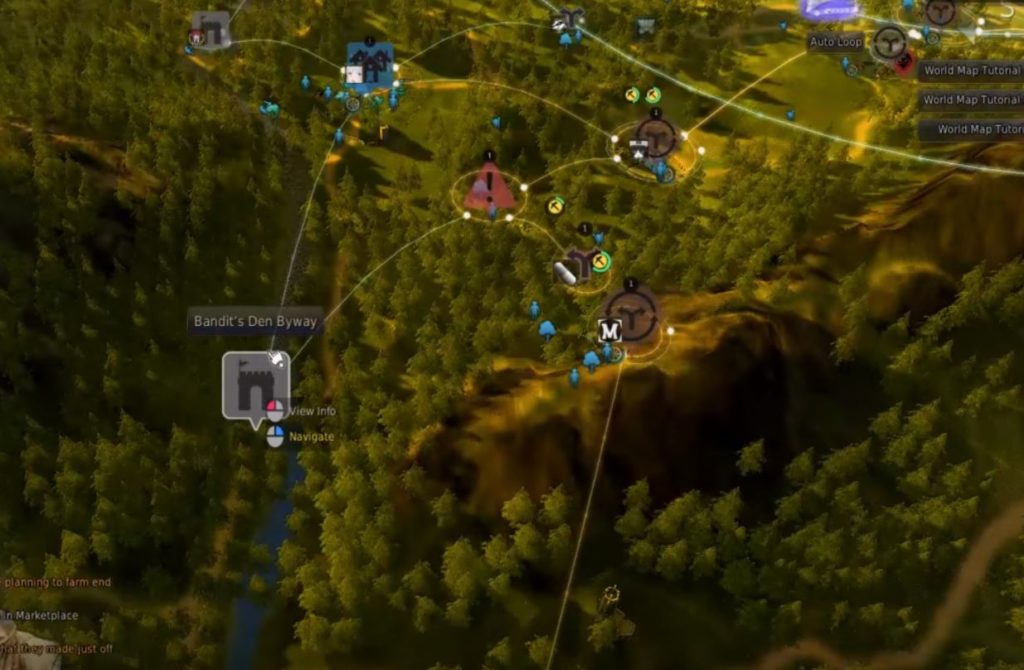
This gives you quick access to Dim tree, Red Nose, Bheg and Karanda all with one character
Park the second character at Glish
This gives you quick access to Mudster and Kzarka
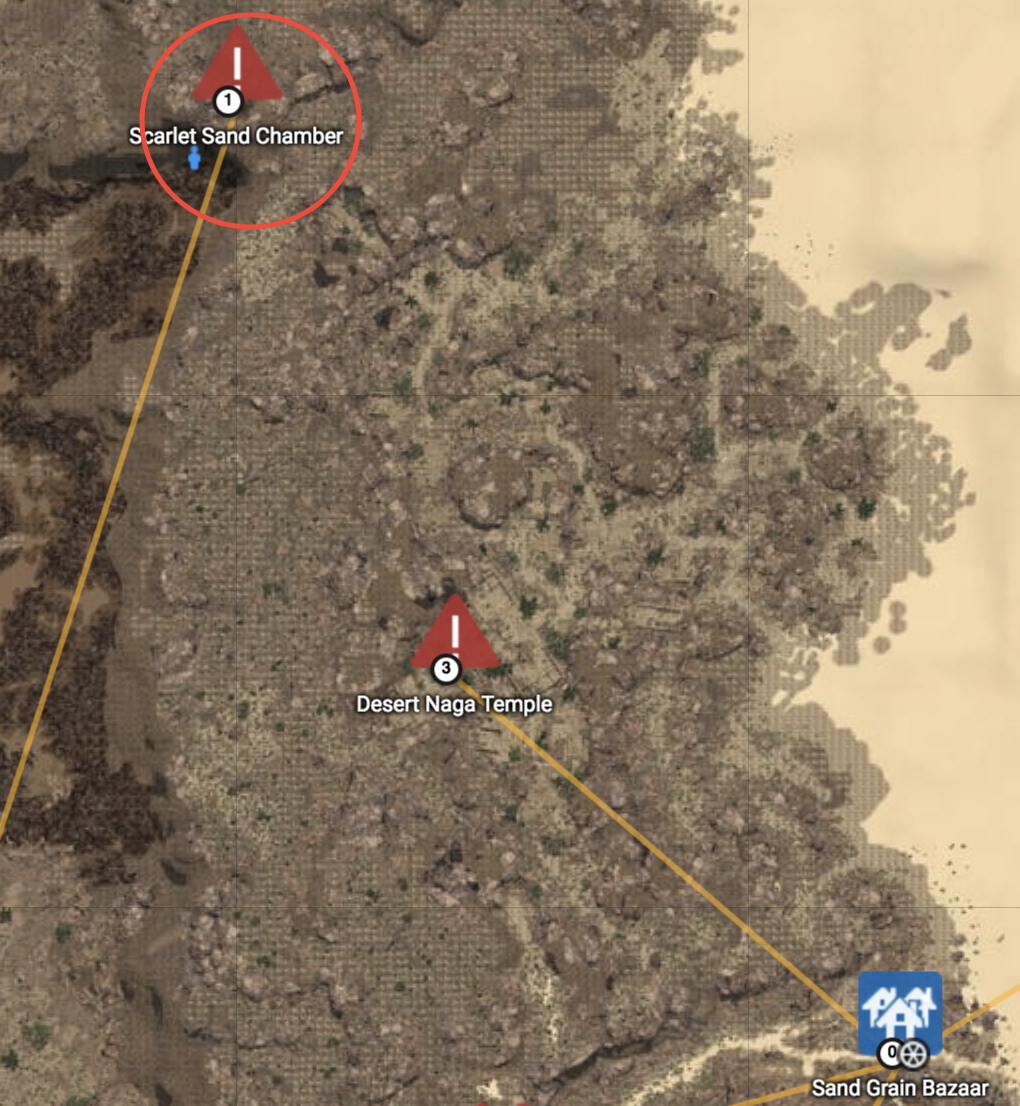
And finally, if you want to do the desert bosses I recommend parking the third character @ Scarlet Sand Chamber which is where Kutum spawns.
Another important thing to do is turn off your speller effects as they melt any CPU or graphics cards and you will drop around five to ten frames a second.
Also, you might want to disable other players’ pets they are going to clog up your screen.
Kzarka
Kzarka spawns in the Serendia shrine, which is located in southern Serendia.

Kzarka Knowledge
To get knowledge on Kzarka, you have to speak to the node manager for the Serendia shrine and play the amity games. It is not hard to do, but it is a bit time-consuming. Once you have done it, you might need to reset your knowledge with Calpheon or with an Elixir of Oblivion and then try again.
Kzarka Drop
Kzarka drops the Kzarka weapon, which the best main hand weapon in the game.
Kzarka’s Abilities
He is a pretty easy boss overall. As expected, you are going to need to dodge his standard frontal melee attacks and try to stand behind him as much as possible as this will allow you to avoid being hit whilst also giving you the extra attack damage you gain from doing back attacks.

The only ability that you should be concerned about with Kzarka is his fire breath. When you see Kzarka gathering dark clouds or smoke around him, you can either run behind him or fore extra safety, you can behind one of the pillars around the room.
Kzarka also becomes untargetable during this time. That is another way to notice he will use his fire breath if you are having issues noticing the smoke. So when you cannot attack him anymore, just run behind one of the pillars or behind the boss.
Kutum
Kutum is located in the Scarlet Sand Chamber in the Valencia area.
Kutum Knowledge
To get knowledge off of Kutum, you will need to do a short quest chain. You obtain the first quest from the node manager of the Sand Chamber. She will ask you to explore the Sand Chamber. All you need t do is run through it and find the glowing white items and press R on them. Once you have done this, you will need to turn in the quest to her and then head over to an NPC, which is located near the Sand Grain Bazaar. She will then send you back to the Chamber node manager to receive Kutum knowledge. If you are not happy with the rank you’ve just got on the boss, you can reset it and do another Amity game.
Kutum Drop
Kutum drops the Kutum Offhand, which is an AP and DP item. It has two gem slots and it also offers 10% ignore resistance, so it is a great pickup for a lot of the classes in the game.
Kutum’s Abilities
In terms of not dying at Kutum, he is a bit more difficult than other bosses as he is quite hard-hitting if you are not well-geared. You will need to watch out for his melee swipe by either standing behind him or dashing through when he does the attack. If you are over 230 DP, then you can pretty much ignore these attacks and pop up again straight after. Kutum will also randomly burrow and start jumping up through the ground in the chamber.
When he burrows under, you should just run for the edge of the room and look for the earth-shaking beneath you. If it does this, then you should move out of the way. During this phase, Kutum may also pop his head out of the ground in the middle of the room and do a lightning explosion. If you see him pop up, just stay at max range away from him and block if it is possible for your class to do that.
This boss has one main kill ability, his AoE (area of effect) Vacuum. When you see Kutum stop moving and gathering dark clouds by his mouth, you will want to run away from him as far as possible. If this ability hits you, it will pull you in towards him and do massive damage to you.
If you can avoid these abilities, then you are pretty much set to fight Kutum and obtain a lot of free loot.
Dim Tree Spirit
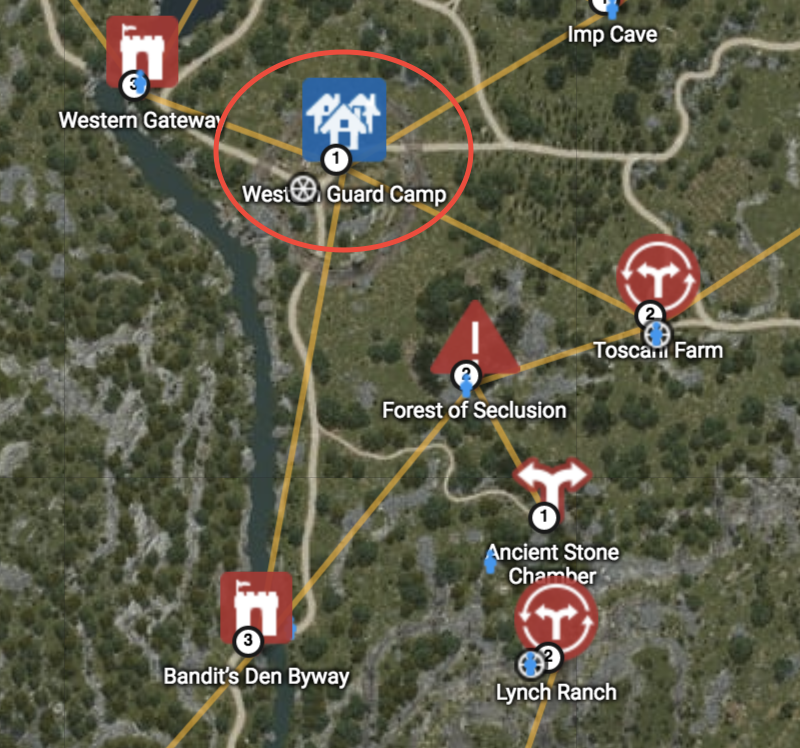
The Dim Tree Spirit is located in the Forest of Seclusion, which is south of the Western Guard Camp in the Balenos region.

Dim Tree Spirit Knowledge
To get knowledge of the Dim Tree Spirit, you will need to kill the weekly tree boss scroll, which you can get from your Black Spirit and to try to get the last hit on it. It is best to do this boss in a group of friends who can rotate the last hit on the boss so that you can all get knowledge as quickly as possible.
Dim Tree Drop
This world boss has a really great loot. You can get your normal black stones, weapon boxes, hunter seals, and gems, but on top of that, you can get an item called the Tree Spirit Belt, which gives AP and accuracy or you can even obtain the fabled Tree Spirit Armor, which is the rarest boss drop in the game. The armor gives plus 200 HP, plus 100 mana, and more DP than a standard chest-piece, making it a great addition to your gear set.
Dim Tree Spirit’s Abilities
When you engage with the Tree Spirit, you have to be cautious of various abilities when you fight him, which mostly involve the boss digging his arms in the ground. The first ability is a rock throw. He will pull out three rocks from the ground and throw them at ranged targets. This does AoE damage, so avoid stacking up on other people where possible. His next ability is his stun ability. He will dig his arms into the ground again for a short amount of time and then throw out a big AoE stun.
The best way to avoid this ability is to just run out to a safe distance if you are worried about getting one-shot by it. Another ability is that he will summon little tree adds to fight for him. Normally, you do not have to worry about them as they mostly get cleared up by the group AoE and they do not do too much damage. His main ability you have to worry about is his massive AoE knock-off and killing ability.
He will once again dig his arms into the ground for an extended amount of time as if he is trying to pull the earth of the ground. Then, he will rip his arms out of the ground, doing massive AoE damage to anyone near him and normally one-shots most people. You need to run away from him and get a good distance from him, especially if you are a melee class.
Red Nose
Red Nose is located by Western Guard Camp in central Balenos. Players normally avoid this boss because he is a nightmare and is somewhat glitchy.
Red Nose Drop
Red Nose drops the Red Nose Armor, which gives plus 10 HP recovery and plus 100 mana. Most people do not go for the Red Nose Armor since the plus 200 HP from the Dim Tree Armor is better than HP recovery.
Red Nose’s Abilities
When you engage Red Nose, he has some core mechanics. One ability is his charge mechanic. He will start scuffing the ground near him and charge towards an enemy. It does not do too much damage so if you see him starting to charge, just move out of the way. He will keep going straight ahead and then stop in the end. His other abilities can easily one-shot you, so be careful.
One ability is his jump ability. He will get down and bend his legs and then start jumping around. He will jump twice and then out of this, he will do a belly flop. When you see him getting ready to jump, just dash away and get out of range if you are a melee character.
If you are a ranged character, just make sure he is not jumping towards you. If you get hit by the jump and then by the belly flop, you will get knocked down and probably killed if you are not heavily geared. Another ability is his AoE shout, which most players fall victim to. He will start gathering dark smoke around him and then do an AoE roar, This attack hits everyone in front of him.
If you are a melee character, you can get behind him. But be careful how close you are when you are behind him because if your attacks are going through his body, you will still get hit by his AoE roar. So it best to just run away from him and afterward, go straight back in and start attacking.
When his HP hits around 40-45%, he will do another AoE roar and this roar goes in a full 360-degree angle around him and hit anyone that is near him. When you see him do this, back away, wait for him to the roar, and then go back in again and continue attacking him. Red Nose’s abilities do a lot more damage compared to other world bosses, so avoid getting hit by him. So try to stand behind him and try to block his attacks if you are able to.
Nouver
Nouver is located in the Great Valencian desert. He is trickier to find because you cannot use your map in the desert unless you have a compass. First, you need to make sure you have Purified Water and Star Anise Tea. These will negate the effects of dehydration and hypothermia, which are debuffs that occur when you are in the desert. One of each should be enough and they are purchasable in the marketplace. They can also be bought at the General Good Vendor at the Sand Grain Bazaar.

Nouver Knowledge
In order to get knowledge of Nouver, you need to do a quest chain, which begins in the Ibellab Oasis, located north of the Valencian desert. You obtain a quest from the stable keeper, who asks to find a book in the nearby desert. You have to this three times in order to get knowledge of Nouver. Don’t worry as they are easy to find. They are shown on the map and as you are near one of them, they appear on the mini-map. It is possible to reset your knowledge to obtain a better rank with Calpheon or an Elixir of Oblivion.
Nouver Drop
Nouver drops the Nouver Offhand, which is the highest AP offhand weapon in the game. This weapon is great for some classes.
Nouver’s Abilities
Nouver is relatively easy if you know his abilities. His Side Step or Hop ability allows him to jump away from you and sometimes he may disappear in front of you and then reappears behind you, becoming a rather tedious and annoying world boss. Another mechanic he possesses is his Whirlwind ability. He will spawn multiple whirlwinds that slowly move around the world boss’s location. If you get stuck inside a whirlwind, it is very hard to escape out of it, making you an easy target for Nouver. The whirlwinds do not produce too much damage and are sometimes hard to avoid, especially at night time as they are hard to see.
Another ability he has is a fire breath attack whilst flying. He will take off and shoot fire from above. Your best chance is to stand still and try to avoid any fireball aimed at you. However, they do not produce too much damage. His main ability you have to be careful is his Frontal Fire breath mechanic. He does this throughout the fight and at random intervals. This is Nouver’s only one-shot ability and it is very simple to avoid. You just have to move behind the world boss or to his side, however, he does have a tailwhip. Therefore, it is best to move to his side.
Mudster
Mudster is located south of Heidel and east of the Central Guard Camp.
Mudster Drop
He drops various loot, like Liverto and awakening boxes. He also has a chance to drop Mark of Shadows, which is not as important as a boss weapon or gear, but it is worth from seven to ten million.
Mudster’s Abilities
He is a very easy boss. There is only one ability you have to watch out and it is his “Wobble” ability. He will start to shake (wobble) back and forth for a few seconds before he burrows underground. Then, he starts to shoot mud spikes from under the ground, so you must dash away from him as far as possible. This attack can easily one-shot you if you are not properly geared. However, if you are well geared, you can probably block it.
Another ability he has is spawning little mudster adds, that do not do a lot of damage. They are easily AoE by everyone. Another mechanic Mudster may do is burrow underground and charge towards a player and then appear in front of them. You simply have to move out of his path. That is basically what you need to do in order to defeat Mudster.
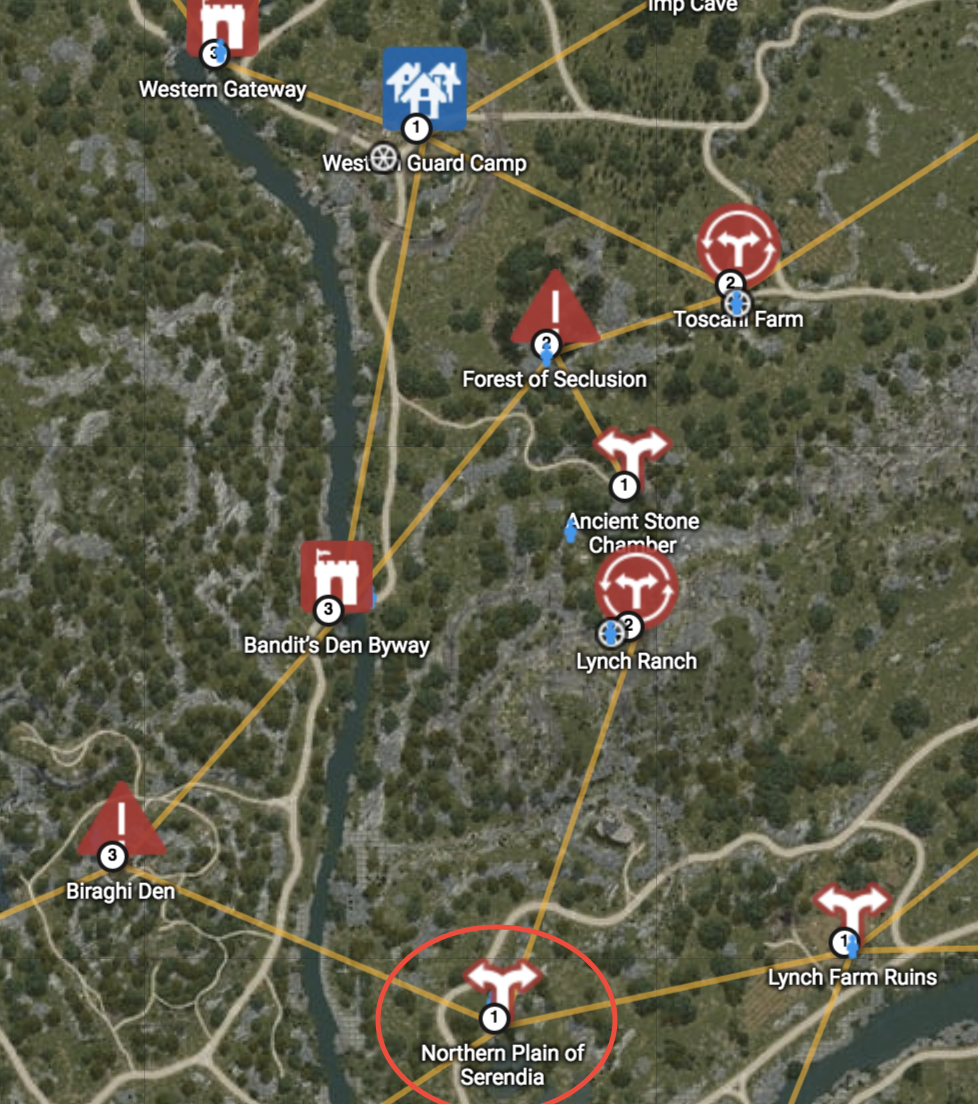
Dastard Bheg
Dastard Bheg spawns in the Northern Plains of Serendia, which is located west of Heidel. Most players fight this boss because of this gear drop.
Dastard Bheg Knowledge
To obtain Bheg’s knowledge, you must do the daily boss scrolls that you obtain fro your Black Spirit after level 45. Remember to try to get the last hit as it makes more probable to secure the knowledge quickly.
Dastard Bheg Drop
He drops the Bheg’s Gloves, which give bonus accuracy as you enhance them, have two gem slots, and slightly higher DP than other gloves.
Dastard Bheg’s Abilities
He only has one main ability you must be cautious of and it is his Chain Flail ability. He will stop auto-attacking and do a roar for a few seconds. Once his animation is complete, he will start spinning his chain around him in a 360-degree angle, doing massive damage to any near him. Therefore, you must run away from him as far as possible and once his attack is over, you dash right back in and continue attacking him.
His standard auto-attack is lashing his chain at a player with Agro and it is an AoE attack, so try to stay behind him or pinpoint who he is attacking and keep your distance. However, you have to be careful as he changes the target quite often.
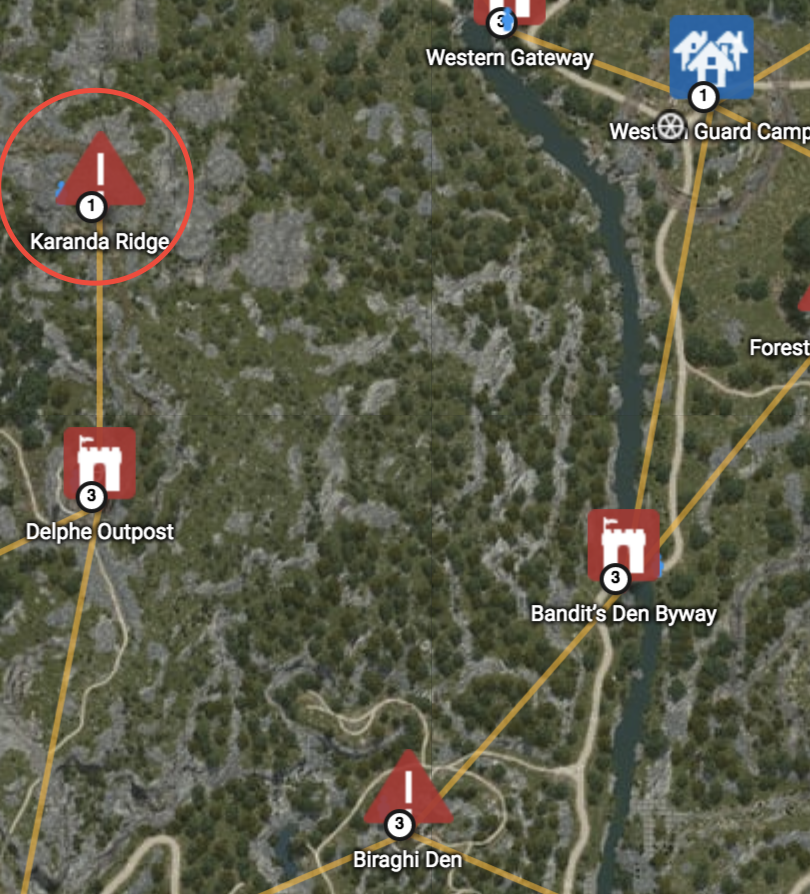
Karanda
Karanda is the toughest world boss as she provides the best awakening weapon in the game. She is a Harpy Queen boss, located at the summit of the Karanda Ridge in the Balenos Mountains.
Karanda Drop
Karanda drops the best awakening weapon in the game, which is the Dandelion. This weapon has more AP than any other awakening weapon, making it an ultra-rare weapon. Many players are still doing this world boss fight because they still have not been able to obtain the Dandelion.
Karanda’s Abilities
Karanda has two main abilities that can one-shot you. One is her Reigning Arrows ability. in which there are two different approaches through possibility indicators. There will be a red ring on the field and you must know if the attack will occur inside or outside of the ring. Before Kuranda initiates her attack, she will shoot into the sky and then dash quickly herself into the sky.
In this scenario, you must stay in and do not move away as Kuranda will shoot outside of the red ring. However, if Kuranda lowers herself on the ground and afterward shoots herself into the sky, the attack will target inside of the circle. Therefore, you must move away from the red ring as fast as possible. If you are able to recognize these animations swiftly, you will be able to avoid her attack and become a less complicated boss fight. Her other abilities include a standard auto-attack and soaring in the sky and summoning multiple harpies to fight for her. The harpies will produce massive damage if they gang up on you, so be cautious. This is the main strategy for Karanda.